Denon DN-A7100 User Guide - Page 8
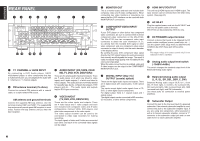
Front Panel - remote control
 |
UPC - 081757507554
View all Denon DN-A7100 manuals
Add to My Manuals
Save this manual to your list of manuals |
Page 8 highlights
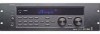
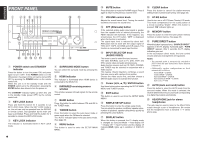
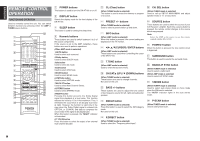
ENGLISH FRONT PANEL q w e t uio ry @2 @0 !8 !6 @3 @1 !9 !7 !5 !4 q POWER switch and STANDBY indicator Press the button to turn the power ON, and press again to turn it OFF. If the POWER switch is in the ON position, the power of this unit can be turned ON/ OFF by pressing the POWER button on the remote control unit. When this unit is in the standby mode with the POWER switch set to the ON position, pressing the ENTER button also allows to turn the power on. The STANDBY indicator lights up when this unit is the standby mode (power OFF) by the remote control unit. w KEY LOCK button Press and hold this button for 3 seconds to set KEY LOCK mode. When the KEY LOCK mode is on, the unit can only be operated from the RS232C or remote control, and operation by the main unit keys is prohibited. Press and hold this button for 3 seconds to release the KEY LOCK mode. e KEY LOCK indicator The indicator is illuminated when in KEY LOCK mode. !0 !1 !3 !2 r SURROUND MODE button You can select the surround mode by pressing this button. t HDMI indicator This indicator is illuminated when HDMI device is connected to the DN-A7100. y INFRARED receiving sensor window This window receives infrared signals for the remote control. u BAND button Press this button to switch between FM and AM in the TUNER mode. i T-MODE button Press this button to select the auto stereo mode or mono mode when the FM band is selected. The "AUTO" indicator lights in the auto stereo mode. (See page 33) o MENU button This button is used to enter the SETUP MAIN MANU. !0 MUTE button Press this button to mute the PreAMP output. Press it again to return to the previous volume level. !1 VOLUME control knob Adjusts the overall sound level. Turning the control clockwise increases the sound level. !2 ATT (Attenuate) button If the selected analog audio input signal is greater than the capable level of internal processing, the PEAK indicator will illuminate. If this happens, you should press the ATT button. "ATT" is displayed when this function is activated. The signal-input level is reduced by about half. Attenuation will not work with the output signal of "REC OUT" (TAPE, CD-R/MD and VCR output). This function is memorized for each input function. !3 INPUT SELECTOR knob (AUDIO/ VIDEO) This knob is used to select the input sources. The video SOURCE, such as TV, DVD, VCR1 and DSS, selects video and audio simultaneously. Audio function sources such as CD, TAPE, CDR/MD, and TUNER may be selected in conjunction with a Video source. This feature (Sound Injection) combines a sound from one source with a picture from another. Choose the video source first, and then choose a different audio source to activate this function. !4 Cursor (1, 2, 3, 4) / ENTER button Use these buttons when operating the SETUP MAIN MENU and TUNER function. !5 EXIT button This button is used to exit from the SETUP MAIN MENU. !6 SIMPLE SETUP button Press this button to enter the simple setup mode. You can setup the speaker conditions (speaker sizes, number of speakers, speaker delay times) quickly by pressing the cursor buttons. !7 DISPLAY button When this button is pressed, the FL display mode is changed as Surround Mode → Auto-display Off → Display Off → Input Function and the display off indicator(DISP) lights up in condition of DISPLAY OFF. !8 CLEAR button Press this button to cancel the station-memory setting mode or preset scan tuning. (See page 33) !9 HT-EQ button Used to turn on or off HT(Home Theater)-EQ mode. This mode compensates for the audio portion of a movie sounding "bright". When this button is pressed, "EQ" indicator lights up. @0 MEMORY button Press this button to enter the tuner preset memory numbers or station names. (See page 33) @1 PURE DIRECT button When this button is pressed once, "SOURCE DIRECT" appears on the FL display. If pressed again, "PURE DIRECT" appears. After 2 seconds, the FL display indication goes out. In the source/pure direct mode, the tone control circuitry and bass management are bypassed. Notes: • The surround mode is automatically switched to AUTO when the pure direct/source direct function is turned on. • Additionally, speaker configurations are fixed automatically as follows. Front SPKR = LARGE Center SPKR = LARGE Surround SPKR = LARGE Surround Back SPKR = LARGE Sub woofer = YES @2 AUTO (Auto surround) button Press this button to select the AUTO mode from the surround modes. When this mode is selected, the receiver determines the surround mode corresponding to a digital input signal automatically. @3 HEADPHONE jack for stereo headphones This jack may be used to listen to the DN-A7100's output through a pair of headphones. Be certain that the headphones have a standard 1 / 4" stereo phono plug. 4
-
 1
1 -
2
-
 3
3 -
 4
4 -
 5
5 -
 6
6 -
 7
7 -
 8
8 -
 9
9 -
 10
10 -
 11
11 -
 12
12 -
 13
13 -
14
-
15
-
16
-
17
-
18
-
19
-
20
-
21
-
22
-
23
-
24
-
25
-
26
-
27
-
28
-
29
-
30
-
31
-
32
-
33
-
34
-
35
-
36
-
37
-
38
-
39
-
40
-
41
-
42
-
43
-
44
-
45
-
46
-
47
-
48
 |
 |
