Denon DRA 397 Owners Manual - English - Page 4

Getting Started - review

Page 4 highlights

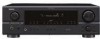
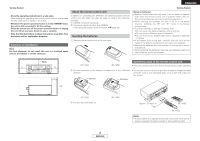
ENGLISH Thank you for choosing the DENON DRA-397 AM-FM Stereo Receiver. This remarkable component has been engineered to provide outstanding high fidelity reproduction of your favorite music sources. As this product is provided with an immense array of features, we recommend that before you begin hookup and operation that you review the contents of this manual before proceeding. Getting Started Accessories Contents Check that the following parts are attached in addition to the main unit: Getting Started Accessories 1 Before using 1, 2 Cautions on installation 2 About the remote control unit 2 Inserting the batteries 2 Operating range of the remote control unit 2 Part names and functions Front panel 3 Display 3 Rear panel 4 Remote control unit 4, 5 Connections Cable indications 6 Speaker connections 6, 7 Connecting a DVD player and monitor 7 Connecting a TV/DBS tuner 7 Connecting a CD player 7 Connecting a turntable 7, 8 Connecting a tape deck, CD recorder or MD recorder 8 Connecting a VCR 8 Connecting the antenna terminals 8 Connecting the XM terminal 9 Connecting the iPod 9 Connecting the MULTI ZONE terminals 10 ZONE2 (or ZONE3) PRE OUT connections 10 Connecting the power supply cord 10 Operation Before operating 11 Playing the input source 11 Turning the sound off temporarily (MUTING 11 Listening over headphones 11 Switching the speakers 11 Checking the currently playing program source, etc 12 Switching the brightness of the display 12 Selecting the play mode (PURE DIRECT 12 Setting the tone control 12 Adjusting the speaker volume 12 Combining the currently playing sound with the desired image (VIDEO SELECT function 12 Listening to the radio 12 Auto preset memory 12 Auto tuning 13 Manual tuning 13 Preset memory 13 Recalling preset stations 13 XM Satellite Radio 14 Checking the XM signal strength and Radio ID 14 Channel selection 14 Category search 14 Direct access of channels 15 Playing the iPod 15 Setting the iPod Assignment 15 Listening to music 16 Listening to music in the Browse mode 16 Viewing still pictures and videos (only for iPods equipped with the slideshow / video function 16 Disconnecting the iPod 16 Multi zone music entertainment system 17 Multi-zone playback using the ZONE2 and ZONE3 PREOUT terminals 17 Outputting a program source to amplifier, etc., in the ZONE2 (or ZONE3) room (ZONE2 or ZONE3 SELECT mode 18 Remote control unit operations during multi-source playback·····18 Recording (audio and/or video 19 About the memory functions 19 Initialization of the microprocessor 19 Operating the remote control unit Operating DENON audio components 20 Setting the preset memory function 20 Setting the punch through function 20 Operating a component stored in the preset memory ····20 ~ 22 Troubleshooting 23 Specifications 24 q Operating instructions 1 w Warranty (for North America model only 1 e Service station list 1 r System remote control unit (RC-1052 1 t R6P/AA batteries (For the RC-1052 2 y ZONE remote control unit (RC-1056 1 u R03/AAA batteries (For the RC-1056 2 i AM loop antenna 1 o FM indoor antenna 1 r t y u i o Before using Pay attention to the following before using this unit: • Moving the unit. To prevent short-circuits or damaged wires in the connection cables, always unplug the power supply cord and disconnect the connection cables between all other audio components when moving the unit. • Cautions on using mobile phones. Using a mobile phone near this unit may result in noise. If so, move the mobile phone away from this unit when it is in use. • Before turning the power operation button on. Check once again that all connections are correct and that there are not problems with the connection cables. Always set the power operation button to the standby position before connecting and disconnecting connection cables. 1 ENGLISH

  • 1
  • 2
  • 3
  • 4
  • 5
  • 6
  • 7
  • 8
  • 9
  • 10
  • 11
  • 12
  • 13
  • 14
  • 15
  • 16
  • 17
  • 18
  • 19
  • 20
  • 21
  • 22
  • 23
  • 24
  • 25
  • 26
  • 27
  • 28
  • 29
  • 30
  • 31
  • 32

ENGLISH
1
ENGLISH
Contents
Thank you for choosing the DENON DRA-397 AM-FM Stereo Receiver. This remarkable component has been engineered to provide
outstanding high fidelity reproduction of your favorite music sources.
As this product is provided with an immense array of features, we recommend that before you begin hookup and operation that you review
the contents of this manual before proceeding.
Accessories
······················································································1
Before using
················································································1, 2
Cautions on installation
·································································2
About the remote control unit························································2
Inserting the batteries····································································2
Operating range of the remote control unit
································2
Part names and functions
Front panel ·····················································································3
Display····························································································3
Rear panel ······················································································4
Remote control unit ···································································4, 5
Cable indications
············································································6
Speaker connections
··································································6, 7
Connecting a DVD player and monitor
········································7
Connecting a TV/DBS tuner
··························································7
Connecting a CD player
·································································7
Connecting a turntable
······························································7, 8
Connecting a tape deck, CD recorder or MD recorder
················8
Connecting a VCR
···········································································8
Connecting the antenna terminals
···············································8
Connecting the XM terminal
·························································9
Connecting the iPod
®
····································································9
Connecting the MULTI ZONE terminals
·····································10
ZONE2 (or ZONE3) PRE OUT connections··································10
Connecting the power supply cord
············································10
Combining the currently playing sound
with the desired image (VIDEO SELECT function)
····················12
Listening to the radio
···································································12
Auto preset memory····································································12
Auto tuning···················································································13
Manual tuning ··············································································13
Preset memory ············································································13
Recalling preset stations······························································13
XM Satellite Radio
········································································14
Checking the XM signal strength and Radio ID ···························14
Channel selection·········································································14
Category search ···········································································14
Direct access of channels ····························································15
Playing the iPod
®
·········································································15
Setting the iPod Assignment ·······················································15
Listening to music········································································16
Listening to music in the Browse mode······································16
Viewing still pictures and videos (only for iPods
equipped with the slideshow / video function)····························16
Disconnecting the iPod ································································16
Multi zone music entertainment system
···································17
Multi-zone playback using the ZONE2 and
ZONE3 PREOUT terminals
···························································17
Outputting a program source to amplifier, etc., in the ZONE2
(or ZONE3) room (ZONE2 or ZONE3 SELECT mode)··················18
Remote control unit operations during multi-source playback·····18
Recording (audio and/or video)
··················································19
About the memory functions
······················································19
Initialization of the microprocessor
············································19
Getting Started
Connections
Troubleshooting
············································································
23
Specifications
················································································
24
Operating DENON audio components
·······································20
Setting the preset memory function
··········································20
Setting the punch through function
···········································20
Operating a component stored in the preset memory
····20 ~ 22
Operating the remote control unit
Before operating
···········································································11
Playing the input source
······························································11
Turning the sound off temporarily (MUTING)·······························11
Listening over headphones··························································11
Switching the speakers ·······························································11
Checking the currently playing program source, etc. ··················12
Switching the brightness of the display·······································12
Selecting the play mode (PURE DIRECT) ····································12
Setting the tone control ·······························································12
Adjusting the speaker volume ·····················································12
Operation
Accessories
Check that the following parts are attached in addition to the main
unit:
q
Operating instructions
..............................................................
1
w
Warranty (for North America model only)
.....................................
1
e
Service station list
....................................................................
1
r
System remote control unit (RC-1052)
.....................................
1
t
R6P/AA batteries (For the RC-1052)
.........................................
2
y
ZONE remote control unit (RC-1056)
.......................................
1
u
R03/AAA batteries (For the RC-1056)
......................................
2
i
AM loop antenna
......................................................................
1
o
FM indoor antenna
...................................................................
1
t
o
y
u
r
i
Getting Started
Before using
Pay attention to the following before using this unit:
• Moving the unit.
To prevent short-circuits or damaged wires in the connection cables,
always unplug the power supply cord and disconnect the connection
cables between all other audio components when moving the unit.
• Cautions on using mobile phones.
Using a mobile phone near this unit may result in noise. If so, move
the mobile phone away from this unit when it is in use.
• Before turning the power operation button on.
Check once again that all connections are correct and that there are
not problems with the connection cables. Always set the power
operation button to the standby position before connecting and
disconnecting connection cables.