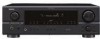
Denon DRA 397 Owners Manual - English - Page 9
Connections - problems
 |
UPC - 081757507349
View all Denon DRA 397 manuals
Add to My Manuals
Save this manual to your list of manuals |
Page 9 highlights
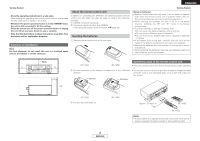
ENGLISH Connections Cable indications The hookup diagrams on the subsequent pages assume the use of the following optional connection cables (not supplied). Audio cable A Analog connections (Stereo) Signal direction Audio signal (White) (Red) L L R R Pin-plug cable IN OUT OUT IN Video signal B Analog connections (Monaural, for subwoofer) IN OUT OUT IN Pin-plug cable C Speaker connections Speaker cable D Video connections (Yellow) Video cable (75 Ω/ohms video pin-plug cable) Speaker connections Connect the speaker terminals with the speakers making sure that like polarities are matched (< with with >). NOTE: When making connections, take care that none of the individual conductors of the speaker cable come in contact with adjacent terminals, with other speaker cable conductors, or with the rear panel and screws. NEVER touch the speaker terminals when the power is on. Doing so could result in electric shocks. Connecting the speaker cables 1. Loosen by turning counterclockwise. 2. Insert the cable. Either tightly twist or terminate the core wires. 3. Tighten by turning clockwise. ¢ Speaker impedance Speaker A, B A+B Impedance 4 ~ 16 Ω/ohms 8 ~ 16 Ω/ohms Note on speaker impedance When using speakers with an impedance below the designated value (for example 4 Ω/ohms), playing for long periods of time with the volume high could cause the temperature to rise, activating the protection circuit. When the protection circuit is activated, the output to the speakers is cut off and the power indicator blinks. If this happens, unplug the power cord, wait for the set to cool off and improve ventilation around the unit. Also check the wiring of the input cables and the speaker cables. After doing this, plug the power cord back in and turn the unit's power back on. If the protection circuit is activated again even though there are no problems with the wiring or the ventilation around the unit, switch off the power and contact a DENON service center. NOTE: • Do not plug in the power supply cord until all connections have been completed. • When making connections, also refer to the operating instructions of the other components. • Be sure to connect the left and right channels properly (left with left, right with right). • Do not bundle power cords together with speaker cables. Doing so could result in humming or noise. Connecting banana plugs Turn clockwise to tighten, then insert the banana plug. 6 ENGLISH
-
 1
1 -
2
-
3
-
 4
4 -
 5
5 -
 6
6 -
 7
7 -
 8
8 -
 9
9 -
 10
10 -
 11
11 -
 12
12 -
 13
13 -
 14
14 -
15
-
16
-
17
-
18
-
19
-
20
-
21
-
22
-
23
-
24
-
25
-
26
-
27
-
28
-
29
-
30
-
31
-
32
 |
 |
