Denon DRW-585 Operating Instructions - Page 13
English, Counter, Memory
 |
View all Denon DRW-585 manuals
Add to My Manuals
Save this manual to your list of manuals |
Page 13 highlights
ENGLISH DENON oAE
-
 1
1 -
2
-
3
-
4
-
5
-
6
-
7
-
 8
8 -
 9
9 -
 10
10 -
 11
11 -
 12
12 -
 13
13 -
 14
14 -
 15
15 -
 16
16 -
 17
17 -
 18
18 -
19
-
20
-
21
-
22
-
23
 |
 |
ENGLISH
DENON
oAE
ORW•585
j
<I
1170
H1:11,41SE
(L=
©
o
8
88
Fri
-88883
•
1
-•
CD CD
C=
A
PLAY
—Fen
COO
<1
AUTO
REIERSE
REC/PUr
B
•
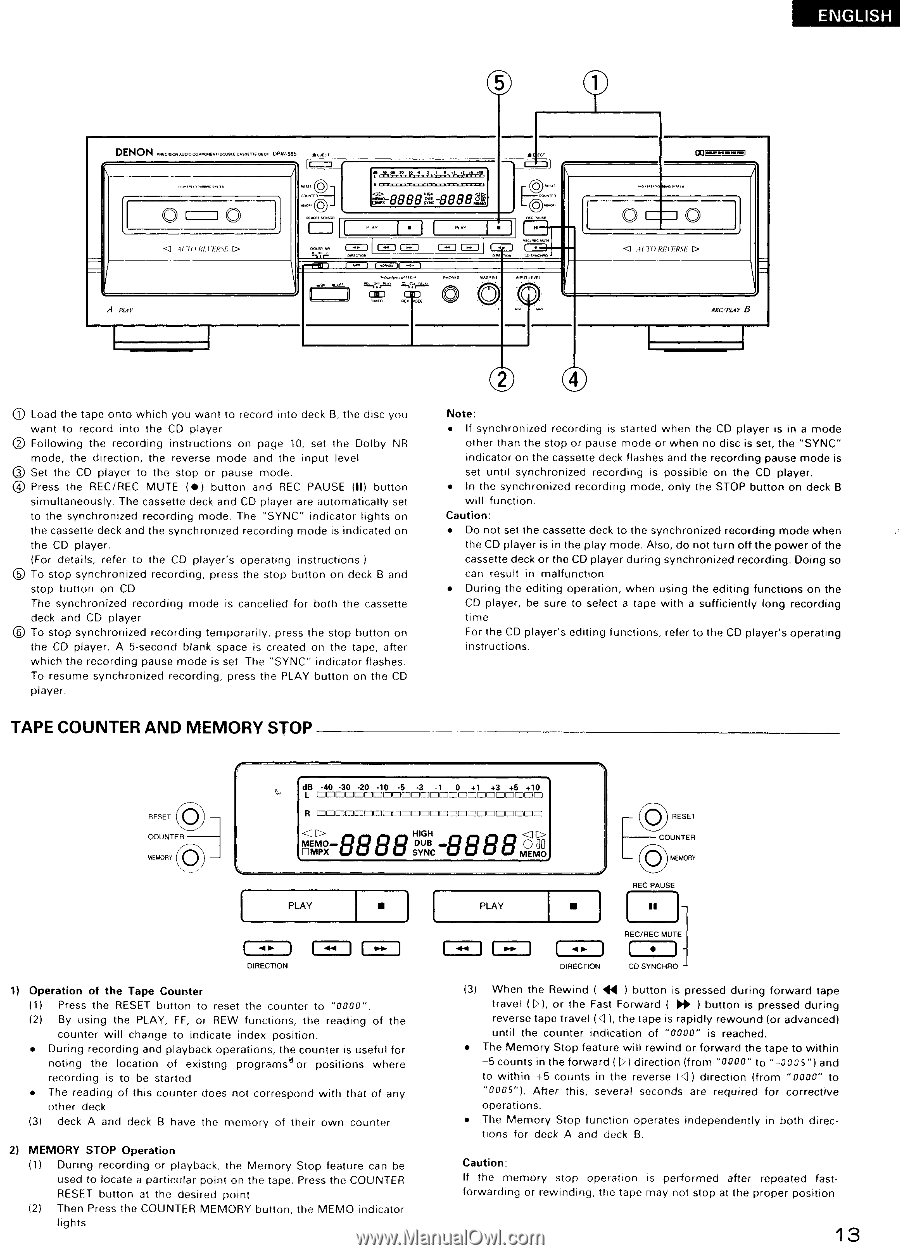
Load
the
tape
onto
which
you
want
to
record
into
deck
B,
the
disc
you
want
to
record
into
the
CD
player.
O
Following
the
recording
instructions
on
page
10,
set
the
Dolby
NR
mode,
the
direction,
the
reverse
mode
and
the
input
level.
0
Set
the
CD
player
to
the
stop
or
pause
mode.
®
Press
the
REC/REC
MUTE
IC
button
and
REC
PAUSE
(II)
button
simultaneously.
The
cassette
deck
and
CD
player
are
automatically
set
to
the
synchronized
recording
mode.
The
"SYNC"
indicator
lights
on
the
cassette
deck
and
the
synchronized
recording
mode
is
indicated
on
the
CD
player.
(For
details,
refer
to
the
CD
player's
operating
instructions
0
To
stop
synchronized
recording,
press
the
stop
button
on
deck
B
and
stop
button
on
CD
The
synchronized
recording
mode
is
cancelled
for
both
the
cassette
deck
and
CD
player
O
To
stop
synchronized
recording
temporari
ly,
press
the
stop
button
on
the
CD
player.
A
5
-second
blank
space
is
created
on
the
tape,
after
which
the
recording
pause
mode
is
set
The
"SYNC"
indicator
flashes.
To
resume
synchronized
recording,
press
the
PLAY
button
on
the
CD
player.
O
Note:
•
If
synchronized
recording
is
started
when
the
CD
player
is
in
a
mode
other
than
the
stop
or
pause
mode
or
when
no
disc
is
set,
the
"SYNC"
indicator
on
the
cassette
deck
flashes
and
the
recording
pause
mode
is
set
until
synchronized
recording
is
possible
on
the
CD
player.
•
In
the
synchronized
recording
mode,
only
the
STOP
button
on
deck
B
will
function.
Caution:
•
Do
not
set
the
cassette
deck
to
the
synchronized
recording
mode
when
the
CD
player
is
in
the
play mode.
Also,
do
not
turn
off
the
power
of
the
cassette
deck
or
the
CD
player
during
synchronized
recording.
Doing
so
can
result
in
malfunction.
•
During
the
editing
operation,
when
using
the
editing
functions
on
the
CD
player,
be
sure
to
select
a
tape
with
a
sufficiently
long
recording
time
For
the
CD
player's
editing
functions,
refer
to
the
CD
player's
operating
instructions.
TAPE
COUNTER
AND
MEMORY
STOP
RESET
COUNTER
MEMORY
dB
-40
-30
-20
-10
-5
-3
-1
0
+1
+3
+5
+10
L
OCDEDOOMETIOIMEICIE7
MEJ
CEIOCIEDO
R
00EDOME_ILDL7MCCIC======
< >
HIGH
<>
MEM.-8
8 8 8
DUB
8888
O
OU
OMPX
SYNC
MEMO
PLAY
•
DIRECTION
1)
Operation
of
the
Tape
Counter
(1)
Press
the
RESET
button
to
reset
the
counter
to
"000
0
".
(2)
By
using
the
PLAY,
FF,
or
REW
functions,
the
reading
of
the
counter
will
change
to
indicate
index
position.
•
During
recording
and
playback
operations,
the
counter
is
useful
for
noting
the
location
of
existing
programs
or
positions
where
recording
is
to
be
started
•
The
reading
of
this
counter
does
not
correspond
with
that
of
any
other
deck
(3)
deck
A
and
deck
B
have
the
memory
of
their
own
counter
2)
MEMORY
STOP
Operation
(1)
During
recording
or
playback,
the
Memory
Stop
feature
can
be
used
to
locate
a
particular
point
on
the
tape.
Press
the
COUNTER
RESET
button
at
the
desired
point
(2)
Then
Press
the
COUNTER
MEMORY
button,
the
MEMO
indicator
lights
PLAY
•
EMS
IC=
(
)
RESET
COUNTER
MEMORY
REC
PAUSE
11
REC/REC
MUTE
c
•
)
DIRECTION
CD
SYNCHRO
(31
When
the
Rewind
(
ill
I
button
is
pressed
during
forward
tape
travel
(
D),
or
the
Fast
Forward
(
10.1.
1
button
is
pressed
during
reverse
tape
travel
(1),
the
tape
is
rapidly
rewound
(or
advanced)
until
the
counter
indication
of
"0000"
is
reached.
•
The
Memory
Stop
feature
will
rewind
or
forward
the
tape
to
within
-5
counts
in
the
forward
(
DI
direction
(from
-0000
-
to
"-0005")
and
to
within
+5
counts
in
the
reverse
(<1
)
direction
(from
"0000"
to
"
0005
").
After
this,
several
seconds
are
required
for
corrective
operations.
•
The
Memory
Stop
function
operates
independently
in
both
direc-
tions
for
deck
A
and
deck
B.
Caution:
If
the
memory
stop
operation
is
performed
after
repeated
fast
-
forwarding
or
rewinding,
the
tape
may
not
stop
at
the
proper
position
13