Denon DRW-585 Operating Instructions - Page 14
recording/playback
 |
View all Denon DRW-585 manuals
Add to My Manuals
Save this manual to your list of manuals |
Page 14 highlights
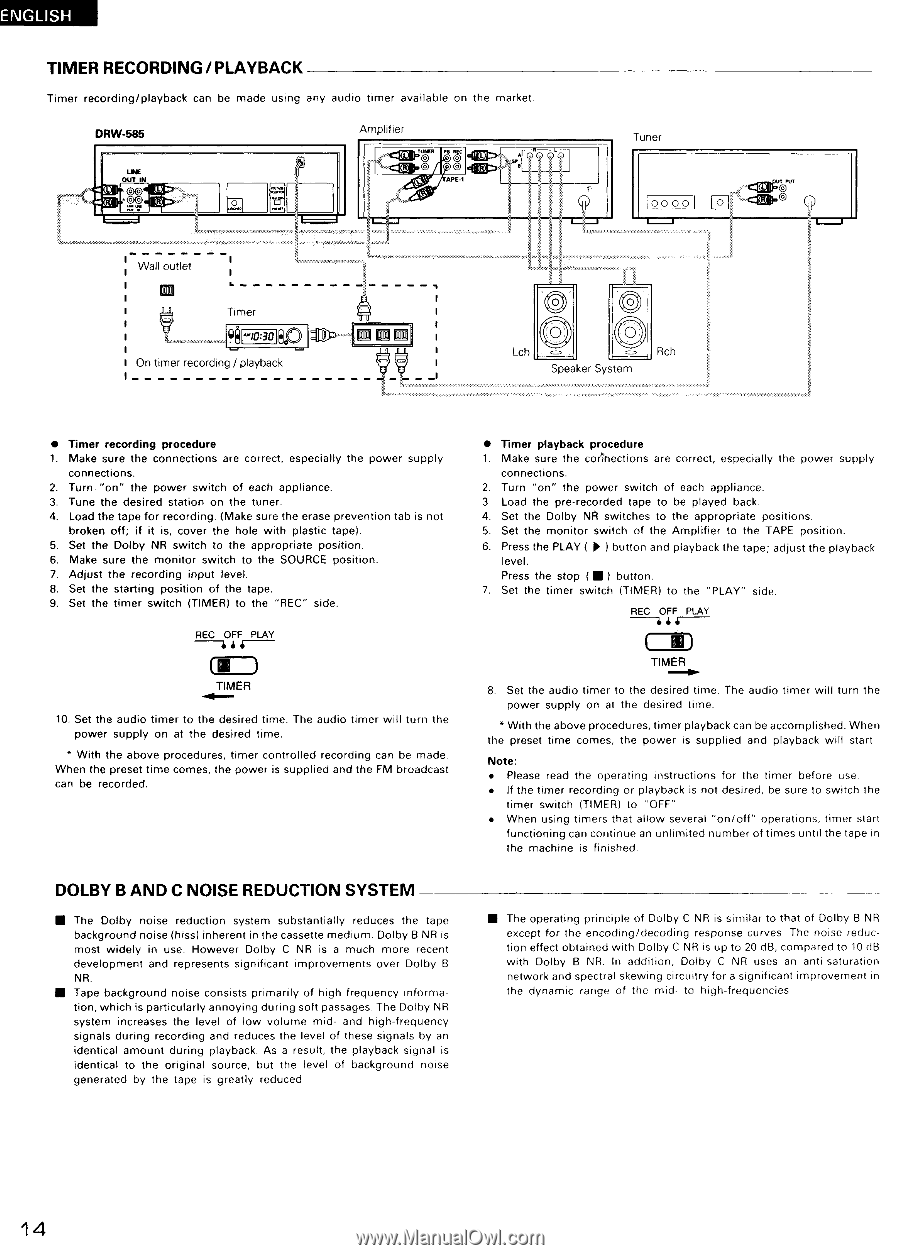
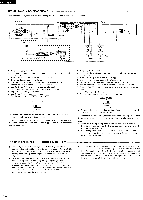
ENGLISH TIMER RECORDING / PLAYBACK Timer recording/playback can be made using any audio timer available on the market. DRW-585 UNE OUT IN CED •O© Amplifier o L APE.I Tuner 0000 cr2PF T [0I O Q Wall outlet itlill Timer oo A.83:30 lllil On timer recording / playback 0 O Lch Rch Speaker System • Timer recording procedure 1. Make sure the connections are correct, especially the power supply connections. 2. Turn • "on" the power switch of each appliance. 3. Tune the desired station on the tuner. 4. Load the tape for recording. (Make sure the erase prevention tab is not broken off; if it is, cover the hole with plastic tape). 5. Set the Dolby NR switch to the appropriate position. 6. Make sure the monitor switch to the SOURCE position. 7. Adjust the recording input level. 8. Set the starting position of the tape. 9. Set the timer switch (TIMER) to the "REC" side. REC OFF PLAY - Z•i - 1. TIMER 10. Set the audio timer to the desired time. The audio timer will turn the power supply on at the desired time. * With the above procedures timer controlled recording can be made. When the preset time comes, the power is supplied and the FM broadcast can be recorded. • Timer playback procedure 1. Make sure the corlhections are correct, especially the power supply connections. 2. Turn "on" the power switch of each appliance. 3 Load the pre-recorded tape to be played back. 4. Set the Dolby NR switches to the appropriate positions. 5. Set the monitor switch of the Amplifier to the TAPE position. 6. Press the PLAY ( ► I button and playback the tape; adjust the playback level. Press the stop ( • I button. 7. Set the timer switch (TIMER) to the "PLAY" side. REC OFF PLAY ( TIMER 8. Set the audio timer to the desired time. The audio timer will turn the power supply on at the desired time. * With the above procedures, timer playback can be accomplished. When the preset time comes, the power is supplied and playback will start Note: • Please read the operating instructions for the timer before use. • If the timer recording or playback is not desired, be sure to switch the timer switch (TIMER) to "OFF" • When using timers that allow several "on/off" operations, timer start functioning can continue an unlimited number of times until the tape in the machine is finished. DOLBY B AND C NOISE REDUCTION SYSTEM • The Dolby noise reduction system substantially reduces the tape background noise (hiss) inherent in the cassette medium. Dolby B NR is most widely in use. However Dolby C NR is a much more recent development and represents significant improvements over Dolby B NR. • Tape background noise consists primarily of high frequency information, which is particularly annoying during soft passages. The Dolby NR system increases the level of low volume mid- and high-frequency signals during recording and reduces the level of these signals by an identical amount during playback. As a result, the playback signal is identical to the original source, but the level of background noise generated by the tape is greatly reduced • The operating principle of Dolby C NR is similar to that of Dolby B NR except for the encoding/decoding response curves The noise reduction effect obtained with Dolby C NR is up to 20 dB, compared to 10 dB with Dolby B NR. In addition, Dolby C NR uses an anti-saturation network and spectral skewing circuitry for a significant improvement in the dynamic range of the mid- to high-frequencies 14
-
 1
1 -
2
-
3
-
4
-
5
-
6
-
7
-
8
-
 9
9 -
 10
10 -
 11
11 -
 12
12 -
 13
13 -
 14
14 -
 15
15 -
 16
16 -
 17
17 -
 18
18 -
 19
19 -
20
-
21
-
22
-
23
 |
 |