Dewalt DCS371P1 Instruction Manual - Page 11
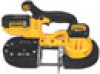
LED Worklight Fig. 2, Blades, Blade Selection, SAVE THESE INSTRUCTIONS, FOR FUTURE USE, COMPONENTS - blade size
 |
View all Dewalt DCS371P1 manuals
Add to My Manuals
Save this manual to your list of manuals |
Page 11 highlights
English NOTE: Battery packs should not be stored completely depleted of charge. The battery pack will need to be recharged before use. SAVE THESE INSTRUCTIONS FOR FUTURE USE COMPONENTS (Fig. 2, 3) WARNING: Never modify the power tool or any part of it. Damage or personal injury could result. A. Auxiliary handle K. Hang hook B. Lock-off button L. Pulley C. Trigger switch M. Blade guard D. Main handle N. Rubber tires E. Hex wrench O. Tracking screws F. Work stop P. Battery pack G. Guide rollers Q. Battery release button H. Adjusting lock nut R. Fuel gauge I. Blade tension lever S. LED worklight J. Blade INTENDED USE This heavy-duty band saw is designed for professional metal cutting applications. DO NOT use under wet conditions or in presence of flammable liquids or gases. This band saw is a professional power tool. DO NOT let children come into contact with the tool. Supervision is required when inexperienced operators use this tool. Trigger Switch (Fig. 2) Release switch lock-off button (B) by pressing button. Pull the trigger switch (C) to turn the motor ON. Releasing the trigger switch turns the motor OFF. Releasing the trigger switch also automatically actuates lock-off button. WARNING: This tool has no provision to lock the switch in the ON position, and should never be locked ON by any other means. LED Worklight (Fig. 2) There is a worklight (S) located above the blade The worklight is activated when the trigger switch is depressed, and will automatically turn off 20 seconds after the trigger switch is released. If the trigger switch remains depressed, the worklight will remain on. NOTE: The worklight is for lighting the immediate work surface and is not intended to be used as a flashlight. Blades This portable band saw is setup for use with .02" (0.5 mm) thick, 1/2" (12.5 mm) wide and 32" (813 mm) long blades. DO NOT use .025" (0.64 mm) thick blades. WARNING: The use of any other blade or accessory might be hazardous. DO NOT use any other type of accessory with your band saw. Blades used on stationary band saws are of different thickness. Do not attempt to use them on your portable unit. Blade Selection In general, first consider the size and shape of the work, and the type of material to be cut. Remember, for the most efficient cutting, the coarsest tooth blade possible should be used in a given application, because the coarser the tooth, the faster the cut. In selecting the appropriate number of teeth per inch of the band saw blade, at least two teeth should contact the work surface when the blade is rested against the workpiece. As a rule of thumb, soft materials usually require coarse tooth blades, while hard materials require fine tooth blades. Where a smoother finish is important, select one of the finer tooth blades. Select the appropriate band saw blade according to the material type, dimensions, and number of teeth. See Blade Description chart. 9
-
 1
1 -
2
-
3
-
4
-
5
-
 6
6 -
 7
7 -
 8
8 -
 9
9 -
 10
10 -
 11
11 -
 12
12 -
 13
13 -
 14
14 -
 15
15 -
 16
16 -
17
-
18
-
19
-
20
-
21
-
22
-
23
-
24
-
25
-
26
-
27
-
28
-
29
-
30
-
31
-
32
-
33
-
34
-
35
-
36
-
37
-
38
-
39
-
40
-
41
-
42
-
43
-
44
-
45
-
46
-
47
-
48
-
49
-
50
-
51
-
52
-
53
-
54
-
55
-
56
-
57
-
58
-
59
-
60
-
61
-
62
-
63
-
64
 |
 |
