Dewalt DW0330S Instruction Manual - Page 15
Measuring Area
 |
View all Dewalt DW0330S manuals
Add to My Manuals
Save this manual to your list of manuals |
Page 15 highlights
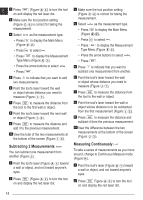
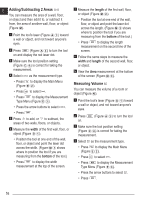
3. Make sure the tool position setting (Figure C 4 ) is correct for taking the measurement. 4. Select as the measurement type. • Press to display the Main Menu (Figure E 2 ). • Press to select . • Press to display the Measurement Type Menu (Figure E 3 ). • Press the arrow buttons to select . • Press . 5. Point the tool's laser (Figure A 1 ) toward the wall or object whose distance you need to measure (Figure K 1 ). 6. At the bottom of the screen, view the current measurement (Figure K 2 ), which will keep changing as you move the tool. 7. To take the current measurement (from the tool to the wall or object) and exit Continuous Measure mode, press . To take a new measurement, press to move the current measurement up to the previous line on the screen. Then repeat steps 4-7. Measuring Area You can measure the area of a wall, floor, or object (Figure L ). 1. Point the tool's laser (Figure A 1 ) toward a wall or object, and not toward anyone's eyes. 2. Press (Figure A 3 ) to turn the tool on and display the red laser dot. 3. Make sure the tool position setting (Figure C 4 ) is correct for taking the measurement. 4. Select as the measurement type. E • Press to display the Main Menu (Figure E 2 ). • Press to select . • Press to display the Measurement Type Menu (Figure E 3 ). • Press the arrow buttons to select . • Press . 5. Measure the width (Figure L 1 ). • Point the top of the tool at one side of the wall, floor, or object. • Position the tool at one end of the wall, floor, or object and point the laser dot across the width. (Figure L 1 shows where to position the tool if you are measuring from the bottom of the tool.) • Press to display the width measurement at the top of the screen. 6. Measure the length (Figure L 2 ). • Position the tool at one end of the wall, floor, or object and point the laser dot across the length. (Figure L 2 shows where to position the tool if you are measuring from the bottom of the tool.) • Press to display the length measurement on the second line of the screen. 7. View the Area measurement at the bottom of the screen (Figure L 3 ). 15
-
 1
1 -
2
-
3
-
4
-
5
-
6
-
7
-
8
-
9
-
 10
10 -
 11
11 -
 12
12 -
 13
13 -
 14
14 -
 15
15 -
 16
16 -
 17
17 -
 18
18 -
 19
19 -
 20
20 -
21
-
22
-
23
-
24
-
25
-
26
-
27
-
28
-
29
-
30
-
31
-
32
-
33
-
34
-
35
-
36
-
37
-
38
-
39
-
40
-
41
-
42
-
43
-
44
-
45
-
46
-
47
-
48
-
49
-
50
-
51
-
52
-
53
-
54
-
55
-
56
-
57
-
58
-
59
-
60
-
61
-
62
-
63
-
64
-
65
-
66
-
67
-
68
-
69
-
70
-
71
-
72
-
73
-
74
-
75
-
76
-
77
-
78
-
79
-
80
-
81
-
82
 |
 |
