Dymo LabelManager® 280 User Guide 1
Dymo LabelManager® 280 Manual
 |
View all Dymo LabelManager® 280 manuals
Add to My Manuals
Save this manual to your list of manuals |
Dymo LabelManager® 280 manual content summary:
- Dymo LabelManager® 280 | User Guide 1 - Page 1
User Guide LabelManager® 280 - Dymo LabelManager® 280 | User Guide 1 - Page 2
reserved. No part of this document or the software may be reproduced or transmitted in any form or by any means or translated into another language without the prior written consent of Newell Rubbermaid, LLC. Trademarks DYMO, DYMO Label, and LabelManager are registered marks in the US and other - Dymo LabelManager® 280 | User Guide 1 - Page 3
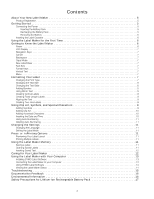
13 Installing DYMO Label Software 13 Connecting the Label Maker to your Computer 13 Using DYMO Label Software 14 Viewing the Label Maker Status 14 Troubleshooting 15 Documentation Feedback 16 Environmental Information 16 Safety Precautions for Lithium-Ion Rechargeable Battery Pack 17 - Dymo LabelManager® 280 | User Guide 1 - Page 4
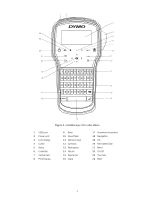
12 3 4 24 5 23 6 7 22 8 21 9 20 10 19 11 18 12 17 13 16 14 15 Figure 1 LabelManager 280 Label Maker 1 USB port 2 Power port 3 LCD display 4 Cutter 5 Italics 6 Underline 7 Vertical text 8 Print/Copies 9 Back 10 Save/Open 11 Numeric keys 12 Symbols 13 Backspace 14 Return 15 Space bar - Dymo LabelManager® 280 | User Guide 1 - Page 5
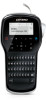
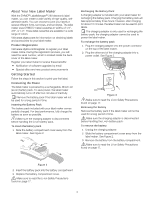
About Your New Label Maker With the DYMO® LabelManager® 280 electronic label maker, you can create a wide variety of high-quality, selfadhesive labels. You can choose to print your labels in several different fonts, text sizes, and text styles. The label maker uses DYMO D1 label cassettes in widths - Dymo LabelManager® 280 | User Guide 1 - Page 6
currently in the label maker and press . Each time you insert a label cassette into the label maker, you are prompted to set the label width so the label maker knows what size label you are currently using. You are now ready to print your first label. To print a label 1 Using the keyboard - Dymo LabelManager® 280 | User Guide 1 - Page 7
> > LCD Display With DYMO's exclusive graphical display, most of the formatting Uppercase 2 Lowercase 3 Accented character 4 Font 5 Text size 6 Battery indicator 7 USB connected 8 Text alignment 9 Mirror text 10 Fixed-length label 11 Auto-numbering 12 Edit area Navigation Keys You can navigate - Dymo LabelManager® 280 | User Guide 1 - Page 8
. , and then press . or to select the border style, and then . When using borders on two-line labels, both lines are enclosed in one border. Using Mirror Text The mirror format allows you to print text which reads from right to left, as you would see the text in a mirror. To apply - Dymo LabelManager® 280 | User Guide 1 - Page 9
the first line and press . 2 Type the text for the second line. 3 Press to print. Using Clip Art, Symbols, and Special Characters Clip art, symbols, punctuation, and other special characters can be added to your labels. Adding Symbols The label maker supports the extended symbol set shown below - Dymo LabelManager® 280 | User Guide 1 - Page 10
Clip Art, and then press . 3 Press the navigation keys to select an image. 4 Press to add the image to your label. Adding Accented Characters The label maker supports the extended Latin character set. You can add accented characters in two ways: Press and then the alpha character. Press and - Dymo LabelManager® 280 | User Guide 1 - Page 11
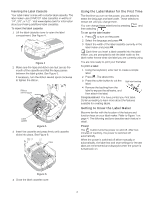
hold for a few seconds. 2 Press or to select the number of copies to print, and press . When printing is finished, the number of copies to print returns to the default value of 1. Using the Label Maker Memory The label maker has a powerful memory feature that allows you to save the text of up to - Dymo LabelManager® 280 | User Guide 1 - Page 12
label. Caring for Your Label Maker Your label maker is designed to give you long and trouble-free service, while requiring very little maintenance. Clean your label maker . To clean the print head 1 Remove the label cassette. 2 Remove the cleaning tool from inside the label compartment cover. See - Dymo LabelManager® 280 | User Guide 1 - Page 13
printer image in the DYMO Label software Print area. All of the label printers that are installed on your computer are displayed. b Select the LabelManager 280 label maker. You are now ready to print labels from DYMO Label software. For more information, see Using DYMO Label Software on the next - Dymo LabelManager® 280 | User Guide 1 - Page 14
following: DYMO Label Help DYMO Label User Guide LabelManager 280 User Guide Viewing the Label Maker Status The label maker status is displayed in the DYMO Label software Print area. The following table describes the possible states of the label maker. Label maker is connected and battery pack - Dymo LabelManager® 280 | User Guide 1 - Page 15
Troubleshooting Review the following possible solutions if you encounter a problem while using your label maker. Problem/Error Message No display Solution Ensure the label maker is turned on. Poor Print Quality Attach the charging adapter to the label maker to recharge the battery pack. See - Dymo LabelManager® 280 | User Guide 1 - Page 16
: Product name, model number, and User Guide page number Brief description of instructions that are inaccurate or unclear, areas where more dymo.com Please keep in mind that this email address is only for documentation feedback. If you have a technical question, please contact Customer Support - Dymo LabelManager® 280 | User Guide 1 - Page 17
in the battery pack. This could damage equipment or injure users. Thoroughly follow the instructions below. While Charging the Battery Pack DANGER only with the same or equivalent type recommended by DYMO. When charging the battery, use dedicated chargers and follow the specified conditions.
-
 1
1 -
 2
2 -
 3
3 -
 4
4 -
 5
5 -
 6
6 -
 7
7 -
8
-
9
-
10
-
11
-
12
-
13
-
14
-
15
-
16
-
17
 |
 |

LabelManager
®
280
User Guide