Dymo LabelManager® 280 User Guide 1 - Page 11
Using Auto-Numbering, Changing the Settings, Changing the Language, Setting the Label Width
 |
View all Dymo LabelManager® 280 manuals
Add to My Manuals
Save this manual to your list of manuals |
Page 11 highlights
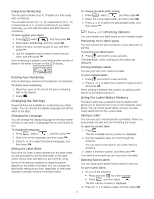
Using Auto-Numbering You can print a series of up to 10 labels at a time using auto-numbering. You can add numeric (0,1, 2...9), uppercase (A, B, C...Z), or lowercase (a, b, c...z) auto-numbering to your label. Optionally, you can add text before and after the autonumbering. To auto-number your labels 1 Press , select , and then press . 2 Select Auto-numbering, and then press . 3 Select the auto-numbering type to use, and then press . 4 Use the navigation keys to select a start and end value, and then press . Auto-numbering is added to your label and the number of labels in the series is shown on the LCD display. Deleting Auto-Numbering Auto-numbering is entered on the label as one character. To delete auto-numbering 1 Place the cursor at the end of the auto-numbering text on the display. 2 Press . Changing the Settings Several options are available for customizing your label maker. You can choose the display language and set the width of the label. Changing the Language You can change the display language for the label maker so that you can work in a language that is most familiar to you. To change the language 1 Press , select , and then press . 2 Select the current language, and then press . > > 3 Press or to select the desired language, and then press . Setting the Label Width Each time you insert a label cassette into the label maker, you are prompted to set the label width so the label maker knows what size label you are currently using. Some of the features available for designing labels depend on the width of the label. You can change the label width setting at any time, regardless of what label cassette is actually inserted in the label maker. To change the label width setting 1 Press , select , and then press . 2 Select the current label width, and then press . 3 Press or > to select the desired label width, and then press . > > Press or > toPrinting Options You can preview your label layout or print multiple copies. Previewing Your Label Layout You can preview the size and layout of your label prior to printing. To preview your label layout Press and hold for a few seconds. The label length, width, and layout information are displayed. Printing Multiple Labels You can print up to ten copies of a label. > > To print multiple labels 1 Press and hold for a few seconds. 2 Press or to select the number of copies to print, and press . When printing is finished, the number of copies to print returns to the default value of 1. Using the Label Maker Memory The label maker has a powerful memory feature that allows you to save the text of up to nine frequently used labels. You can recall saved labels, and you can also insert saved text into the current label. Saving a Label You can save up to nine frequently used labels. When you save a label, the text and any formatting are saved. To save the current label 1 Press . The first available memory location is displayed. 2 Use the navigation keys to move through the locations. You can store a new label in any of the memory locations. 3 Select a memory location, and then press . Your label is saved and you are returned to the label. Opening Saved Labels You can easily open labels that are saved in memory. To open saved labels 1 Do one of the following: • Press and hold for a few seconds. • Press and then select . The first memory location is displayed. > > 2 Press or to select a label, and then press . 11
-
 1
1 -
2
-
3
-
4
-
5
-
 6
6 -
 7
7 -
 8
8 -
 9
9 -
 10
10 -
 11
11 -
 12
12 -
 13
13 -
 14
14 -
 15
15 -
 16
16 -
17
 |
 |
