Dymo LabelManager® Wireless PnP Quick Start Guide - Page 13
Adding the Wireless Printer, The Wireless Setup tool starts.
 |
View all Dymo LabelManager® Wireless PnP manuals
Add to My Manuals
Save this manual to your list of manuals |
Page 13 highlights
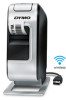
To configure the printer on your wireless network 1 From within the built-in software, click . The Wireless Setup tool starts. Wireless status light 2 Follow the steps in the Wireless Setup tool. The wireless status light located on the top of the label maker turns solid blue when the label maker is successfully connected to a wireless network. See Figure 8. 3 After configuring the label maker as a wireless printer, disconnect the USB cable from your computer. Figure 8 4 Place the printer in an easily accessed location. 5 Plug the USB cable into the wall adapter and then plug the wall adapter into a wall outlet. 6 If necessary, press the power button to turn the printer on. Adding the Wireless Printer To print labels to the networked printer, you must download and install DYMO Label™ v.8.5 or later from the DYMO Web site, and then add the printer to your computer. To add the wireless printer to a Windows computer 1 Download DYMO Label™ v.8.5 or later from the Support section of the DYMO Web site at www.dymo.com. 2 Close all open Microsoft Office applications. 3 Double-click the Installer icon. After a few seconds, the installation screen appears. 4 Click Install and follow the instructions in the installer. When the software installation is complete, you are prompted to connect your printer. 5 Without connecting your printer, click Finish, and then start the software. 9
-
 1
1 -
2
-
3
-
4
-
5
-
6
-
7
-
 8
8 -
 9
9 -
 10
10 -
 11
11 -
 12
12 -
 13
13 -
 14
14 -
 15
15 -
 16
16 -
 17
17 -
 18
18 -
19
-
20
-
21
-
22
-
23
-
24
-
25
-
26
-
27
-
28
-
29
-
30
-
31
-
32
-
33
-
34
-
35
-
36
-
37
-
38
-
39
-
40
-
41
-
42
-
43
-
44
-
45
-
46
-
47
-
48
-
49
-
50
-
51
-
52
-
53
-
54
-
55
-
56
-
57
-
58
-
59
-
60
-
61
-
62
 |
 |
