Dymo LabelManager® Wireless PnP Quick Start Guide - Page 9
Connecting the Label Maker to your Computer, Starting the Built-In Software
 |
View all Dymo LabelManager® Wireless PnP manuals
Add to My Manuals
Save this manual to your list of manuals |
Page 9 highlights
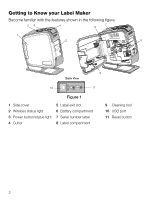
Connecting the Label Maker to your Computer The label maker connects to your computer through the USB connection located on the back of the label maker. To connect the label maker to your computer 1 Plug one end of the USB cable into the label maker. See Figure 5. 2 Plug the other end into an available, powered USB port on your computer. The label maker must be connected to a powered USB port. The label maker may not charge or function properly when connected to a nonpowered USB port, such as those on some Mac keyboards or a non-powered USB hub. Figure 5 Starting the Built-In Software The built-in software resides on the label maker; no installation is required. To start the software for Windows® 1 If necessary, press the power button to turn on the label maker. Depending on Windows AutoRun or AutoPlay settings, the software may start automatically. 2 If the software does not start automatically, do one of the following: • If the AutoRun or AutoPlay dialog box appears, follow the on-screen instructions to start the DYMO Label Light software. • If the AutoRun or AutoPlay dialog box does not appear, navigate to My ComputerDYMO W-PNP, and then click DYMO Label Light.exe. To start the software for Mac OS® 1 If necessary, press the power button to turn on the label maker. The DYMO Wireless PnP volume appears on your desktop. 2 Double-click DYMO W-PNP to open the volume. 3 Double-click to start the software. 5
-
 1
1 -
2
-
3
-
 4
4 -
 5
5 -
 6
6 -
 7
7 -
 8
8 -
 9
9 -
 10
10 -
 11
11 -
 12
12 -
 13
13 -
 14
14 -
15
-
16
-
17
-
18
-
19
-
20
-
21
-
22
-
23
-
24
-
25
-
26
-
27
-
28
-
29
-
30
-
31
-
32
-
33
-
34
-
35
-
36
-
37
-
38
-
39
-
40
-
41
-
42
-
43
-
44
-
45
-
46
-
47
-
48
-
49
-
50
-
51
-
52
-
53
-
54
-
55
-
56
-
57
-
58
-
59
-
60
-
61
-
62
 |
 |
