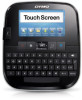
Dymo LabelManager 500 Touch Screen Label Maker User Guide 1
Dymo LabelManager 500 Touch Screen Label Maker Manual
 |
View all Dymo LabelManager 500 Touch Screen Label Maker manuals
Add to My Manuals
Save this manual to your list of manuals |
Dymo LabelManager 500 Touch Screen Label Maker manual content summary:
- Dymo LabelManager 500 Touch Screen Label Maker | User Guide 1 - Page 1
- Dymo LabelManager 500 Touch Screen Label Maker | User Guide 1 - Page 2
reserved. No part of this document or the software may be reproduced or transmitted in any form or by any means or translated into another language without the prior written consent of Sanford, L.P. Trademarks DYMO, DYMO Label, and LabelManager are registered marks in the US and other countries - Dymo LabelManager 500 Touch Screen Label Maker | User Guide 1 - Page 3
to Know the Label Maker 7 Power 7 Home 7 Touch Screen Display 7 Navigation Keys 7 Caps Lock 7 Shift 7 Backspace 8 Delete 8 Using the Touch Screen 8 Making a Selection 8 Selecting Text 8 Scrolling a List 8 Editing Your Label 8 Selecting the Font 8 Changing the Font Type 9 Changing the - Dymo LabelManager 500 Touch Screen Label Maker | User Guide 1 - Page 4
Your Label Maker 15 Cleaning Your Label Maker 15 Calibrating the Touch Screen 15 Using the Label Maker with Your Computer 16 Installing DYMO Label Software 16 Connecting the Label Maker to Your Computer 16 Using DYMO Label Software 17 Viewing the Label Maker Status 17 Troubleshooting 18 - Dymo LabelManager 500 Touch Screen Label Maker | User Guide 1 - Page 5
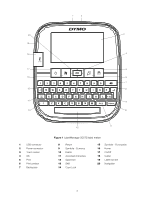
2 20 3 19 18 4 17 5 16 6 7 15 8 14 9 13 10 1 USB connector 2 Power connector 3 Touch screen 4 OK 5 Print 6 Print preview 7 Backspace 11 12 Figure 1 LabelManager 500TS label maker 8 Return 9 Symbols - Currency 10 Delete 11 Accented characters 12 Space bar 13 Shift 14 Caps Lock 15 - Dymo LabelManager 500 Touch Screen Label Maker | User Guide 1 - Page 6
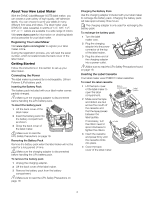
About Your New Label Maker With the DYMO LabelManager 500TS label maker, you can create a wide variety of high-quality, self-adhesive labels. You can choose to print your labels in many different font sizes and styles. The label maker uses DYMO D1 label cassettes in widths of 1/4", 3/8", 1/2", 3/4", - Dymo LabelManager 500 Touch Screen Label Maker | User Guide 1 - Page 7
the touch screen display. Create a new label. Edit the current label. Open a saved or recently printed label. View downloaded labels. Change the label maker settings. Select a user, create new users, and manage user settings. Displays the status of the battery pack. Navigation Keys You can review - Dymo LabelManager 500 Touch Screen Label Maker | User Guide 1 - Page 8
, such as a fingernail. Making a Selection You can make selections on the touch screen by tapping an item. Scrolling a List Dragging a scroll bar moves you quickly through a menu or list. Drag to scroll through a list. Editing Your Label You can choose from several format options to enhance the - Dymo LabelManager 500 Touch Screen Label Maker | User Guide 1 - Page 9
desired font type from the font type list. Changing the Font Size The font sizes available depend on the label width selected. To change the font size screen. 2 Select the Insert tab. Inserting Symbols The label maker supports a variety of useful symbols that you can quickly add to your labels. - Dymo LabelManager 500 Touch Screen Label Maker | User Guide 1 - Page 10
Tap on the Home screen. 2 Select Time from after, above, or below the barcode. This User Guide assumes that you already understand the differences between barcode types appears. 3 Select the day, month, or quarter names to use. A label is created for each day, month, or quarter you selected. 4 To - Dymo LabelManager 500 Touch Screen Label Maker | User Guide 1 - Page 11
Inserting International Characters The label maker supports the extended Latin character set. Pressing followed by the Use word suggestion check box. To delete available word suggestions 1 Tap on the Home screen. 2 Select Word Suggestion from the Settings list. 3 Tap Manage words. The Manage - Dymo LabelManager 500 Touch Screen Label Maker | User Guide 1 - Page 12
on the Save label screen. 4 Enter a name for your label in the Label name box, and then tap Save. Downloading Labels Using DYMO Label™ software on your computer, you can create labels from a database file and download the labels to the label maker. See Using the Label Maker with Your Computer - Dymo LabelManager 500 Touch Screen Label Maker | User Guide 1 - Page 13
the selected location. Clearing Recently Printed Labels You can quickly clear all recently printed labels from the label maker memory. Clearing recently printed labels clears this list of labels for all users. To clear recently printed labels 1 Tap on the Home screen. 2 Select Manage Files from the - Dymo LabelManager 500 Touch Screen Label Maker | User Guide 1 - Page 14
check box. 4 Select the Print cut marks between labels check box. Customizing Your Label Maker Several options are available for customizing your label maker. You can choose the display language, label width, default font, and screen settings. Changing the Language You can change the display - Dymo LabelManager 500 Touch Screen Label Maker | User Guide 1 - Page 15
long and trouble-free service, while requiring very little maintenance. Clean your label maker and calibrate the screen regularly to keep your label maker working properly. Cleaning Your Label Maker Clean your label maker regularly to keep it working properly. To clean the touch screen 1 Use a lint - Dymo LabelManager 500 Touch Screen Label Maker | User Guide 1 - Page 16
OS® system 1 Download the latest version of DYMO Label software from the Support section of the DYMO Web site at www.dymo.com. 2 Double-click the Installer icon and follow the onscreen instructions. Connecting the Label Maker to Your Computer The label maker connects to your computer using the USB - Dymo LabelManager 500 Touch Screen Label Maker | User Guide 1 - Page 17
Help. From the Help menu, you can view the following: DYMO Label v.8 Help DYMO Label v.8 User Guide LabelManager 500TS User Guide Viewing the Label Maker Status The label maker status is displayed in the DYMO Label software Print area. The following table describes the possible states of the - Dymo LabelManager 500 Touch Screen Label Maker | User Guide 1 - Page 18
Troubleshooting Review the following possible solutions if you encounter a problem while using your label maker. Problem/Error Message No display Poor Print Quality No label cassette inserted Text exceeds printable area Battery level is low Label jam Cutter jam Unable to print How do I remove the - Dymo LabelManager 500 Touch Screen Label Maker | User Guide 1 - Page 19
equipment or injure users. Thoroughly follow the instructions below. While Charging the Battery Pack Danger the specified time. Caution Thoroughly read this User Guide before charging the battery pack. Do not charge in DYMO for more information on the environmental performance of our products
-
 1
1 -
 2
2 -
 3
3 -
 4
4 -
 5
5 -
 6
6 -
 7
7 -
8
-
9
-
10
-
11
-
12
-
13
-
14
-
15
-
16
-
17
-
18
-
19
 |
 |
