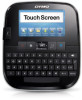
Dymo LabelManager 500 Touch Screen Label Maker User Guide 1 - Page 7
Using the Label Maker for the First Time, Getting to Know the Label Maker - reviews
 |
View all Dymo LabelManager 500 Touch Screen Label Maker manuals
Add to My Manuals
Save this manual to your list of manuals |
Page 7 highlights
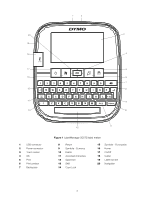
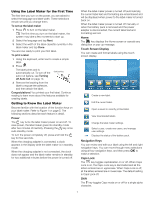
Using the Label Maker for the First Time The first time you turn on the power, you are asked to select the language and label width. These selections remain set until you change them. To set up the label maker 1 Press to turn on the label maker. The first time you turn on the label maker, the system may take a few moments to start up. 2 Select the language and tap Next. 3 Select the width of the label cassette currently in the label maker and tap Done. You are now ready to print your first label. To print a label 1 Using the keyboard, enter text to create a simple label. 2 Press . The label prints and is automatically cut. To turn off the auto-cut feature, see Turning off Auto-Cut on page 14. Split backing 3 Remove the backing from the label to expose the adhesive, and then attach the label. Congratulations! You printed your first label. Continue reading to learn more about the features available for creating labels. Getting to Know the Label Maker Become familiar with the location of the function keys on your label maker. Refer to Figure 1 on page 5. The following sections describe each feature in detail. Power The key turns the label maker power on and off. To save power, the label maker goes into standby mode after two minutes of inactivity. Pressing the key once exits standby mode. To turn the power completely off, press and hold the key for five seconds. When the charging adapter is connected, a clock appears in the display while the label maker is in standby mode. When the charging adapter is not connected, the clock does not appear and the label maker remains in standby for two additional minutes before the power is turned off. When the label maker power is turned off automatically, the current label text and formatting are remembered and will be displayed when power to the label maker is turned back on. When the label maker power is turned off manually or when the battery pack is removed and the power adapter is disconnected, the current label text and formatting are lost. Home The key displays the Home screen or cancels any dialog box or pop-up message. Touch Screen Display You can create and format labels using the touch screen display. Create a new label. Edit the current label. Open a saved or recently printed label. View downloaded labels. Change the label maker settings. Select a user, create new users, and manage user settings. Displays the status of the battery pack. Navigation Keys You can review and edit your label using the left and right navigation keys. You can move through menu selections using all four navigation keys, and then press to make a selection. Caps Lock The key toggles capitalization on or off. When Caps Lock is on, the Caps Lock key is illuminated and all the letters entered are in uppercase. When Caps Lock is off, all the letters entered are in lowercase. The default setting is Caps Lock off. Shift The key toggles Caps mode on or off for a single alpha character. 7
-
 1
1 -
 2
2 -
 3
3 -
 4
4 -
 5
5 -
 6
6 -
 7
7 -
 8
8 -
 9
9 -
 10
10 -
 11
11 -
 12
12 -
13
-
14
-
15
-
16
-
17
-
18
-
19
 |
 |
