Dymo LabelManager 500 Touch Screen Label Maker User Guide 1 - Page 18
Troubleshooting, Documentation Feedback
 |
View all Dymo LabelManager 500 Touch Screen Label Maker manuals
Add to My Manuals
Save this manual to your list of manuals |
Page 18 highlights
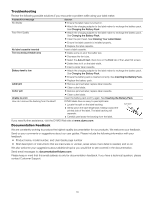
Troubleshooting Review the following possible solutions if you encounter a problem while using your label maker. Problem/Error Message No display Poor Print Quality No label cassette inserted Text exceeds printable area Battery level is low Label jam Cutter jam Unable to print How do I remove the backing from the label? Solution Ensure the label maker is turned on. Attach the charging adapter to the label maker to recharge the battery pack. See Charging the Battery Pack. Attach the charging adapter to the label maker to recharge the battery pack. See Charging the Battery Pack. Clean the print head. See Cleaning Your Label Maker. Ensure the label cassette is installed properly. Replace the label cassette. Insert a label cassette. Delete some or all of the buffer text. Decrease the font size. Select the Auto-fit text check box on the Font tab of the Label Edit screen. Delete lines to fit on the label width. Insert a wider label cassette. Attach the charging adapter to the label maker to recharge the battery pack. See Charging the Battery Pack. Ensure the battery pack is inserted correctly. See Inserting the Battery Pack. Replace the battery pack. Remove jammed label; replace label cassette. Clean cutter blade. Remove jammed label; replace label cassette. Clean cutter blade. Insert the battery pack and try again. See Inserting the Battery Pack. DYMO labels have an easy-to-peel split back. 1 Locate the split on the label backing. Split label 2 Gently pinch the label lengthwise, folding toward the printed side of the label. The label backing will separate. 3 Carefully peel away the backing from the label. If you need further assistance, visit the DYMO Web site at www.dymo.com. Documentation Feedback We are constantly working to produce the highest quality documentation for our products. We welcome your feedback. Send us your comments or suggestions about our user guides. Please include the following information with your feedback: Product name, model number, and User Guide page number Brief description of instructions that are inaccurate or unclear, areas where more detail is needed, and so on We also welcome your suggestions about additional topics you would like to see covered in the documentation. Send email messages to: [email protected] Please keep in mind that this email address is only for documentation feedback. If you have a technical question, please contact Customer Support. 18
-
 1
1 -
2
-
3
-
4
-
5
-
6
-
7
-
8
-
9
-
10
-
11
-
12
-
 13
13 -
 14
14 -
 15
15 -
 16
16 -
 17
17 -
 18
18 -
 19
19
 |
 |
