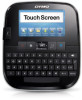
Dymo LabelManager 500 Touch Screen Label Maker User Guide 1 - Page 14
Customizing Your Label Maker, Working with User Accounts
 |
View all Dymo LabelManager 500 Touch Screen Label Maker manuals
Add to My Manuals
Save this manual to your list of manuals |
Page 14 highlights
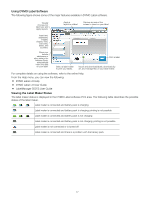
Turning off Auto-Cut When the auto-cut feature is turned on, each label is automatically cut after printing. This feature is on by default. However, you can turn off auto-cut. To turn off auto-cut 1 Tap on the Home screen. 2 Select Label from the Settings list. 3 Clear the Cut each label after printing check box. Printing Cut Marks Between Labels When auto-cut is off, you can choose to print a label separator cut mark between each label to indicate where the labels should be cut. To print cut marks between labels 1 Tap on the Home screen. 2 Select Label from the Settings list. 3 If necessary, clear the Cut each label after printing check box. 4 Select the Print cut marks between labels check box. Customizing Your Label Maker Several options are available for customizing your label maker. You can choose the display language, label width, default font, and screen settings. Changing the Language You can change the display language for the label maker so that you can work in a language that is most familiar to you. To change the language 1 Tap on the Home screen. 2 Select Language from the Settings list. 3 Select the desired language from the Set language list, and then tap Done. Changing the Label Width Each time you insert a label cassette into the label maker, you are prompted to set the label width so the label maker knows what size label you are currently using. Some of the features available for designing labels depend on the width of the label. You can change the label width setting at any time, regardless of what label cassette is actually inserted in the label maker. To change the label width 1 Tap on the Home screen. 2 Select Label from the Settings list. 3 Select the width of the label currently inserted in the printer from the Label width list, and then tap Done. The label in the Label Edit screen changes to the new width. Changing the Default Font You can select the default font type, size, and style to use for all your labels. You can easily change the font for individual labels from the Label Edit screen. To change the default font 1 Tap on the Home screen. 2 Select Font from the Settings list. 3 Select the font type, size, and style to use as the default font, and then tap Done. Changing the Screen Settings You can adjust the screen brightness and choose whether or not to show the clock when the label maker is in standby mode and the charging adapter is connected. To change the screen brightness 1 Tap on the Home screen. 2 Select Screen from the Settings list. 3 Under Screen brightness, move the slider right or left to increase or decrease the screen brightness. 4 Tap Done. To turn off the clock 1 Tap on the Home screen. 2 Select Screen from the Settings list. 3 Clear the Show clock while charging check box, and then tap Done. Working with User Accounts You can create user accounts on the label maker for different users. Each user can then select their own default settings for the label maker. Creating User Accounts You can create up to five user accounts. To create a user account 1 Tap on the Home screen. 2 Tap New user. The User settings dialog box appears. 3 Enter a name for the new user in the User name box. 4 Select the settings for the new user. See Changing User Settings on page 15 for information about selecting user settings. 5 Tap Save. 14
-
 1
1 -
2
-
3
-
4
-
5
-
6
-
7
-
8
-
 9
9 -
 10
10 -
 11
11 -
 12
12 -
 13
13 -
 14
14 -
 15
15 -
 16
16 -
 17
17 -
 18
18 -
 19
19
 |
 |
