Dymo LabelWriter® 450 Duo Label Printer User Guide 1 - Page 3
Quick Start Guide
 |
View all Dymo LabelWriter® 450 Duo Label Printer manuals
Add to My Manuals
Save this manual to your list of manuals |
Page 3 highlights
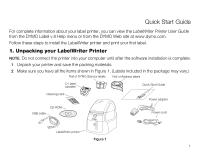
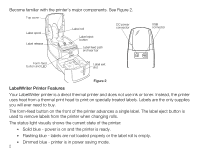
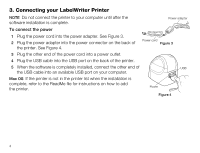
Quick Start Guide For complete information about your label printer, you can view the LabelWriter Printer User Guide from the DYMO Label v.8 Help menu or from the DYMO Web site at www.dymo.com. Follow these steps to install the LabelWriter printer and print your first label. 1. Unpacking your LabelWriter Printer NOTE Do not connect the printer into your computer until after the software installation is complete. 1 Unpack your printer and save the packing materials. 2 Make sure you have all the items shown in Figure 1. (Labels included in the package may vary.) Roll of DYMO Stamps labels Roll of Address labels D1 label cassette Cleaning card Quick Start Guide LabelWriter Quick Start Power adapter CD-ROM USB cable Power cord LabelWriter printer Figure 1 1
-
 1
1 -
 2
2 -
 3
3 -
 4
4 -
 5
5 -
 6
6 -
 7
7 -
 8
8 -
 9
9 -
10
-
11
-
12
-
13
-
14
-
15
-
16
 |
 |
