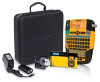
Dymo Rhino 4200 Case Kit User Guide
Dymo Rhino 4200 Case Kit Manual
 |
View all Dymo Rhino 4200 Case Kit manuals
Add to My Manuals
Save this manual to your list of manuals |
Dymo Rhino 4200 Case Kit manual content summary:
- Dymo Rhino 4200 Case Kit | User Guide - Page 1
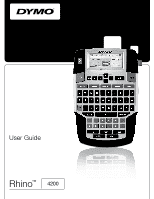
User Guide Rhino™ 4200 - Dymo Rhino 4200 Case Kit | User Guide - Page 2
Copyright © 2012 Sanford, L.P. All rights reserved. No part of this document or the software may be reproduced or transmitted in any form or by any means or translated into another language without the prior written consent of Sanford, L.P. Trademarks DYMO and RHINO are registered marks in the US - Dymo Rhino 4200 Case Kit | User Guide - Page 3
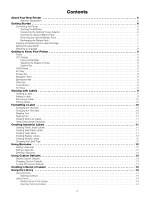
Contents About Your New Printer 6 Warranty Registration 6 Getting Started 6 Connecting the Power 6 Inserting the Batteries 6 Connecting the Optional Power Adapter 6 Inserting the Optional Battery Pack 7 Removing the Optional Battery Pack 7 Recharging the Battery Pack 7 Inserting and - Dymo Rhino 4200 Case Kit | User Guide - Page 4
Brackets 17 Hazard and Warning 17 Pro AV and Security 17 Numbers 17 Currency 17 Electrical 17 Terms 18 Audio 18 Video 18 Security 18 Troubleshooting 19 4 - Dymo Rhino 4200 Case Kit | User Guide - Page 5
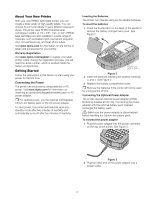
1 23 22 21 20 19 18 17 16 15 14 2 3 4 5 6 7 8 9 10 11 12 13 Figure 1 RHINO 4200 Label Printer 1 Power connector 2 Label exit slot 3 LCD Display 4 Cutter button 5 Print 6 OK 7 Navigation 8 Backspace 9 Return 10 Favorites 11 Add/Remove 12 Custom/Settings 13 Serial/Feed 14 Library/Save 15 Size/ - Dymo Rhino 4200 Case Kit | User Guide - Page 6
online. During the registration process, you will need the serial number, which is located inside the battery compartment. Getting Started Follow the instructions in this section to start using your printer for the first time. Connecting the Power The printer can be powered using batteries or AC - Dymo Rhino 4200 Case Kit | User Guide - Page 7
of the printer. 2 Make sure the label and ribbon are taut across the mouth of the cartridge and that the label passes between the label guides. If necessary, turn the ribbon rewind spool clockwise to tighten the ribbon. 3 Insert the cartridge with the label and ribbon positioned between the label - Dymo Rhino 4200 Case Kit | User Guide - Page 8
Selecting a Language The first time you turn on the power, you are prompted to select your desired language. By default, the language is set to English. Several language-related features of the printer, such as special characters, menu text, and so on, are determined by the language setting. You - Dymo Rhino 4200 Case Kit | User Guide - Page 9
and formatting text. These Hot Keys are described in detail later in this User Guide. Working with Labels You can create a single label or a group of labels. A group of labels can be created manually by adding labels to the current label or automatically using serialization. See Creating a Series - Dymo Rhino 4200 Case Kit | User Guide - Page 10
Removing a Label You can remove a label from the current group. To remove a label 1 Press + . 2 Select one of the following: • All to remove all of the labels in the group. • Current to remove the label at the current cursor position. 3 Press . The selected labels are removed from the - Dymo Rhino 4200 Case Kit | User Guide - Page 11
these steps for each additional line. Using International Characters The printer supports the extended Latin character set using RACE technology. Similar to using of the text and the width or length of the label. You can manually enter the diameter of the cable you are creating a label for, or - Dymo Rhino 4200 Case Kit | User Guide - Page 12
Creating Breaker Labels A breaker label is a multi-cell label used to label a row of breakers. You select the breaker height and number of breakers, enter the text for each breaker, and print. The result is a long label with a text for each breaker. To create a breaker label 1 Press . 2 Select - Dymo Rhino 4200 Case Kit | User Guide - Page 13
Place the cursor at the end of the barcode text in the display. 2 Press . Using Custom Defaults Each time you create a label, you are guided through selecting the settings for the type of label you are creating. However, you can set custom defaults for each label type. Once custom default - Dymo Rhino 4200 Case Kit | User Guide - Page 14
4 Select the amount you want to increment the character and press . You can choose to increment in steps up to 10. 5 Select the number of times to increment and press . New labels are added in the display as needed to complete the series. To print multiple copies of the same serialized label - Dymo Rhino 4200 Case Kit | User Guide - Page 15
Recalling Labels Once a label is saved to the library, you can recall the label to print or edit. Recalling a label replaces the current label in the display. To recall a label 1 Press . 2 Select My Labels and press . 3 Select the label to recall and press . Deleting Labels When you no - Dymo Rhino 4200 Case Kit | User Guide - Page 16
Repeat as necessary until you are satisfied with the print quality. Cleaning Your Printer Your printer is designed to give you long and trouble-free service, while requiring very little maintenance. Clean your printer from time to time to keep it working properly. To clean the cutter blade 1 Remove - Dymo Rhino 4200 Case Kit | User Guide - Page 17
Symbols The following tables show the commonly used symbols by category. Arrows and Brackets Currency ()[ ] { } Hazard and Warning Pro AV and Security $ ¢£¥ € Electrical Numbers 17 - Dymo Rhino 4200 Case Kit | User Guide - Page 18
Terms The following lists the commonly used terms by category. Audio ANALOG RIGHT BACK SPKR CD RIGHT FRONT SPKR CENT FRONT SPKR RIGHT OUTD SPKR CENTER BACK SPKR RIGHT SIDE SPKR DIGITAL RIGHT SURR SPKR LEFT BACK SPKR SPEAKER LEFT FRONT SPKR SUBWOOFER LEFT OUTD SPKR SURROUND LEFT - Dymo Rhino 4200 Case Kit | User Guide - Page 19
Troubleshooting Review the following possible solutions if you encounter a problem while using your printer. Problem/Error Message See Cleaning Your Printer. Make sure the label passes smoothly through the label guides on the label cartridge and that the label and ribbon are taut across the mouth - Dymo Rhino 4200 Case Kit | User Guide - Page 20
number, and User Guide page number Brief description of instructions that are inaccurate or technical question, please contact Customer Support. Safety Precautions for Lithium-Ion Rechargeable use or store battery close to fire or inside the car where temperature may be over 60°C. Warning Stop - Dymo Rhino 4200 Case Kit | User Guide - Page 21
Environmental Information The equipment that you have bought requires the extraction and use of natural resources for its production. It may contain substances that are hazardous to health and the environment. In order to avoid the dissemination of those substances in our environment, and to
-
 1
1 -
 2
2 -
 3
3 -
 4
4 -
 5
5 -
 6
6 -
 7
7 -
8
-
9
-
10
-
11
-
12
-
13
-
14
-
15
-
16
-
17
-
18
-
19
-
20
-
21
 |
 |

Rhino
™
4200
User Guide