Dymo Rhino 4200 Case Kit User Guide - Page 7
Inserting and Removing the Label Cartridge, Setting the Label Width
 |
View all Dymo Rhino 4200 Case Kit manuals
Add to My Manuals
Save this manual to your list of manuals |
Page 7 highlights
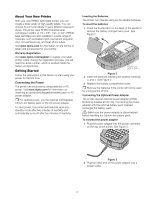
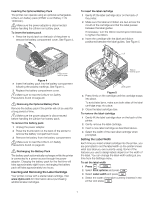
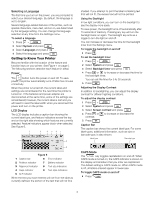
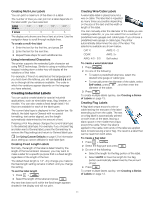
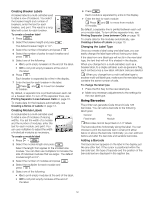
Inserting the Optional Battery Pack The printer can operate using an optional rechargeable, Lithium-ion battery pack (DYMO Li-ion Battery 7.4V 1400mAh). Make sure the power adapter is disconnected before handling the Lithium-ion battery pack. To insert the battery pack 1 Press the thumb latch on the back of the printer to remove the battery compartment cover. See Figure 4. To insert the label cartridge 1 Gently lift the label cartridge door on the back of the printer. 2 Make sure the label and ribbon are taut across the mouth of the cartridge and that the label passes between the label guides. If necessary, turn the ribbon rewind spool clockwise to tighten the ribbon. 3 Insert the cartridge with the label and ribbon positioned between the label guides. See Figure 5. Lift Press thumb latch to open Figure 4 2 Insert the battery pack into the battery compartment following the polarity markings. See Figure 4. 3 Replace the battery compartment cover. Make sure to read the Lithium-ion Safety Precautions found on page 20. Removing the Optional Battery Pack Remove the battery pack if the printer will not be used for a long period of time. Make sure the power adapter is disconnected before handling the Lithium-ion battery pack. To remove the battery pack 1 Unplug the power adapter. 2 Press the thumb latch on the back of the printer to remove the battery compartment cover. 3 Remove the battery from the battery compartment. Make sure to read the Lithium-ion Safety Precautions found on page 20. Recharging the Battery Pack The battery pack automatically recharges while the printer is connected to a power source through the power adapter. Charging the battery pack for the first time will take approximately eight hours; recharging the battery pack will take approximately two hours. Inserting and Removing the Label Cartridge Your printer comes with a starter label cartridge. Visit www.dymo.com for information about purchasing additional label cartridges. Ribbon rewind spool Label guides Figure 5 4 Press firmly on the cartridge until the cartridge snaps into place. To avoid label jams, make sure both sides of the label cartridge snap into place. 5 Close the label cartridge door. To remove the label cartridge 1 Gently lift the label cartridge door on the back of the printer. 2 Gently remove the label cartridge. 3 Insert a new label cartridge as described above. 4 Select the width of the new label cartridge when prompted. Setting the Label Width Each time you insert a label cartridge into the printer, you are prompted to set the label width so the printer knows what size label you are currently using. Some of the features you use to design labels depend on the width of the label. You can change the label width setting at any time from the Settings menu. To set the label width 1 Press + . 2 Select Print options and press . 3 Select Label width and press . 4 Select the width of the label currently inserted in the printer and press . 7
-
 1
1 -
 2
2 -
 3
3 -
 4
4 -
 5
5 -
 6
6 -
 7
7 -
 8
8 -
 9
9 -
 10
10 -
 11
11 -
 12
12 -
13
-
14
-
15
-
16
-
17
-
18
-
19
-
20
-
21
 |
 |
