Edimax EW-7416APn V2 Quick Install Guide - Page 3
Rear Panel, Antenna Connector, WPS/Reset Button, LAN Port, 5V DC, do - factory reset
 |
View all Edimax EW-7416APn V2 manuals
Add to My Manuals
Save this manual to your list of manuals |
Page 3 highlights
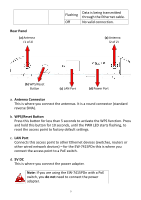
Rear Panel (a) Antenna (1 of 2) Flashing Data is being transmitted through the Ethernet cable. Off No valid connection. (a) Antenna (2 of 2) (b) WPS/Reset Button (c) LAN Port (d) Power Port a. Antenna Connector This is where you connect the antennas. It is a round connector (standard reverse SMA). b. WPS/Reset Button Press this button for less than 5 seconds to activate the WPS function. Press and hold this button for 10 seconds, until the PWR LED starts flashing, to reset the access point to factory default settings. c. LAN Port Connects this access point to other Ethernet devices (switches, routers or other wired network devices) - for the EW-7415PDn this is where you connect the access point to a PoE switch. d. 5V DC This is where you connect the power adapter. Note: If you are using the EW-7415PDn with a PoE switch, you do not need to connect the power adapter. 3
-
 1
1 -
 2
2 -
 3
3 -
 4
4 -
 5
5 -
 6
6 -
 7
7 -
 8
8 -
 9
9 -
10
-
11
-
12
-
13
-
14
-
15
-
16
-
17
-
18
-
19
 |
 |
