Edimax IC-3005 Quick Install Guide
Edimax IC-3005 Manual
 |
View all Edimax IC-3005 manuals
Add to My Manuals
Save this manual to your list of manuals |
Edimax IC-3005 manual content summary:
- Edimax IC-3005 | Quick Install Guide - Page 1
1 - Edimax IC-3005 | Quick Install Guide - Page 2
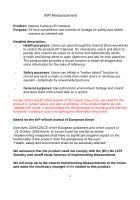
safety and health reasons as intented use. Detailed description: - Health purposes: Users can pass through the Internet (from anywhere) to control the product (IP Camera). It's intended to watch and listen to people who need to be cared for at home and automatically sends e-mails and phone alerts to - Edimax IC-3005 | Quick Install Guide - Page 3
entire cost of all necessary servicing, repair, and any incidental or consequential damages resulting from any defect in the software. Further, this company 's Manual on the CD-ROM. The software and specifications could be subjected to change without notice. Please visit our web site www.edimax.com - Edimax IC-3005 | Quick Install Guide - Page 4
For details, see the GPL Code and LGPL Code licenses. You can download the firmware-files at http://www.edimax.com under "Download" page. 4 - Edimax IC-3005 | Quick Install Guide - Page 5
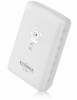
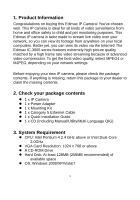
your dealer to claim the missing contents. 2. Check your package contents 1 x IP Camera 1 x Power Adapter 1 x Mounting Kit 1 x Category 5 Ethernet Cable 1 x Quick Installation Guide 1 x CD (Including Manual/Utility/Multi-Language QIG) 3. System Requirement CPU: Intel Pentium 4 2.4 GHz - Edimax IC-3005 | Quick Install Guide - Page 6
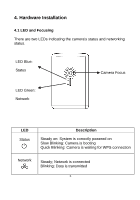
4. Hardware Installation 4.1 LED and Focusing There are two LEDs indicating the camera's status and networking status. LED Blue: Status Camera Focus LED Green: Network LED Status Description Steady on: System is correctly powered on Slow Blinking: Camera is booting Quick Blinking: Camera is - Edimax IC-3005 | Quick Install Guide - Page 7
to Default / *WPS (IC-3005Wn only) Ethernet Connector Description Connects to standard tripod / camera wall holder Connects to 5V DC power adapter Press and hold this button for more than 5 seconds to reset the camera settings to factory default. Press the WPS button (click) on the IP Cam and click - Edimax IC-3005 | Quick Install Guide - Page 8
4. Hardware Installation 1. Unpack your Edimax IP Camera from its packaging and ensure that all the items listed in Chapter 1 are there. 2. Connect the Edimax IP Camera to your network by attaching a network cable from your switch or router to the LAN port on the IP Camera. 3. Connect the power - Edimax IC-3005 | Quick Install Guide - Page 9
5. Software Installation The Installation Wizard will guide you through this simple process. Below we tell you how to get it started up. The following example is for Windows Vista. The procedure is similar for Windows 2000/XP/7. 1. Insert the Edimax CD into your CD-ROM drive. It should start up - Edimax IC-3005 | Quick Install Guide - Page 10
3. The 'Install Wizard' should take you here. Click on „Next‟ to continue your installation. 4. Click on 'Next' to move to the next step. If you wish to install the program to an alternate location, click on „Browse‟ and select a location. 10 - Edimax IC-3005 | Quick Install Guide - Page 11
5. Click „Next‟ to move on to the next step or make your selections here. 11 - Edimax IC-3005 | Quick Install Guide - Page 12
6. Click on „Install‟ to install the program. 12 - Edimax IC-3005 | Quick Install Guide - Page 13
to confirm the software installation. 8. If you have Windows Defender or other 3rd party firewall software, you may see the following or a similar message, Please click „Unblock‟ to allow your Edimax IP camera Utility to pass through the firewall. Not doing so may cause the IP camera utility to not - Edimax IC-3005 | Quick Install Guide - Page 14
9. A new folder named „Internet Camera‟ under „All Programs‟ will be created. Click on 'IP Cam Admin Utility' to connect to the IP camera and use the camera's functions directly. 14 - Edimax IC-3005 | Quick Install Guide - Page 15
10. After installation, the system will automatically run the „Administrator Utility‟. On the first page, the cameras found in your network will be listed. Select the one you wish to configure and click on the „Configure Camera‟ icon. 15 - Edimax IC-3005 | Quick Install Guide - Page 16
), and the default password is „1234‟ (changeable). Click „OK‟ to continue. 12. The program will automatically detect the IP address status of your network and suggest a free IP address for the IP Camera using DHCP. You can accept the suggested address or enter the values manually. If you enter - Edimax IC-3005 | Quick Install Guide - Page 17
(Internet Explorer 5.5 or above) to connect to the IP camera. Type the IP address (see 5.12) in the address bar of your web browser. Bookmark the address for ease of future use. You‟ll be prompted to insert a user name and password: User name: admin / Password: 1234 Once you're logged on, you will - Edimax IC-3005 | Quick Install Guide - Page 18
you see this message, click ‟Install‟. ActiveX control will be installed, allowing you to access the IP camera. You should now be able to see the images and hear the sounds captured by the Edimax IP camera. For advanced functions, please refer to instructions in the user manual (also on CD-ROM). 18 - Edimax IC-3005 | Quick Install Guide - Page 19
Satellite Earth Station Equipment) As of April 8, 2000. Safety This equipment is designed with the utmost care for the safety of those who install and use it. However, special attention must be paid to the dangers of electric shock and static electricity when working with electrical equipment. All - Edimax IC-3005 | Quick Install Guide - Page 20
20
-
 1
1 -
 2
2 -
 3
3 -
 4
4 -
 5
5 -
 6
6 -
 7
7 -
8
-
9
-
10
-
11
-
12
-
13
-
14
-
15
-
16
-
17
-
18
-
19
-
20
 |
 |

1