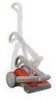
Electrolux EL5020A Owners Guide - Page 9
TROUBLESHOOT}NG, CAUTRON, theceaner
 |
UPC - 023169120020
View all Electrolux EL5020A manuals
Add to My Manuals
Save this manual to your list of manuals |
Page 9 highlights
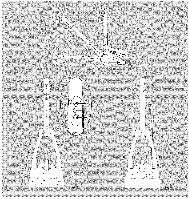
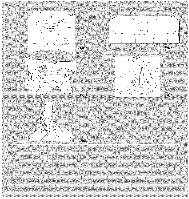
TROUBLESHOOT}NG CAUTRTOurNonf:tfheceanaenr dunplug the e ectrical cord before serv c rig, I3 _f the b_ue OPTIMUM Light is r_ot _it (Fig. 4@, one of several items needs attention. If the bag or exha sst filter needs chang ng the apprepnate Ight will illsminate (Fig 4a or 4b) See Bag and Fiter change instructions If the Carpet/Bare Floor ind cators flash on and off repeatedly (Fig 5), the br sshroll is stalled because of an obstr ction Once the obstrsction (rug fringe, sock, etc) is removed, pug in the cleaner and return to normal use I4 _f the brushroH is not turning but the carpet indicator is Iluminated, the hande is not in the operat ng position (Fg lb o lc on page 6). If the handle is foded fo ward in the storage posit on, or if it s in the vertica parked pos tion (Fig 1@, the brsshroll will not operate I5 _f the c_eaner is p_ugged in but the c_eaner will r_ot turn on and no indicators i uminate, check to ens are that the bag cover (Fig. 6) is securely in pace If it is not, atch t correctly and turn on the cleaner I6 _f the c_eaner sudder_y shuts off and none of the ind cators are illuminated, t is probable that the suct on motor has overheated Unplug the cleaner and check for a full bag, blocked fter, or other obstruction. If any of those cond tions are found, correct the problem, wait 30 minutes, then plug in the c eaner and return to normal use CHANGING THE DJST BAG (Bag styJe EL20@ CAUTION: Turn off the c eaner and unplug the e ectrical cord befoe serv c ng. When the BAG CHANGE indicator is lit: I7 Push the bag cover atch and re'_tove the cover as shown (Fg. 6). I8 Piw£ the bag collar away from the bag inet (Fig. 7) and Ift the bag by the coar tab out of the chamber. I9 Place the new bag and colar into the chambe and slide the colar into the track with the collar tab pointing @ward. Push the coar onto the bag inlet so that it is snugy in place Tuck rema nder of bag inside the bag compartment The bag collar must be secured over the inet tube for the bag cover to close preperly Note: The cleaner will not turn on unless the bad cover is securely latched in place 20 A preo-motor filter is included wth each package of replacement bags. It is a good idea to replace the fter (see Fig. 8) when yo_ instal the ast bag from your replacement bag package Slide the filter frame spward and remove the dirty filter. Install a clean fter and slide the frame back into place 21 Place the front of the bag cover into its locating slets and push to latch s_ut DEPANNAG8 ATTENTION : Arr6tez }'asp rater r arrfft et depdsez le cordon d'al mentation avant tcute intervention d'entretiemd6pannage_ I3 Si _e t@_o[n b_eu Optimum eat _tei_t (Fig 4c) il fast contr6br tout ce qu suit. Si le sac ou le filtre d'6chappement doivent 6tre remplac6s, b temon adequat s'al umera. Veir les instructions concemant le remplacement ds sac et du fitre S les temo ns de moquette/sol nu clignotent de faqon r6pet6e (Fig 5) la brosse retative est immobilis_ par un colmatage Une fois le colmatage s @pr n% (frange de tapis, chaussette, etc), prsez a nouveau I aspirateur et retournez une _t lisation normale I4 Si _a brosse rotative ne tourne pas alo[s que le temoin de moquette est all am6, le manche n'est plus ssr la position de fonctionne sent (Fig lb ou Ic a la page 6). S e manche est replie vers I avant dans la postion de rangement os s' est dans la position parquee verticale (Fig. 1a), la brosse rotative ne tosrnera pas 15 Si _'aspirateur est pris_ mais r_e s'aHume pas et s ascun t_moin ne s'allume, verifie q_e e couvercb de sac (Fig. 6) est bien assqetti en pace. S'il ne I'est pas, verrou ezo- e correctement et aumer I'aspirateur. I6 Si _'aspirateur s'a_rSte soudain et si aucsn des t_mo ns ne s'al ume, il est probable que le mote sr d'asp rat on a s _mhauf%. D_pdsez I'aspirateur et verifiez que Is sac n'est pas plen, que le filtre n'est pas colmate ou qu'il n'y a aucun autre colmatage. Si lun de ces etats est responsable de a situation, remediez au probl@se, attendez 30 minutes puis prsez I asp rateur et servez--vous en no r/salement. CHANGEMENT DE S¢,_ A R}USSI_[RE (lbj_ de sac 8_} ATTSNT_ON: Arr@tez 'asp stet _ arr6t et d_pr set le cordon d'al mentation avant route intervent on d'ent_et en--d6pannage_ Quand le temoin BAG CHANGE (Remp aceme st du sac) est allume: 17 Poussez le verrou du couvercle de sac et retirez-- e de la mani6re illustree (Fig. 6). I8 Faites pivoter le cdlier du sac a I'oppose de I'entr6e du sac (Fig. 7) et retirez Is sac du ogement en le so s evant par le collier. I9 Placez Is sac neuf et le col ier dans Is Iogement et glissez le coler dans la gl ss 6re avec I'ongbt du collier dirige vers Is haut. Poussez le collier sur I'entr6e du sac de sorte qs' tienne fermement en place. Poussez Is reste ds sac dans le Iogement du sac. Le coil er du sac doit 6tre assu]etti sur le tube d'admission pour que e couvercle de sac se ferme norma ement. Remarque : L'asp/rateur ne se met pas en mamhe s/ /e couvem/e de sac n'est pas refinement ver_oui//4, en place. 20 Un prefiltre de moteur est foum avec chaqse paquet de sacs de rechange. II vaut mieux remplacer le filtre (vor Fig. 8) quand on monte le dern er sac du paq _et de sacs de rechange. Cos ssez e chass s de filtre vers le haut et retirez le fitre sale. Montez un fltre propre et cou ssez le chassis de nouveau en place. 21 Placez le couvercb de sac avant dans ses fentes de local sation et poussez pour enclencher la fermeture. LOCAUZACION Y SOLUC_ON D_ AVER_AS PREOAUO_ON: Antes de realza e servicio, apag _e la asp radora y desenchufe e cord6n el#sctrico. I3 Si _a _uz azu_ Optimum r}o est8 e_cendida (Fig_ 4@, alguno de los elementos necesita atenci6n Ses necesario cambar la bosa o e fltro de descarga, se enciende la luz correspondiente (Fig. 4a o 4b). Vea as instrucconesdecambodebosaofltre Silos indicadores de alfombrdpiso d_ro destellan repetidamente (Fig. 5), significa que el cepo giratodo esta atascado debido a una obstrucci6n Una vez eliminada la obstrucci6n (fieco de felpudo ca cetin, etc.), enchufe la aspiradora y v selva a usada normalmente I4 Si e_ cepiHo no gila pete el indicador de alfombra est& encendido, sign fica que el mango no est{_ en posici6n de operaci6n (Fg. lb o lc de la pagina 6). Si el mango se piega haca adelante en posici6n de almacenamiento o s esta estacionado en posici6nvertica funciona (Fig. 1a) elcep o girato ono I5 Si _a aspiradora est_ e_chufada pete r_o se e_cier_de y no se i uminan los ndicadores, verifique qse a cubierta de la bolsa (Fg. 6) este firmemente colocada en su sitio. I6 Si _a aspiradora se detier_e bruscame_te y no queda encendido ninguno de los indicadores, es probable que el motor de s _cci6n se haya recalentado Desenchufe la aspiradora y ver f que si la boba esta Ilena, el filtro esta bloq seado o hay alguna otra obstrucci6n. Si se descubre agna de estas condiciones, cordja el prob ema, espe_ 30 m nutos, hego enchufe Ja aspiradora y wselva a usarla norma mente CAMBO DE LA BOLSA RARAPOL'.JO(Bol_ ti_ E_} PREOAUOION: Antes de realizar e servicio, apague la aspkadora y desench ]fee cord6n e _sctrico_ Cuando se enciende e ind cador BAG CHANGE (Cambiar be sa): 17 Pres one la traba de la cubierta de la bolsa y retire la cubierta come se muestra (Fig. 6). I8 Gre el aro de la boba alejandolo de la entrada de a misma (Fg 7) y levante la bolsa tom{]ndola per la leng0eta de aro para extraerla de la camara I9 Coloq se la nueva boba y el aro en la camara y deslice el aro a su pista con la leng0eta del mismo apuntando hacia arriba Presione el aro hacia adentro de la entrada de la boba de mode que quede colocado a]ustadamente en su sitio Introduzca el resto de a boba en el compartimiento de la misma. Para q_e la cubierta de la bosa cierre correctamente, el aro de la boba debe estar fi]ado sobre el tube de entrada Nora: La aspk_dora no se enc/ende s/ la cub/erta de la bo/sa no eat4 fir_cnemente tr_bada en su sit/(}. 20 Se inchye sn prefiltro del motor con cada paquete de bobas de reemplazo Es buena idea reemp azar el filtre (yea la Fig 8) cuando instala la Otma bolsa de s_ paquete de bobas de reemp azo Desce el bastidor del filtro haca arriba y retire el fltro sucio Instale un filtro Impio y deslice el bastidor a su sitio 21 Coloque el frente de la c _bierta de la boba en sus ranuras gua y presi6ne a para cerar la traba
-
 1
1 -
2
-
3
-
 4
4 -
 5
5 -
 6
6 -
 7
7 -
 8
8 -
 9
9 -
 10
10 -
 11
11 -
 12
12 -
 13
13 -
 14
14 -
15
-
16
 |
 |
