Electrolux ELFW7537AT Complete Owners Guide English
Electrolux ELFW7537AT Manual
 |
View all Electrolux ELFW7537AT manuals
Add to My Manuals
Save this manual to your list of manuals |
Electrolux ELFW7537AT manual content summary:
- Electrolux ELFW7537AT | Complete Owners Guide English - Page 1
Use & Care Manual Washing Machine Manuel d'utilisation et d'entretien Machine à laver Manual de uso y cuidado Lavadora EN 2 FR 52 SP 108 electroluxappliances.com\register - Electrolux ELFW7537AT | Complete Owners Guide English - Page 2
. This Use & Care Manual is part of our commitment to customer satisfaction and product quality throughout the service life of your new appliance Instructions 32 Purchase date Normal Operating Sounds 37 Stain Removal Guide 38 Electrolux serial number Care and Cleaning 40 Troubleshooting - Electrolux ELFW7537AT | Complete Owners Guide English - Page 3
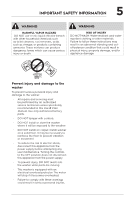
IMPORTANT SAFETY INFORMATION 3 Important safety instructions Safety precautions DO NOT attempt to install or operate your unit until you have read the safety precautions in this manual. Safety items throughout this manual are labeled with a Danger, Warning, or Caution based on the risk type. - Electrolux ELFW7537AT | Complete Owners Guide English - Page 4
of child entrapment Child entrapment and suffocation are not problems of the past. Junked or abandoned washers and dryers service person in accordance with local codes. Installation instructions are packed in the washer for installer's reference. Refer to the Installation sections of this manual - Electrolux ELFW7537AT | Complete Owners Guide English - Page 5
repellent clothing or other materials. Failure to follow these instructions may result in an abnormal vibrating and outof-balance condition All repairs and servicing must be performed by an authorized service technician unless specifically recommended in this Use & Care Manual. Use only authorized - Electrolux ELFW7537AT | Complete Owners Guide English - Page 6
6 FEATURES 2 1 15 16 45 3 7 6 8 9 10 14 12 13 11 Not all cycles, options, or features listed are available on every model. 1. Door striker 2. Reversible door 3. Laundry products dispenser 4. LED Display 5. Cycle Display 6. Drum light (select models) 7. Control lock 8. Serial and model # - Electrolux ELFW7537AT | Complete Owners Guide English - Page 7
support (under wash tub) removed and stored ˆ Shipping bolts and spacers removed from rear of appliance and stored ˆ Hole plugs (shipped in manual is sitting solid on all corners Door Reversal ˆ Follow detailed instructions in this manual ˆ Test hinge and latch for function Water Supply ˆ Use - Electrolux ELFW7537AT | Complete Owners Guide English - Page 8
8 PRE-INSTALLATION REQUIREMENTS NOTE Because of potentially inconsistent voltage capabilities, the use of this washer with power created by gas powered generators, solar powered generators, wind powered generators or any other generator other than the local utility company is not recommended. - Electrolux ELFW7537AT | Complete Owners Guide English - Page 9
PRE-INSTALLATION REQUIREMENTS 9 96" (244 cm) max. 24" (61 cm) min. 60 sq. Inches NOTE Drain hose length is 59 in. (150 cm). For installations requiring a longer drain hose, use hose P/N 137098000, available from an authorized parts distributor. 120 sq. Inches Equally Divided Split Vent Door - Electrolux ELFW7537AT | Complete Owners Guide English - Page 10
10 PRE-INSTALLATION REQUIREMENTS 120 sq. Inches min. Louvered Opening Louvered Door MIN. INSTALLATION CLEARANCES Inches (cm) Sides Rear Top Front Alcove/ recess 0" (0 cm) 0" (0 cm) 0" (0 cm) Open Closet with 0" 0" 0" 1" door vent (0 cm) (0 cm) (0 cm) (2.5 cm) Closet with 1" 1" 1" 1" - Electrolux ELFW7537AT | Complete Owners Guide English - Page 11
11 PRE-INSTALLATION REQUIREMENTS Washer dimensions 53.5" (136 cm)* to clear open door 32" (81.25 cm)* to front of closed door water supply connection on rear of unit drain hose on rear of unit3 freestand washer on floor floor line washer mounted on optional pedestal floor line 27.0" (68.5 cm) - Electrolux ELFW7537AT | Complete Owners Guide English - Page 12
12 INSTALLATION Unpacking the washer WARNING ELECTRICAL SHOCK HAZARD Improper connection of the equipment grounding conductor can result in a risk of electrical shock. Check with a licensed electrician if you are in doubt as to whether the appliance is properly grounded. 1. Temporarily remove door - Electrolux ELFW7537AT | Complete Owners Guide English - Page 13
shipping hole. Installing hole plugs HOT Water Hose CALIENTE CHAUDE COLD Water Hose FRIA FROIDE Locate hole plugs in the small bag supplied with washer instruction manuals. Insert them in the holes in the washer back panel where the shipping hardware has been removed. x7 - Electrolux ELFW7537AT | Complete Owners Guide English - Page 14
four legs. Keep the leveling leg extension at a minimum for best performance of the washer. NOTE For pedestal installations, see additional installation instructions included with the pedestal. Connecting the water 1. Run some water from the hot and cold faucets to flush the water lines and remove - Electrolux ELFW7537AT | Complete Owners Guide English - Page 15
a standpipe and secure the drain hose with the cable tie (provided in the manual bag) to the standpipe, inlet hose, laundry tub, etc. so the hose during initial operation, please review the Troubleshooting section before calling for service. 6. Place these instructions in a location near the washer - Electrolux ELFW7537AT | Complete Owners Guide English - Page 16
WARNING ELECTRICAL SHOCK HAZARD Failure to disconnect power source before servicing could result in personal injury or even death. Removing hinge screws with #2 square bit driver. Save for reinstalling later. 4. While supporting the door with one hand, pinch the tabs to release the plastic terminal - Electrolux ELFW7537AT | Complete Owners Guide English - Page 17
cover upward to release it from the front panel. You may have to use a non-scratching plastic knife if you are unable to release it manually. Then, slide the cover down slightly and remove it from the front panel. 2 22 Coarse Thread Reversing door assembly 1. Locate nine screws on inner door - Electrolux ELFW7537AT | Complete Owners Guide English - Page 18
18 INSTALLATION 3. Make sure the alignment tabs reengage. 3. Insert hinge locating pins into the hole that were previously covered by the plastic hole cover. Press on the face of the hinge to snap the other locating pins into place. Connect to Notches 4. Reattach the inner door to the outer door - Electrolux ELFW7537AT | Complete Owners Guide English - Page 19
19 ACCESSORIES AND REPLACEMENT PARTS Accessories MATCHING STORAGE PEDESTAL* White Pedestal - P/N EPWD257UIW Titanium Pedestal - P/N EPWD257UTT A storage pedestal accessory, specifically designed for this washer may be used to elevate the washer for ease of use. This pedestal will add about 15" (38 - Electrolux ELFW7537AT | Complete Owners Guide English - Page 20
SMARTBOOST LUXCARE PLUS WASH STAINSOAK CYCLES ANY STAIN BLOOD CHOCOLATE CALL SERVICE MIN DOO R CLOSE DOOR POWER OPTIC WHITES HEAVY DUTY NORMAL ACTIVEWEAR set/select 9 cancel 10 start 11 PODS® (select models) This manual covers many models and not all cycles, options, or features listed - Electrolux ELFW7537AT | Complete Owners Guide English - Page 21
21 CONTROLS AND SETTINGS Settings chart - 300 series washer LUXCARE WASH POWER CALL SERVICE MIN DOO R CLOSE DOOR WHITES HEAVY DUTY HOT NORMAL 20MIN FAST WASH DELICATES WARM COOL RINSE & SPIN ECO COLD CLEAN WASHER TEMP HEAVY HIGH NORMAL - Electrolux ELFW7537AT | Complete Owners Guide English - Page 22
22 CONTROLS AND SETTINGS Settings chart - 400 series washer LUXCARE WASH STAINTREAT CYCLES CALL SERVICE MIN DOO R CLOSE DOOR WHITEST WHITES SANITIZE HEAVY DUTY HOT NORMAL 18MIN FAST WASH DELICATES WARM COOL RINSE & SPIN ECO COLD CLEAN WASHER TEMP SOLID - Electrolux ELFW7537AT | Complete Owners Guide English - Page 23
23 CONTROLS AND SETTINGS Settings chart - 500 series washer LUXCARE PLUS WASH STAINTREAT II CYCLES ANY STAIN BLOOD CHOCOLATE CALL SERVICE MIN DOO R CLOSE DOOR POWER WHITEST WHITES HEAVY DUTY NORMAL ACTIVEWEAR COLORS TOWELS 15MIN FAST WASH DELICATES RINSE & SPIN CLEAN WASHER SANITIZE HOT - Electrolux ELFW7537AT | Complete Owners Guide English - Page 24
24 CONTROLS AND SETTINGS Settings chart - 600 series washer SMARTBOOST LUXCARE PLUS WASH STAINSOAK CYCLES ANY STAIN BLOOD CHOCOLATE CALL SERVICE MIN DOO R CLOSE DOOR POWER OPTIC WHITES HEAVY DUTY NORMAL ACTIVEWEAR COLORS TOWELS 15MIN FAST WASH DELICATES HAND WASH RINSE & SPIN CLEAN WASHER - Electrolux ELFW7537AT | Complete Owners Guide English - Page 25
settings. NOTE Turning the cycle selector knob without canceling the cycle first, will not change the cycle. For best results Follow the fabric care label instructions on items to be washed. - Electrolux ELFW7537AT | Complete Owners Guide English - Page 26
spin speeds Rinse and spin only (cold rinse or add fabric softener) • cold temperature See "Care and Cleaning" section of the manual *All cycles not available on every model. See Page 19. Cycle settings Washing temperature The appropriate washing temperature will automatically be indicated for - Electrolux ELFW7537AT | Complete Owners Guide English - Page 27
is paused or canceled while the internal drum temperature is above 130°F (55°C), the door will remain locked until it cools. You may manually perform a rinse & spin cycle to cool the internal temperature sooner. allergen (on select models) Removes dust mites and dander from household objects. The - Electrolux ELFW7537AT | Complete Owners Guide English - Page 28
, use one of the options below to deal with tough stains on your garments. See step 5 in the Operating Your Washer section in this manual for details on adding stain additives to the dispenser. Cycle options The default options for each cycle will automatically be chosen when a cycle is selected - Electrolux ELFW7537AT | Complete Owners Guide English - Page 29
will be elevated. • If the wash cycle is paused or cancelled during a steam cycle, the door will remain locked until it cools. You may manually perform a rinse & spin cycle to cool the internal temperature sooner. • During a steam cycle, steam exiting from the rear vent of the washer is normal - Electrolux ELFW7537AT | Complete Owners Guide English - Page 30
button. Shut off each water supply valve and attach each supply hose to the correct inlet connection on the washer. ANY STAIN BLOOD CHOCOLATE CALL SERVICE MIN DOO R CLOSE DOOR Icons may vary according to model. The estimated total cycle time will be displayed when the cycle is selected. The - Electrolux ELFW7537AT | Complete Owners Guide English - Page 31
31 CONTROLS AND SETTINGS Door stand ventilation Help prevent odor buildup and reduce humidity between washes by utilizing your washer's door stand ventilation feature. Open the door, locate the stand below the door latch and rotate the stand counterclockwise to unlock it. NOTE If unable to rotate - Electrolux ELFW7537AT | Complete Owners Guide English - Page 32
injury to persons, read the Important Safety Instructions in this Use & Care Manual before operating your washer. WARNING CAUTION RISK See stain treatment function in Cycle Options for your particular model or Stain Removal Guide for more information. • Combine large and small items in a load. - Electrolux ELFW7537AT | Complete Owners Guide English - Page 33
available with every cycle. If a setting or option is not available for the cycle selected, the indicator will not light. Follow fabric care label instructions on items to be washed. Make sure that the PODS® option is selected when using models that have a separate detergent pack compartment. See - Electrolux ELFW7537AT | Complete Owners Guide English - Page 34
34 OPERATING INSTRUCTIONS Adding laundry products Laundry product dispensers Product dispenser - three compartment dispenser (300 Series) Detergent Liquid or Powder Liquid Bleach Liquid Fabric Softener Product dispenser - Adaptive - Electrolux ELFW7537AT | Complete Owners Guide English - Page 35
not over the blue cover. • Amount of detergent may need to be adjusted for water temperature, water hardness, and load size. Follow manufacturers instructions. IMPORTANT DO NOT mix liquids and powders. IMPORTANT DO NOT exceed MAX fill line. IMPORTANT Pour liquid into the liquid detergent cup. DO - Electrolux ELFW7537AT | Complete Owners Guide English - Page 36
the PODS® option has been chosen, the washer will retain the PODS® setting until manually changed. • The washer will ALWAYS use a small amount of HOT water to dissolve options for your model. • See Stain Removal Guide in this instruction for additional suggestions. IMPORTANT Use of multi-product - Electrolux ELFW7537AT | Complete Owners Guide English - Page 37
Abnormal, on-going sounds may be an indication of a pending washer failure and should be investigated by a qualified technician. Refer to NOISE section of the Troubleshooting section of this manual. - Electrolux ELFW7537AT | Complete Owners Guide English - Page 38
38 STAIN REMOVAL GUIDE Stain removal procedures To reduce the risk of fire or serious injury to persons or property, comply with the basic warnings listed below: • Read and comply with all instructions on stain removal products. • Keep stain removal products in their original labeled containers and - Electrolux ELFW7537AT | Complete Owners Guide English - Page 39
39 STAIN REMOVAL GUIDE Stain removal suggestions STAIN TREATMENT Adhesive tape, gum, Apply ice. Scrape off excess. Place stain down on paper towels. Saturate rubber cement with prewash stain - Electrolux ELFW7537AT | Complete Owners Guide English - Page 40
40 CARE AND CLEANING Inside routine cleaning (preventative) To help prevent odors or humidity accumulation leave the door open with the door stand ventilation feature (on select models) for a few hours after use or whenever the washer is not in use. CAUTION WARNING HARMFUL VAPOR HAZARD DO NOT use - Electrolux ELFW7537AT | Complete Owners Guide English - Page 41
41 CARE AND CLEANING 4. Rinse the drawer and inserts with hot tap water to remove traces of accumulated powders and liquids. Large amounts of fabric softener residue may indicate improper dilution or more frequent cleaning is required. 5. To clean the drawer opening, use a small brush to clean the - Electrolux ELFW7537AT | Complete Owners Guide English - Page 42
cleaning of rubber gasket folds isn't done, and severe odor or residue buildup have developed, follow the below cleaning procedure to help alleviate the problem. Cleaning procedure-washer drum Ensure the wash tub is empty. Open the detergent drawer and pour eight cups of bleach into the Main Wash - Electrolux ELFW7537AT | Complete Owners Guide English - Page 43
43 CARE AND CLEANING Outside routine cleaning Winterizing instructions • When washing is completed, wipe top and sides of washer with a damp can occur or moved in freezing temperatures, follow these winterizing instructions to prevent damage to the washer: RV ANTIFREEZE Follow WINTERIZING - Electrolux ELFW7537AT | Complete Owners Guide English - Page 44
every 5 years to reduce the risk of hose failures. When replacing hoses, refer to the Installation sections of this Use & Care Manual for proper installation instructions. DO NOT overtighten or cross thread the fittings. DO NOT allow the hose to rub against sharp objects. Always ensure the hose - Electrolux ELFW7537AT | Complete Owners Guide English - Page 45
45 TROUBLESHOOTING Common washing inquiries Many washing problems involve poor soil and stain removal, residues of lint and scum, and fabric damage. For satisfactory washing results, follow these suggestions provided by The Soap and Detergent Association. PROBLEM Blue stains Discoloration, graying - Electrolux ELFW7537AT | Complete Owners Guide English - Page 46
46 TROUBLESHOOTING PROBLEM POSSIBLE CAUSES SOLUTIONS PREVENTIVE MEASURES Pilling • Pilling is normal • Use a lint brush or • Use lines. stains. It may intensify • Drain water heater discoloration. occasionally. • For an ongoing problem, install an iron filter in your water supply system. - Electrolux ELFW7537AT | Complete Owners Guide English - Page 47
47 TROUBLESHOOTING PROBLEM Residue stain buildup in gasket Residue stain buildup in dispenser drawer or detergent pack not dissolved. Water in fold of flexible gasket Odor POSSIBLE CAUSES • - Electrolux ELFW7537AT | Complete Owners Guide English - Page 48
TROUBLESHOOTING Before calling Before calling for service, review this list. It may save both time and expense. The list includes common occurrences that are not the result of defective workmanship or materials in this washer. PROBLEM not been removed during manual for removing shipping bolts - Electrolux ELFW7537AT | Complete Owners Guide English - Page 49
49 TROUBLESHOOTING PROBLEM POSSIBLE CAUSES SOLUTIONS Washer does not start • Electrical power It will automatically restart after a cool down period of up to 30 minutes (if washer has not been manually turned off). • Door may be open. Unit will not • Ensure door is closed. operate with door open. - Electrolux ELFW7537AT | Complete Owners Guide English - Page 50
50 TROUBLESHOOTING PROBLEM POSSIBLE CAUSES SOLUTIONS Warm or hot water is not hot enough may be unable to support more than 1 use at a time. • Clean and straighten the drain hose. • Reduce standpipe height to less than 8' (2.4 m). See Installation sections of this manual. • Unclog drain pipes - Electrolux ELFW7537AT | Complete Owners Guide English - Page 51
materials or workmanship, or for appliances not in ordinary household use or used other than in accordance with the provided instructions. 7. Service calls to correct the installation of your appliance or to instruct you how to use your appliance. 8. Expenses for making the appliance accessible for - Electrolux ELFW7537AT | Complete Owners Guide English - Page 52
A20448601 (March 2021) electroluxappliances.com
-
 1
1 -
 2
2 -
 3
3 -
 4
4 -
 5
5 -
 6
6 -
 7
7 -
8
-
9
-
10
-
11
-
12
-
13
-
14
-
15
-
16
-
17
-
18
-
19
-
20
-
21
-
22
-
23
-
24
-
25
-
26
-
27
-
28
-
29
-
30
-
31
-
32
-
33
-
34
-
35
-
36
-
37
-
38
-
39
-
40
-
41
-
42
-
43
-
44
-
45
-
46
-
47
-
48
-
49
-
50
-
51
-
52
 |
 |
electroluxappliances.com\register
Use & Care Manual
EN
2
Washing Machine
Manuel d’utilisation et d’entretien
FR
52
Machine à laver
Manual de uso y cuidado
SP
108
Lavadora