Electrolux ELFW7537AT Complete Owners Guide English - Page 18
Reinstalling door assembly, Verify reversed door operation, correct door lock operation by starting
 |
View all Electrolux ELFW7537AT manuals
Add to My Manuals
Save this manual to your list of manuals |
Page 18 highlights
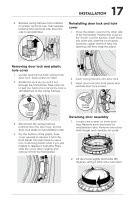
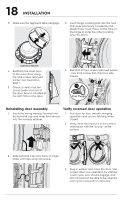
18 INSTALLATION 3. Make sure the alignment tabs reengage. 3. Insert hinge locating pins into the hole that were previously covered by the plastic hole cover. Press on the face of the hinge to snap the other locating pins into place. Connect to Notches 4. Reattach the inner door to the outer door using the nine screws removed earlier. See illustration, Step 1. 5. Check to verify that the scoop (wider section) of the door bowl is situated at the BOTTOM of the door. 4. Reinstall all four screws removed earlier - two front screws first, then two side screws. 13 x4 Fine Thread 4 2 Reinstalling door assembly 1. Insert the wiring harness terminal into the terminal cap and wrap the harness into the harness retainer. Verify reversed door operation 1. Test door for free, smooth swinging operation and secure latching when closed. 2. Verify inner door bowl is in the correct orientation with the "scoop" at the bottom. 2. Slide terminal cap onto back of hinge plate until tabs snap into place. 3. Plug in washer and close the door. Test correct door lock operation by starting a test cycle: lock should engage, and door should not be able to be opened until cycle is paused or canceled.
-
 1
1 -
2
-
3
-
4
-
5
-
6
-
7
-
8
-
9
-
10
-
11
-
12
-
 13
13 -
 14
14 -
 15
15 -
 16
16 -
 17
17 -
 18
18 -
 19
19 -
 20
20 -
 21
21 -
 22
22 -
 23
23 -
24
-
25
-
26
-
27
-
28
-
29
-
30
-
31
-
32
-
33
-
34
-
35
-
36
-
37
-
38
-
39
-
40
-
41
-
42
-
43
-
44
-
45
-
46
-
47
-
48
-
49
-
50
-
51
-
52
 |
 |
