Electrolux ELFW7537AT Complete Owners Guide English - Page 17
INSTALLATION, Reinstalling door lock and hole, cover, Reversing door assembly
 |
View all Electrolux ELFW7537AT manuals
Add to My Manuals
Save this manual to your list of manuals |
Page 17 highlights
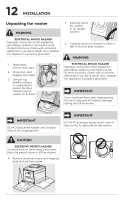
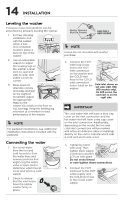
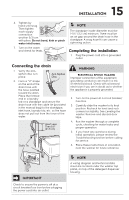
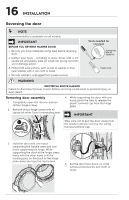
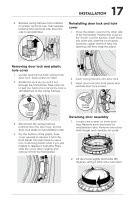
17 INSTALLATION 6. Release wiring harness from retainer on plastic terminal cap. Then release terminal from terminal cap. Save the cap to reinstall later. Reinstalling door lock and hole cover 1. Move the plastic cover to the other side of the front panel. Position the cover so the "hook" is at the bottom. Insert hook into lower slot, slide the cover down, and press upper retention tabs into opening until they snap into place. 2 Removing door lock and plastic hole cover 1. Locate and remove both screws from door lock. Save screws for later. 2. Rotate the lock as you pull it out through the front panel. Take care not to pull too hard or too far as the lock is still attached to the wiring harness. 1 2. Insert wiring harness into door lock. 3. Insert door lock into front panel and reinstall door lock screws. 11 x2 Coarse Thread 3. Disconnect the wiring harness terminal from the door lock. Set the door lock aside for reinstallation later. 4. Pry the bottom of the plastic hole cover upward to release it from the front panel. You may have to use a non-scratching plastic knife if you are unable to release it manually. Then, slide the cover down slightly and remove it from the front panel. 2 22 Coarse Thread Reversing door assembly 1. Locate nine screws on inner door ring. Remove each and save for reinstallation later. Remove inner door (with hinge) and carefully set aside. 2. Lift door bowl slightly and rotate 180 degrees, setting it back onto outer door. 1
-
 1
1 -
2
-
3
-
4
-
5
-
6
-
7
-
8
-
9
-
10
-
11
-
 12
12 -
 13
13 -
 14
14 -
 15
15 -
 16
16 -
 17
17 -
 18
18 -
 19
19 -
 20
20 -
 21
21 -
 22
22 -
23
-
24
-
25
-
26
-
27
-
28
-
29
-
30
-
31
-
32
-
33
-
34
-
35
-
36
-
37
-
38
-
39
-
40
-
41
-
42
-
43
-
44
-
45
-
46
-
47
-
48
-
49
-
50
-
51
-
52
 |
 |
