Epson 2180 User Manual - Page 70
do not lock it. Move the paper support midway between
 |
UPC - 010343815766
View all Epson 2180 manuals
Add to My Manuals
Save this manual to your list of manuals |
Page 70 highlights
5. Slide the left sprocket to the left margin of the paper using the scale on the paper guide as a guide. (Printing starts at the arrow mark.) Then push the lever back to lock it in place. 2 Note: See "Paper alignment" and "Printable area" in Appendix C for more information on the left margin position. 6. Push back the left sprocket lever to lock it in place. 7. Slide the right sprocket to match the width of your paper, but do not lock it. Move the paper support midway between the two sprockets as shown above. Then open both sprocket covers. 8. Make sure your paper has a clean, straight edge. Printing on Continuous Paper 2-25
-
 1
1 -
2
-
3
-
4
-
5
-
6
-
7
-
8
-
9
-
10
-
11
-
12
-
13
-
14
-
15
-
16
-
17
-
18
-
19
-
20
-
21
-
22
-
23
-
24
-
25
-
26
-
27
-
28
-
29
-
30
-
31
-
32
-
33
-
34
-
35
-
36
-
37
-
38
-
39
-
40
-
41
-
42
-
43
-
44
-
45
-
46
-
47
-
48
-
49
-
50
-
51
-
52
-
53
-
54
-
55
-
56
-
57
-
58
-
59
-
60
-
61
-
62
-
63
-
64
-
 65
65 -
 66
66 -
 67
67 -
 68
68 -
 69
69 -
 70
70 -
 71
71 -
 72
72 -
 73
73 -
 74
74 -
 75
75 -
76
-
77
-
78
-
79
-
80
-
81
-
82
-
83
-
84
-
85
-
86
-
87
-
88
-
89
-
90
-
91
-
92
-
93
-
94
-
95
-
96
-
97
-
98
-
99
-
100
-
101
-
102
-
103
-
104
-
105
-
106
-
107
-
108
-
109
-
110
-
111
-
112
-
113
-
114
-
115
-
116
-
117
-
118
-
119
-
120
-
121
-
122
-
123
-
124
-
125
-
126
-
127
-
128
-
129
-
130
-
131
-
132
-
133
-
134
-
135
-
136
-
137
-
138
-
139
-
140
-
141
-
142
-
143
-
144
-
145
-
146
-
147
-
148
-
149
-
150
-
151
-
152
-
153
-
154
-
155
-
156
-
157
-
158
-
159
-
160
-
161
-
162
-
163
-
164
-
165
-
166
-
167
-
168
-
169
-
170
-
171
-
172
-
173
-
174
-
175
-
176
-
177
-
178
-
179
-
180
-
181
-
182
-
183
-
184
-
185
-
186
-
187
-
188
-
189
-
190
-
191
-
192
-
193
-
194
-
195
-
196
-
197
-
198
-
199
-
200
-
201
-
202
-
203
-
204
-
205
-
206
-
207
-
208
-
209
-
210
-
211
-
212
-
213
-
214
-
215
-
216
-
217
-
218
-
219
-
220
-
221
-
222
-
223
-
224
-
225
-
226
-
227
-
228
-
229
 |
 |

2
Printing on Continuous Paper
2-25
5.
Slide the left sprocket to the left margin of the paper using the
scale on the paper guide as a guide. (Printing starts at the
arrow mark.) Then push the lever back to lock it in place.
Note:
See “Paper alignment” and “Printable area” in Appendix C for
more information on the left margin position.
6.
Push back the left sprocket lever to lock it in place.
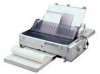
7.
Slide the right sprocket to match the width of your paper, but
do not lock it. Move the paper support midway between the
two sprockets as shown above. Then open both sprocket
covers.
8.
Make sure your paper has a clean, straight edge.