Epson 5700i User Setup Information
Epson 5700i - EPL B/W Laser Printer Manual
 |
UPC - 010343818620
View all Epson 5700i manuals
Add to My Manuals
Save this manual to your list of manuals |
Epson 5700i manual content summary:
- Epson 5700i | User Setup Information - Page 1
- Epson 5700i | User Setup Information - Page 2
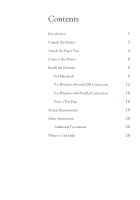
2 Attach the Paper Tray 4 Connect the Printer 6 Install the Software 8 For Macintosh 8 For Windows 98 with USB Connection 12 For Windows with Parallel Connection 16 Print a Test Page 18 System Requirements 19 Safety Instructions 20 Additional Precautions 26 Where to Get Help 28 - Epson 5700i | User Setup Information - Page 3
in this guide to get your EPSON EPL-5700i up and running: 1 Unpack the Printer 2 Attach the Paper Tray 3 Connect the Printer 4 Install the Software Also be sure to check the System Requirements and follow all the Safety Instructions in the back of this guide. See your Reference Guide for detailed - Epson 5700i | User Setup Information - Page 4
a USB or parallel cable to connect the printer to your computer. EPSON® EPL-5700i EPSON® EPL-5700i Setup Guide Setup Guide Reference Guide Reference Guide Printer Software CD-ROM power cord printer paper tray developer cartridge and photoconductor unit (both already installed) 2 Remove - Epson 5700i | User Setup Information - Page 5
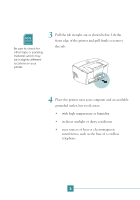
tape or packing material, which may be in slightly different locations on your printer. 3 Pull the tab straight out as shown below. Lift the front edge of the printer and pull firmly to remove the tab. 4 Place the printer near your computer and an available grounded outlet, but avoid areas: • with - Epson 5700i | User Setup Information - Page 6
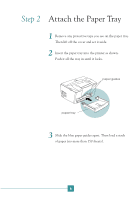
any protective tape you see on the paper tray. Then lift off the cover and set it aside. 2 Insert the paper tray into the printer as shown. Push it all the way in until it locks. paper guides paper tray 3 Slide the blue paper guides apart. Then load a stack of paper (no more than 150 sheets). 4 - Epson 5700i | User Setup Information - Page 7
4 Place the cover on the paper tray. 5 Raise the output tray extension until you feel it lock. 5 - Epson 5700i | User Setup Information - Page 8
Step 3 Connect the Printer 1 Make sure the printer and computer are turned off. CAUTION Avoid using outlets on the same circuit with large motors or other major appliances that might disrupt the power supply. 2 Plug the power cord into the back of the printer. Then plug the other end into a - Epson 5700i | User Setup Information - Page 9
cable, plug the square end of the cable into your printer as shown. Then plug the other end into your computer's USB connector or a first-tier USB hub. • If you're using a parallel cable, connect it to your printer as shown. Then connect the other end to your computer's main parallel connector (LPT1 - Epson 5700i | User Setup Information - Page 10
CAUTION Turn off all virus protection programs before you install your printer software. Follow the steps below to install the software that makes your printer work. For Windows® 98 with a USB connection, see page 12. For Windows with a parallel connection, see page 16. For Macintosh® If you - Epson 5700i | User Setup Information - Page 11
until you see the desktop icons. Then turn on your EPSON printer. 3. Insert your printer software CD-ROM. After a moment, the CD-ROM opens on your desktop. 4. Double-click your printer's installer icon. You see the following screen: 5. Click Install, then on the next screen click Continue. 6. After - Epson 5700i | User Setup Information - Page 12
After installing the printer software, you need to select your printer in the Chooser: 1. Make sure your printer is on. 2. From the Apple menu, select Chooser. 3. Click the EPL-5700i icon and make sure your printer's USB port is selected. 4. Turn on background printing if you want. When background - Epson 5700i | User Setup Information - Page 13
To make sure your printer is installed correctly, you can print a test page: 1. With the Chooser open, click Setup. 2. Click Status Sheet. 3. To print the status sheet, click Status Sheet. 4. After the status sheet prints, close the Chooser. 11 - Epson 5700i | User Setup Information - Page 14
For Windows 98 with USB Connection 1. Make sure your printer and computer are connected and turned off. 2. Turn on your computer and printer, and wait until you see the Add New Hardware Wizard: 3. Insert your printer software CD-ROM and click Next. You see the following screen: 12 - Epson 5700i | User Setup Information - Page 15
4. Select Search for the best driver for your device and click Next. You see the following screen: 5. Select Specify a location, then click Browse to locate the Win98 folder on your CD-ROM. 6. Click Next. Windows finds the USB software. 13 - Epson 5700i | User Setup Information - Page 16
7. Click Next. Windows finishes installing the USB software. 8. At the final screen, click Finish. Windows detects your printer and displays the following screen: 14 - Epson 5700i | User Setup Information - Page 17
Next to install your printer driver. 10. Select Search for the best driver for your device and click Next. 11. Make sure the Win98 folder is selected under Specify a location. Then click Next and follow the on-screen instructions to finish installing your printer software. 12. When installation is - Epson 5700i | User Setup Information - Page 18
Connection 1. Turn on your computer and wait until you see the Windows desktop icons, then insert your printer software CD-ROM. 2. Double-click the My Computer icon on your desktop, double-click the Epson CD-ROM icon, then double-click Setup.exe. You see the EPSON Printer Utility Setup screen: 16 - Epson 5700i | User Setup Information - Page 19
3. Make sure your printer is selected in the setup screen and click OK. When installation is complete, you see the following: 4. Click OK. 5. Remove the CD-ROM from your CD-ROM drive. 6. Restart your system. If you want to test your printer to make sure it's installed correctly, continue on to the - Epson 5700i | User Setup Information - Page 20
. Print a Test Page To make sure your printer is installed correctly, you can print a test page by following these steps: 1. Make sure your printer is turned on. 2. Click Start, point to Settings, and click Printers. 3. Right-click the EPL-5700i printer icon and choose Properties. 4. Click Basic - Epson 5700i | User Setup Information - Page 21
better display adapter and monitor • Double-speed (or faster) CD-ROM drive for installing the printer software • Shielded USB "AB" cable from Series A (computer) to Series B (printer), up to 6.5 feet (2 meters) long For Windows Users: • IBM® compatible PC with a 100 MHz Pentium processor or higher - Epson 5700i | User Setup Information - Page 22
Safety Instructions Follow these precautions when operating your printer: Laser Safety This printer is certified as a Class 1 laser product under the U.S. Department of Health and Human Services (DHHS) Radiation Performance Standard according to the Radiation Control for Health and Safety Act of - Epson 5700i | User Setup Information - Page 23
than those specified in this guide may result in hazardous radiation exposure. Your printer is a Class 1 laser product as defined in IEC Class IIIb Laser Diode. The Laser Diode and Scanning Polygon Mirror are incorporated in the print head unit. The print head unit is NOT A FIELD SERVICE ITEM. The - Epson 5700i | User Setup Information - Page 24
time-weighted concentration over an eight (8) hour period. The EPL-5700i laser printer generates less than 0.01 ppm for eight hours of continuous 10' x 12'). Minimize the risk To minimize the risk of exposure to ozone, you should avoid the following conditions: • Use of multiple laser printers - Epson 5700i | User Setup Information - Page 25
Contact • Avoid touching the components inside the printer unless instructed to do so in this guide. • Try not to touch the toner and avoid all contact with your eyes. • Follow all warnings and instructions marked on the printer. • Unplug the printer from the electrical outlet before cleaning. Use - Epson 5700i | User Setup Information - Page 26
you are unable to insert the plug into the outlet, contact an electrician. • Do not put your printer where the power cord will be stepped on. • If you use an extension cord with the printer, make sure the total ampere rating of the devices plugged into the extension cord does not exceed - Epson 5700i | User Setup Information - Page 27
liquid of any kind on the printer. • Except as specifically explained in this guide, do not attempt to service this product yourself. Opening or removing covers that are marked "Do Not Remove" may expose you to high voltage or other risks. Refer all servicing in those compartments to a qualified - Epson 5700i | User Setup Information - Page 28
Additional Precautions To avoid damaging your printer, follow these guidelines: • Never force the printer's components into place. Although the printer is designed to be sturdy, rough handling can damage it. • When removing the developer cartridge, never touch the developing roller under the flap; - Epson 5700i | User Setup Information - Page 29
only those controls that are covered by the operating instructions, as improper adjustment of other controls may result in damage and may require repairs by a qualified service representative. • When removing or installing a new photoconductor unit, avoid exposing it to light. The green cylinder - Epson 5700i | User Setup Information - Page 30
If you need help with your printer or its software, see the contact information below. EPSON provides technical assistance through electronic support services and automated telephone services 24 hours a day, as listed in the following tables: Electronic support services Service World Wide Web - Epson 5700i | User Setup Information - Page 31
have the following information ready: • Product name (EPL-5700i) • Product serial number (located on the back of the printer) • Computer configuration • Description of the problem You can purchase cartridges, paper, manuals, and accessories from EPSON Accessories at (800)␣ 873-7766 or visit our - Epson 5700i | User Setup Information - Page 32
Peripherals; and/or CPU Boards and Power Supplies used with Class B Personal Computers: We: Located at: EPSON AMERICA, INC. 20770 Madrona Avenue MS: B2-11 Torrance, CA 90503 Telephone : (310) 782- may cause undesired operation. Trade Name: Type of Product: Model: EPSON Laser Printer L270D 30 - Epson 5700i | User Setup Information - Page 33
be trademarks of their respective owners. EPSON disclaims any and all rights in those marks. The ENERGY STAR emblem does not represent EPA endorsement of any product or service. Copyright © 1999 by Epson America, Inc. Printed on recycled paper with at least 10% post-consumer content. CPD 9246 9/99
-
 1
1 -
 2
2 -
 3
3 -
 4
4 -
 5
5 -
 6
6 -
 7
7 -
8
-
9
-
10
-
11
-
12
-
13
-
14
-
15
-
16
-
17
-
18
-
19
-
20
-
21
-
22
-
23
-
24
-
25
-
26
-
27
-
28
-
29
-
30
-
31
-
32
-
33
 |
 |