Epson Artisan 810 Network Installation Guide - Page 14
Confirm Your Network Settings, Once it's connected, you see - network setup
 |
View all Epson Artisan 810 manuals
Add to My Manuals
Save this manual to your list of manuals |
Page 14 highlights
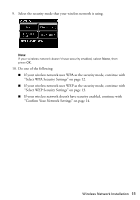
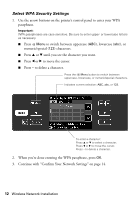
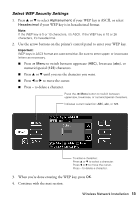
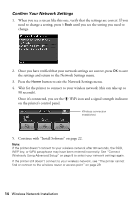
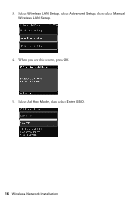
Confirm Your Network Settings 1. When you see a screen like this one, verify that the settings are correct. If you need to change a setting, press y Back until you see the setting you need to change. 2. Once you have verified that your network settings are correct, press OK to save the settings and return to the Network Settings menu. 3. Press the Home button to exit the Network Settings menu. 4. Wait for the printer to connect to your wireless network (this can take up to 90 seconds). Once it's connected, you see the WiFi icon and a signal strength indicator on the printer's control panel. Wireless connection established 5. Continue with "Install Software" on page 22. Note: If the printer doesn't connect to your wireless network after 90 seconds, the SSID, WEP key, or WPA passphrase may have been entered incorrectly. See "Connect Wirelessly Using Advanced Setup" on page 8 to select your network settings again. If the printer still doesn't connect to your wireless network, see "The printer cannot find or connect to the wireless router or access point" on page 29. 14 Wireless Network Installation
-
 1
1 -
2
-
3
-
4
-
5
-
6
-
7
-
8
-
 9
9 -
 10
10 -
 11
11 -
 12
12 -
 13
13 -
 14
14 -
 15
15 -
 16
16 -
 17
17 -
 18
18 -
 19
19 -
20
-
21
-
22
-
23
-
24
-
25
-
26
-
27
-
28
-
29
-
30
-
31
-
32
-
33
-
34
-
35
-
36
 |
 |
