Epson EX3220 Operation Guide - EasyMP Monitor v4.53 - Page 11
Registering and deleting projectors for monitoring, Starting EasyMP Monitor
 |
View all Epson EX3220 manuals
Add to My Manuals
Save this manual to your list of manuals |
Page 11 highlights
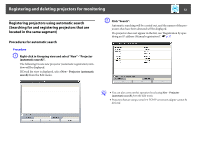
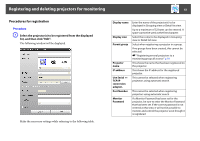
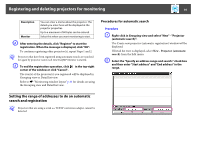
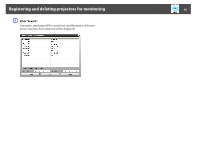
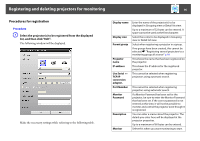
Registering and deleting projectors for monitoring 11 Registering and deleting projectors for monitoring This operation is carried out when starting EasyMP Monitor for the first time after it has been installed and when you would like to add projectors. Once a projector has been registered, the status for the projector will be displayed automatically each time EasyMP Monitor is started from that point onwards. B The main window will be displayed. The red box area described in the screen below is referred to as Grouping view. The operations to register projectors vary depending on where the projectors are connected on the network. • When registering a projector that is located in the same segment as the computer in which EasyMP Monitor is installed. s "Registering projectors using automatic search (Searching for and registering projectors that are located in the same segment)" p.12 • When registering projectors that are in multiple segments of the network. s "Setting the range of addresses to do an automatic search and registration" p.14 Starting EasyMP Monitor Procedure A Use one of the following methods to start EasyMP Monitor. If your operating system is Windows 2000, Windows XP, Windows Vista, or Windows 7 Click "Start" - "Programs" (or "All Programs") - "EPSON Projector" - "EasyMP Monitor Ver.x.xx" to start EasyMP Monitor. If your operating system is Windows 8 From the Start menu , select "EasyMP Monitor Ver.x.x.xx" to start EasyMP Monitor.
-
 1
1 -
2
-
3
-
4
-
5
-
 6
6 -
 7
7 -
 8
8 -
 9
9 -
 10
10 -
 11
11 -
 12
12 -
 13
13 -
 14
14 -
 15
15 -
 16
16 -
17
-
18
-
19
-
20
-
21
-
22
-
23
-
24
-
25
-
26
-
27
-
28
-
29
-
30
-
31
-
32
-
33
-
34
-
35
-
36
-
37
-
38
-
39
-
40
-
41
-
42
-
43
-
44
-
45
-
46
-
47
-
48
 |
 |