Epson EX3220 Operation Guide - EasyMP Monitor v4.53 - Page 14
Setting the range of addresses to do an automatic search and registration
 |
View all Epson EX3220 manuals
Add to My Manuals
Save this manual to your list of manuals |
Page 14 highlights
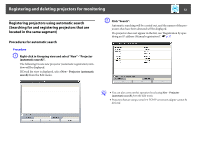
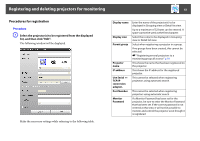
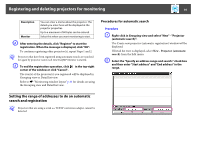
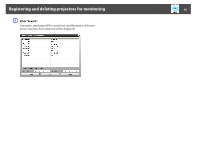
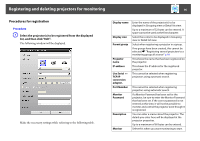
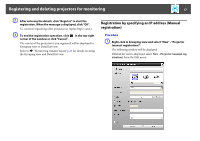
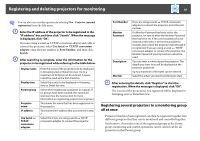
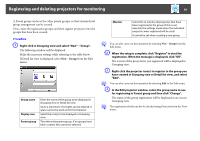
Registering and deleting projectors for monitoring 14 Description Monitor You can enter a memo about the projector. The details you enter here will be displayed at the projector properties. Up to a maximum of 60 bytes can be entered. Select this when you want monitoring to start. B After entering the details, click "Register" to start the registration. When the message is displayed, click "OK". To continue registering other projector(s), repeat Steps 1 and 2. q Projectors that have been registered using automatic search are searched for again by projector name each time EasyMP Monitor is started. C To end the registration operation, click corner of the window or click "Cancel". in the top-right The icon(s) of the projector(s) you registered will be displayed in Grouping view or Detail list view. Refer to s "Monitoring window layout" p.21 for details on using the Grouping view and Detail list view. Procedures for automatic search Procedure A Right-click in Grouping view and select "New" - "Projector (automatic search)". The Create new projector (automatic registration) window will be displayed. If Detail list view is displayed, select New - Projector (automatic search) from the Edit menu. B Select the "Specify an address range and search." check box and then enter "Start address" and "End address" in the range. Setting the range of addresses to do an automatic search and registration q Projectors that are using a serial W TCP/IP conversion adapter cannot be detected.
-
 1
1 -
2
-
3
-
4
-
5
-
6
-
7
-
8
-
 9
9 -
 10
10 -
 11
11 -
 12
12 -
 13
13 -
 14
14 -
 15
15 -
 16
16 -
 17
17 -
 18
18 -
 19
19 -
20
-
21
-
22
-
23
-
24
-
25
-
26
-
27
-
28
-
29
-
30
-
31
-
32
-
33
-
34
-
35
-
36
-
37
-
38
-
39
-
40
-
41
-
42
-
43
-
44
-
45
-
46
-
47
-
48
 |
 |