Epson Expression 13000XL Users Guide
Epson Expression 13000XL Manual
 |
View all Epson Expression 13000XL manuals
Add to My Manuals
Save this manual to your list of manuals |
Epson Expression 13000XL manual content summary:
- Epson Expression 13000XL | Users Guide - Page 1
User's Guide - Epson Expression 13000XL | Users Guide - Page 2
Epson Corporation's operating and maintenance instructions. Seiko Epson Corporation and its affiliates shall not be liable for any damages or problems designated as Epson Approved Products by Seiko Epson Corporation. © 2022 Seiko Epson Corporation The contents of this manual and the specifications - Epson Expression 13000XL | Users Guide - Page 3
logo is a registered logomark of Seiko Epson Corporation. Microsoft , Windows and Windows Server are trademarks of the Microsoft group of companies. ❏ herein are for identification purposes only and may be trademarks of their respective owners. Epson disclaims any and all rights in those marks. 3 - Epson Expression 13000XL | Users Guide - Page 4
Marks and Symbols 6 Descriptions Used in this Manual 6 Operating System References 7 Important Instructions Safety Instructions 8 Restrictions on Copying 9 Scanner Basics Part Names 10 Buttons and Lights 11 Information on Applications 13 Epson Scan 2 13 Application for Updating Software and - Epson Expression 13000XL | Users Guide - Page 5
61 Where to Get Help Technical Support Web Site 69 Contacting Epson Support 69 Before Contacting Epson 69 Help for Users in the United States, Canada, and the Caribbean 70 Technical Specifications General Scanner Specifications 63 Dimension Specifications 63 Electrical Specifications - Epson Expression 13000XL | Users Guide - Page 6
Canada) http://latin.epson.com/support/13000xl (Latin America) ❏ Start Here (paper manual) Provides you with information on setting up the product and installing the application. ❏ User's Guide (digital manual) Provides instructions on using the product, maintenance, and solving problems. As well as - Epson Expression 13000XL | Users Guide - Page 7
Windows Server 2012 operating system ® ® ❏ Microsoft Windows Server 2008 operating system ® ® ❏ Microsoft Windows Server 2008 R2 operating system Mac OS In this manual, "Mac OS" is used to refer to macOS Monterey, macOS Big Sur, macOS Catalina, macOS Mojave, macOS High Sierra, macOS Sierra, and OS - Epson Expression 13000XL | Users Guide - Page 8
Safety Instructions Read all these instructions, and follow all warnings and instructions marked on the product. ❏ Some of the symbols used on your product are to ensure safety and proper use of the product. Visit the following Web site to learn the meaning of the symbols. http://support.epson.net - Epson Expression 13000XL | Users Guide - Page 9
Important Instructions > Restrictions on Copying ❏ Unplug the product and the power cord before alone. Two people should lift and carry the product. ❏ Do not place heavy objects on the scanner glass and do not press the glass with too much force. Restrictions on Copying Observe the following - Epson Expression 13000XL | Users Guide - Page 10
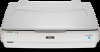
Scanner Basics > Part Names Scanner Basics Part Names Note: Check all of the items that came with your product. A a start button B . power button C Ready light D Error light A Document cover B Scanner glass C Control panel 10 - Epson Expression 13000XL | Users Guide - Page 11
Scanner Basics > Buttons and Lights D Carriage (in the scanner glass) A Option connector B USB port C AC inlet D Transportation lock lever A Power cord B USB cable Buttons and Lights Buttons The product has two buttons for scanning operations. 11 - Epson Expression 13000XL | Users Guide - Page 12
Scanner Basics > Buttons and Lights Before using the product buttons, make sure you have installed your scanning software. A a button B . button Starts scanning. Turns the product on - Epson Expression 13000XL | Users Guide - Page 13
, and updates firmware and manuals over the Internet. If you want to check for update information regularly, you can set the interval for checking for updates in EPSON Software Updater's auto update settings. Note: Windows Server operating systems are not supported. Starting on Windows ❏ Windows - Epson Expression 13000XL | Users Guide - Page 14
and do not press the glass with too much force. Placing Originals 1. Open the document cover. 2. Place your original face down on the scanner glass making sure the top corner of the side you want to scan is aligned with the d mark. Note: If you are scanning multiple originals - Epson Expression 13000XL | Users Guide - Page 15
Large or Thick Originals 3. Close the document cover gently so that your original does not move. Note: ❏ Always keep the scanner glass clean. ❏ Do not leave originals on the scanner glass for an extended period of time as they may stick to the glass. Related Information & "Basic Scanning" on page - Epson Expression 13000XL | Users Guide - Page 16
sure you raise it to the upright position to prevent the hinges from snapping back on the springs. ❏ Do not force the cover off the scanner or lift the cover from in front of the cover hinge; otherwise, the cover may be damaged. 2. Place a large or thick original face-down on - Epson Expression 13000XL | Users Guide - Page 17
Placing Originals on the Product > Placing Large or Thick Originals 3. Close the document cover and hold it down firmly as you scan. Note: ❏ When scanning without the document cover, gently press down on your original to flatten it. ❏ If your original is very thick or curled at the edges, cover the - Epson Expression 13000XL | Users Guide - Page 18
photos or pictures. 1. Place the originals. When placing multiple originals on the scanner glass, you can scan them all at the same time. Make sure there is a gap of at least 0.8 in. (20 mm) between the originals. 2. Start Epson Scan 2. ❏ Windows 11/Windows Server 2022 Click the start button, and - Epson Expression 13000XL | Users Guide - Page 19
Basic Scanning > Scanning Using Epson Scan 2 > Scanning Photos or Pictures (Photo Mode) 4. Make the following settings on the Main Settings tab. ❏ Image Type: Select the color for saving the scanned - Epson Expression 13000XL | Users Guide - Page 20
Basic Scanning > Scanning Using Epson Scan 2 > Scanning Photos or Pictures (Photo Mode) 5. Click Preview. The preview window opens, and the previewed image is displayed as thumbnails. Note: To preview the - Epson Expression 13000XL | Users Guide - Page 21
Basic Scanning > Scanning Using Epson Scan 2 > Scanning Photos or Pictures (Photo Mode) ❏ Brightness: Select to adjust the brightness for the scanned image. ❏ Contrast: Select to adjust the contrast for the - Epson Expression 13000XL | Users Guide - Page 22
Scanning Purpose" on page 25 & "Image Adjustment Features for Photo Mode" on page 27 Scanning Documents (Document Mode) Using Document Mode in Epson Scan 2, you can scan the originals using detailed settings that are suitable for text documents. Note: You cannot scan films using Transparency Unit - Epson Expression 13000XL | Users Guide - Page 23
Basic Scanning > Scanning Using Epson Scan 2 > Scanning Documents (Document Mode) 4. Make the following scanned image. ❏ Resolution: Select the resolution. Note: The Document Source setting is fixed as Scanner Glass. You cannot change this setting. 5. Make other scan settings if necessary. ❏ You - Epson Expression 13000XL | Users Guide - Page 24
or create a new folder by selecting Select from the list. 7. Click Scan. Related Information & "Placing Originals on the Product" on page 14 & "Epson Scan 2" on page 13 & "Setting a Resolution That Suits the Scanning Purpose" on page 25 & "Image Adjustment Features for Document Mode" on page 33 - Epson Expression 13000XL | Users Guide - Page 25
Basic Scanning > Scanning Using Epson Scan 2 > Setting a Resolution That Suits the Scanning Purpose Setting a Resolution That Suits the Scanning Purpose Advantages and Disadvantages of Increasing the Resolution Resolution indicates the - Epson Expression 13000XL | Users Guide - Page 26
dpi 1,600 dpi 2,400 dpi 3,200 dpi Scanning Using a Scanner Button You can scan using the button on your scanner. Note: Before using this feature, check the following. ❏ Epson Scan 2 is installed on your computer. ❏ The scanner is connected to your computer correctly. 1. Place the original. 2. Press - Epson Expression 13000XL | Users Guide - Page 27
Photo Mode Advanced Scanning Image Adjustment Features for Photo Mode You can adjust scanned images using the features on the Advanced Settings tab in Epson Scan 2. For Photo Mode, you can use image adjustment features that are suitable for photos or pictures. For most features, you can check the - Epson Expression 13000XL | Users Guide - Page 28
Advanced Scanning > Image Adjustment Features for Photo Mode Contrast You can adjust the contrast for the whole image. If you increase the contrast, the bright areas become brighter, and the dark areas become darker. On the other hand, if you lower the contrast, the differences between the bright - Epson Expression 13000XL | Users Guide - Page 29
Advanced Scanning > Image Adjustment Features for Photo Mode Color Balance Adjusts the color balance of the image. You can adjust the tint when photos are tinted with red and green due to the weather or the lighting where the photo was shot. Gray Balance Intensity Adjusts the gray balance of the - Epson Expression 13000XL | Users Guide - Page 30
Advanced Scanning > Image Adjustment Features for Photo Mode Histogram Adjustment Tab You can use the histogram to adjust the brightness of the image. Histogram While checking the histogram (a graph that indicates light and shade) of the image, you can adjust the brightness (shadow for the darkest - Epson Expression 13000XL | Users Guide - Page 31
Advanced Scanning > Image Adjustment Features for Photo Mode Unsharp Mask You can enhance and sharpen the outlines of the image. Note: This feature is not available when selecting the Main Settings tab > Image Type > Black & White. Color Restoration You can correct images and film that have faded to - Epson Expression 13000XL | Users Guide - Page 32
Advanced Scanning > Image Adjustment Features for Photo Mode Descreening You can remove moiré patterns (web-like shadows) that appear when scanning printed paper such as a magazine. To check for moiré patterns, display the image at 100 % (1:1). If the displayed image is zoomed out, the image appears - Epson Expression 13000XL | Users Guide - Page 33
of the scanned results. Image Adjustment Features for Document Mode You can adjust scanned images using the features on the Advanced Settings tab in Epson Scan 2. For Document Mode, you can use image adjustment features that are suitable for text documents. For most features, you can check the - Epson Expression 13000XL | Users Guide - Page 34
Advanced Scanning > Image Adjustment Features for Document Mode Text Enhancement You can make blurred letters in the original clear and sharp. You can also reduce the offset or unevenness of the background. When you select the Main Settings tab > Image Type > Color or Grayscale, you can select the - Epson Expression 13000XL | Users Guide - Page 35
Advanced Scanning > Image Adjustment Features for Document Mode If you select Customize from the color list in Dropout, you can make settings for the color you want to remove while checking the preview window (for Windows only). Note: This feature is not available when selecting the Main Settings - Epson Expression 13000XL | Users Guide - Page 36
Advanced Scanning > Image Adjustment Features for Document Mode Gamma You can adjust the gamma (brightness of the intermediate range) for the whole image. If the image is too light or too dark, you can adjust the brightness. Note: This feature is not available depending on the settings on the Main - Epson Expression 13000XL | Users Guide - Page 37
Advanced Scanning > Image Adjustment Features for Document Mode Descreening You can remove moiré patterns (web-like shadows) that appear when scanning printed paper such as a magazine. To check for moiré patterns, display the image at 100 % (1:1). If the displayed image is zoomed out, the image - Epson Expression 13000XL | Users Guide - Page 38
folder for the scanned image from the Folder list. 13. Click Scan. The scanned image is saved as a Searchable PDF. Related Information & "Scanning Using Epson Scan 2" on page 18 & "Placing Originals on the Product" on page 14 & "Text is Not Recognized Correctly when Saving as a Searchable PDF" on - Epson Expression 13000XL | Users Guide - Page 39
all the items shown below are included and have not been damaged during shipping. Contact your Epson dealer if any item is missing or damaged. A Transparency Unit B Transparency guide C Film holders Unlocking the transportation lock Before you install the Transparency Unit, you need to unlock - Epson Expression 13000XL | Users Guide - Page 40
Unit > Installing the Transparency Unit 2. Use a coin to unlock the transportation lock by turning it counter-clockwise one-quarter. Note: ❏ Before transporting the scanner, lock the transportation lock to prevent damage. ❏ If the unit's lamp assembly is not in its home position, you cannot lock the - Epson Expression 13000XL | Users Guide - Page 41
Using the Transparency Unit > Installing the Transparency Unit 3. Align the pins of the unit with the holes of the scanner, and then lower the unit until it rests securely on the scanner with the pins in the holes. 4. Remove the document mat from the Transparency Unit as shown below. 5. Place the - Epson Expression 13000XL | Users Guide - Page 42
the Photo Mode in Epson Scan 2, and make sure you set the Document Source and Document Type correctly. 1. Open the Transparency Unit. 2. Place the film in the appropriate holder. 3. Place the film holder on the scanner glass, aligning it with the notch on the transparency guide. Make sure the glossy - Epson Expression 13000XL | Users Guide - Page 43
Using the Transparency Unit > Setting and Placing Films > 35 mm film strips 35 mm film strips 1. Place the 35 mm film holder on a flat surface, and then remove the strip cover. 2. Insert the film, face down, in the holder. 3. Replace the strip cover that you removed in step 1. Repeat steps 1 to 3 - Epson Expression 13000XL | Users Guide - Page 44
Using the Transparency Unit > Setting and Placing Films > Mounted slides 4. Place the film holder on the scanner glass and align it with the notch on the transparency guide as shown below. Mounted slides 1. Load slides, face down, in the Mounted slide holder, as shown below. Repeat this step for all - Epson Expression 13000XL | Users Guide - Page 45
Using the Transparency Unit > Setting and Placing Films > Medium format (120/220) Medium format (120/220) 1. Place the Medium format holder on a flat surface, and then open the strip cover. 2. Insert the film, face down, in the holder. 3. Close the cover. Repeat steps 1 to 3 for all the films you - Epson Expression 13000XL | Users Guide - Page 46
Using the Transparency Unit > Setting and Placing Films > 4×5 inch film 4. Place the film holder on the scanner glass and align it with the notch on the transparency guide, as shown below. 4×5 inch film 1. Place the 4×5 inch film holder on a flat surface, and then open the cover. 2. Insert the film, - Epson Expression 13000XL | Users Guide - Page 47
on the scanner glass and align it with the notch on the transparency guide, as shown below. Non-standard film sizes Place the film directly on the scanner glass, making .02 in (2.0 ±0.5 mm) from the vertical edges of the scanner glass cannot be scanned. ❏ When you place the film directly on the - Epson Expression 13000XL | Users Guide - Page 48
materials you want to scan. 1. Make sure the scanner is connected to your computer. 2. Place your films on the scanner glass. 3. Start Epson Scan 2. 4. Select Photo Mode from the Mode , make sure you remove the transparency guide from the scanner glass. Insert the document mat as described below. 48 - Epson Expression 13000XL | Users Guide - Page 49
Transparency Unit > Using the Transparency Unit to Scan > Scanning reflective (non-film) originals 1. Open the Transparency Unit, and then remove the transparency guide from the scanner glass. 2. Slide the mat into the upper side, and then insert the tabs into the slots on the lower side slots on - Epson Expression 13000XL | Users Guide - Page 50
components. This could permanently damage the mechanism and circuitry. ❏ Do not spray lubricants on the scanner. ❏ Never open the scanner case. 1. Turn off the scanner. 2. Unplug the power cord from the scanner. 3. Clean the outer case with a cloth dampened with mild detergent and water. 4. If the - Epson Expression 13000XL | Users Guide - Page 51
2008/Windows Server 2008 R2 Click the start button, and then select All Programs (or Programs) > EPSON > Epson Scan 2 > Epson Scan 2 Utility. ❏ Mac OS Select Go > Applications > Epson Software > Epson Scan 2 Utility. 2. Click the Power Save tab. 3. Set the Power Off Timer (minutes) or Power Off - Epson Expression 13000XL | Users Guide - Page 52
and firmware. c Important: ❏ Do not turn off the computer or the scanner while updating. 1. Make sure that the scanner and the computer are connected, and the computer is connected to the internet. 2. Start EPSON Software Updater, and update the applications or the firmware. Note: Windows Server - Epson Expression 13000XL | Users Guide - Page 53
to update in the list, you cannot update using the EPSON Software Updater. Check for the latest versions of the applications on your local Epson website. http://www.epson.com/support/13000xl (U.S.) http://www.epson.ca/support/13000xl (Canada) http://latin.epson.com/support/13000xl (Latin English) 53 - Epson Expression 13000XL | Users Guide - Page 54
, or the light source in the scanner unit may need to be replaced. Contact your dealer. Related Information & "Buttons and Lights" on page 11 Problems Starting Scanning ❏ Make sure the scanning software is fully installed. See the paper manual for instructions on installing the scanning software - Epson Expression 13000XL | Users Guide - Page 55
Solving Problems > Problems Starting Scanning > Cannot Scan Using Scanning Software Other Than Epson Scan 2 Cannot Start Epson Scan 2 Make sure the scanner is connected to your computer properly. ❏ Check the USB cable connection. ❏ Make sure the USB cable is securely connected to the scanner and the - Epson Expression 13000XL | Users Guide - Page 56
of Images Scanned Image Problems Uneven Colors, Dirt, Spots, and so on Appear when Scanning from the Scanner Glass ❏ Clean the scanner glass. ❏ Remove occur. Related Information & "Cleaning the Scanner" on page 50 The Image Quality is Rough ❏ Set the Mode in Epson Scan 2 according to the original you - Epson Expression 13000XL | Users Guide - Page 57
Solving Problems > Scanned Image Problems > Cannot Scan the Correct Area on the Scanner Glass Text is Blurred ❏ In Document Mode in Epson Scan 2, select the Advanced Settings tab, and then Image Option > Text Enhancement. ❏ Select Document Mode as the Mode in Epson Scan 2. Scan using the settings - Epson Expression 13000XL | Users Guide - Page 58
entire scanned area, and then create marquees manually. Cannot Achieve the Results Intended in Auto with creases or wrinkles ❏ In Document Mode in Epson Scan 2, when Image Type on the Main scanner glass, characters may appear distorted or blurred on the binding margin. If this problem occurs - Epson Expression 13000XL | Users Guide - Page 59
force. Otherwise, the booklet or the scanner may be damaged. Cannot Solve Problems in the Scanned Image If you have tried all of the solutions and have not solved the problem, initialize the Epson Scan 2 settings using Epson Scan 2 Utility. Note: Epson Scan 2 Utility is an application that comes - Epson Expression 13000XL | Users Guide - Page 60
❏ For Preview Mode, select Thumbnail checkbox at the top of the preview window. Problems With Scanning Time ❏ Computers with Hi-Speed external USB ports can scan faster than for Windows 1. Quit all running applications. 2. Disconnect the scanner from your computer. 3. Open the Control Panel: ❏ - Epson Expression 13000XL | Users Guide - Page 61
Solving Problems > Uninstalling window is displayed, click Continue. 7. Follow the on-screen instructions. Note: A message may be displayed prompting you to restart The Uninstaller removes all drivers for Epson scanners on the computer. If you use multiple Epson scanners and you only want to delete - Epson Expression 13000XL | Users Guide - Page 62
Solving Problems > Uninstalling and Installing Applications > Installing Your Applications Note: ❏ Log . 2. When installing scanner driver (Epson Scan 2), disconnect the scanner and the computer temporarily. Note: Do not connect the scanner and the computer until you are instructed to do so. - Epson Expression 13000XL | Users Guide - Page 63
type Photoelectric device Document Size Scanning resolution Output resolution Image data Interface Light source Flatbed A3 Color Image Scanner Color CCD line sensor 12.2×17.2 inches (310×437 mm) 2400 dpi (main scan) 4800 dpi with Micro Step (sub scan) 50 to 6400 dpi - Epson Expression 13000XL | Users Guide - Page 64
for details on power consumption. http://www.epson.eu/energy-consumption Environmental Specifications Temperature Humidity Operating office or home conditions. Avoid operating the scanner in direct sunlight, near a strong light Supported operating systems may vary depending on the application. - Epson Expression 13000XL | Users Guide - Page 65
8/8.1 Windows 7 Windows Server 2008 or later Mac OS X 10.9 or later, macOS 11 or later *1 Fast User Switching on Mac OS or later is not supported. *2 The UNIX File System (UFS) for Mac OS is not - Epson Expression 13000XL | Users Guide - Page 66
CISPR32 Class B ZICTA Type Approval for Users in Zambia See the following website to check the information for ZICTA Type Approval. https://support.epson.net/zicta/ OPEN SOURCE SOFTWARE LICENSE 1) This product includes open source software programs according to the license terms of each open source - Epson Expression 13000XL | Users Guide - Page 67
the information contained herein is provided on an "AS IS" basis and THE INTERNET SOCIETY AND THE INTERNET ENGINEERING TASK FORCE DISCLAIMS ALL WARRANTIES, EXPRESS OR IMPLIED, INCLUDING BUT NOT LIMITED TO ANY WARRANTY THAT THE USE OF THE INFORMATION HEREIN WILL NOT INFRINGE ANY RIGHTS OR ANY IMPLIED - Epson Expression 13000XL | Users Guide - Page 68
mail addresses or the Info-ZIP URL(s), such as to imply Info-ZIP will provide support for the altered versions. 4. Info-ZIP retains the right to use the names "Info IS PROVIDED "AS IS", WITHOUT WARRANTY OF ANY KIND, EXPRESS OR IMPLIED, INCLUDING BUT NOT LIMITED TO THE WARRANTIES OF MERCHANTABILITY - Epson Expression 13000XL | Users Guide - Page 69
Epson support services for assistance. Contacting Epson Support Before Contacting Epson If your Epson product is not operating properly and you cannot solve the problem using the troubleshooting information in your product manuals, contact Epson support services for assistance. If Epson support - Epson Expression 13000XL | Users Guide - Page 70
contact Epson for technical support services, use the following support options. Internet Support Visit Epson's support website at http://latin.epson.com/support/13000xl and select your product for solutions to common problems. You can download utilities and documentation, get troubleshooting advice - Epson Expression 13000XL | Users Guide - Page 71
Where to Get Help > Contacting Epson Support > Help for Users in Latin America Purchase Supplies and Accessories You can purchase genuine Epson accessories from an Epson authorized reseller. To find the nearest reseller, visit http://latin.epson.com or call your nearest Epson sales office.
-
 1
1 -
 2
2 -
 3
3 -
 4
4 -
 5
5 -
 6
6 -
 7
7 -
8
-
9
-
10
-
11
-
12
-
13
-
14
-
15
-
16
-
17
-
18
-
19
-
20
-
21
-
22
-
23
-
24
-
25
-
26
-
27
-
28
-
29
-
30
-
31
-
32
-
33
-
34
-
35
-
36
-
37
-
38
-
39
-
40
-
41
-
42
-
43
-
44
-
45
-
46
-
47
-
48
-
49
-
50
-
51
-
52
-
53
-
54
-
55
-
56
-
57
-
58
-
59
-
60
-
61
-
62
-
63
-
64
-
65
-
66
-
67
-
68
-
69
-
70
-
71
 |
 |

User's Guide