Epson FX-286 User Manual - Page 33
Running the Self Test, paper, see Appendix B.
 |
View all Epson FX-286 manuals
Add to My Manuals
Save this manual to your list of manuals |
Page 33 highlights
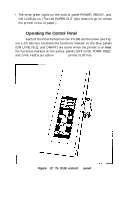
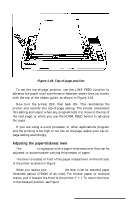
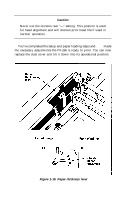
8 Running the Self Test The FX-286 has a built-in self test function that automatically prints out all of the characters in the printer's character set, even if it's not connected to a computer. Before running the self test, load 8½ x 14-inch-wide paper into the printer, because the self test uses the full 14-inch measure to print out the characters. Align the left edge of the paper with the first black mark on the paper bail-this will ensure that the self test stays on the paper and doesn't run onto the platen. Note If you've already loaded narrower paper, such as 8½ x 11, then you should replace it with wider 14-inch paper before running the self test. For information on loading single-sheet paper, see Appendix B. With the power OFF, hold down the DRAFT button while you turn the power switch ON-the self test takes over and the FX-286 starts printing out the full character set in draft mode (see Figure 1-20). The self test continues until you shut the power OFF or the paperout sensor is triggered. To print the self test in the NLQ mode, press the NLQ button when you switch the power ON (see Figure 1-20). To perform the self test in the IBM Proprinter mode see Appendix A. 1-21
-
 1
1 -
2
-
3
-
4
-
5
-
6
-
7
-
8
-
9
-
10
-
11
-
12
-
13
-
14
-
15
-
16
-
17
-
18
-
19
-
20
-
21
-
22
-
23
-
24
-
25
-
26
-
27
-
 28
28 -
 29
29 -
 30
30 -
 31
31 -
 32
32 -
 33
33 -
 34
34 -
 35
35 -
 36
36 -
 37
37 -
 38
38 -
39
-
40
-
41
-
42
-
43
-
44
-
45
-
46
-
47
-
48
-
49
-
50
-
51
-
52
-
53
-
54
-
55
-
56
-
57
-
58
-
59
-
60
-
61
-
62
-
63
-
64
-
65
-
66
-
67
-
68
-
69
-
70
-
71
-
72
-
73
-
74
-
75
-
76
-
77
-
78
-
79
-
80
-
81
-
82
-
83
-
84
-
85
-
86
-
87
-
88
-
89
-
90
-
91
-
92
-
93
-
94
-
95
-
96
-
97
-
98
-
99
-
100
-
101
-
102
-
103
-
104
-
105
-
106
-
107
-
108
-
109
-
110
-
111
-
112
-
113
-
114
-
115
-
116
-
117
-
118
-
119
-
120
-
121
-
122
-
123
-
124
-
125
-
126
-
127
-
128
-
129
-
130
-
131
-
132
-
133
-
134
-
135
-
136
-
137
-
138
-
139
-
140
-
141
-
142
-
143
-
144
-
145
-
146
-
147
-
148
-
149
-
150
-
151
-
152
-
153
-
154
-
155
-
156
-
157
-
158
-
159
-
160
-
161
-
162
-
163
-
164
-
165
-
166
-
167
-
168
-
169
-
170
-
171
-
172
-
173
-
174
-
175
-
176
-
177
-
178
-
179
-
180
-
181
-
182
-
183
-
184
-
185
-
186
-
187
-
188
-
189
-
190
-
191
-
192
-
193
-
194
-
195
-
196
-
197
-
198
-
199
-
200
-
201
-
202
-
203
-
204
-
205
-
206
-
207
-
208
-
209
-
210
-
211
-
212
-
213
-
214
-
215
-
216
-
217
-
218
-
219
-
220
-
221
-
222
-
223
 |
 |
