Epson Stylus Photo 1270 Printer Basics - Page 29
Using PhotoEnhance, Custom, and Advanced Settings
 |
View all Epson Stylus Photo 1270 manuals
Add to My Manuals
Save this manual to your list of manuals |
Page 29 highlights
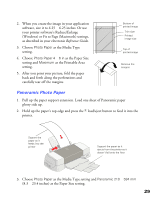
Using PhotoEnhance, Custom, and Advanced Settings When you're printing special projects, you can customize your printer software settings, as described in these sections: s "Using PhotoEnhance" below s "Using Custom Settings" on page 25 s "Using Advanced Settings" on page 25 For additional information on these settings, see the electronic Reference Guide, as described on page 11. Using PhotoEnhance The printer software includes PhotoEnhance options that increase image brightness and contrast to improve the appearance of low-resolution photos. You can also add special effects, such as Soft Focus. If you're printing high-resolution images, you may want to use the Automatic setting instead; see page 17 (Windows) or page 22 (Macintosh). PhotoEnhance does not affect your original image; it only affects your printout. Printing with PhotoEnhance may take longer on some systems and images. To use PhotoEnhance, you must select Color ink; you cannot turn on PhotoEnhance with Black ink selected. If your photograph was taken with a digital camera, you can select Digital Camera Correction to give your printed images the appearance of photographs taken with a film camera. For more fine-tuning, you can select from a list of specialized settings for photographs, such as People or Nature, or special filters, such as Soft Focus or Sepia. Don't select Roll Paper or Roll Paper (Zero Margins) as your Paper Source setting; you can't use these options with the PhotoEnhance setting. 24
-
 1
1 -
2
-
3
-
4
-
5
-
6
-
7
-
8
-
9
-
10
-
11
-
12
-
13
-
14
-
15
-
16
-
17
-
18
-
19
-
20
-
21
-
22
-
23
-
 24
24 -
 25
25 -
 26
26 -
 27
27 -
 28
28 -
 29
29 -
 30
30 -
 31
31 -
 32
32 -
 33
33 -
 34
34 -
35
-
36
-
37
-
38
-
39
-
40
-
41
-
42
-
43
-
44
-
45
-
46
-
47
-
48
-
49
-
50
-
51
-
52
-
53
-
54
-
55
-
56
-
57
-
58
-
59
-
60
-
61
-
62
-
63
-
64
-
65
-
66
-
67
-
68
-
69
-
70
-
71
-
72
-
73
-
74
-
75
-
76
-
77
-
78
-
79
-
80
-
81
-
82
-
83
-
84
-
85
-
86
-
87
-
88
-
89
-
90
-
91
-
92
-
93
 |
 |
