Epson Stylus Pro 10600 Quick Reference Guide - Page 2
Loading Roll Paper for Printing - print head
 |
View all Epson Stylus Pro 10600 manuals
Add to My Manuals
Save this manual to your list of manuals |
Page 2 highlights
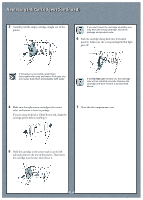
Loading Roll Paper (Continued) Loading Roll Paper for Printing Once the roll paper is attached to the spindle and inserted in the printer, you're ready to load it for printing. 1 Make sure the printer is turned on. Then press the Paper Source button repeatedly until one of the Roll lights comes on (either Roll Auto Cut or Roll Cutter Off). 3 Feed the paper into the paper slot and then pull it down so it extends through the slot. 4 Turn the paper roll back to remove the slack. Then align the paper with the two rows of holes at the paper exit. To avoid feeding excess paper, make sure you don't select Sheet when you're using roll paper. If you're printing on canvas, vinyl, or other heavy media, select Roll Cutter Off. 2 Pull the paper set lever out, to the released position. 5 Push the paper set lever all the way in, then close the roll paper cover. To avoid damaging the printer, never move the paper set lever while the Operate or Pause light is flashing. If you're using Roll Auto Cut and the leading edge of the paper is uneven, press the Cut/Eject button to recut the edge. 6 Press the Pause button. The print head moves and the paper feeds into printing position automatically. READY appears on the control panel display. 2
-
 1
1 -
 2
2 -
 3
3 -
 4
4 -
 5
5 -
 6
6 -
 7
7 -
 8
8 -
9
 |
 |
