Epson Stylus Pro 10600 Quick Reference Guide - Page 5
Aligning the Print Head
 |
View all Epson Stylus Pro 10600 manuals
Add to My Manuals
Save this manual to your list of manuals |
Page 5 highlights
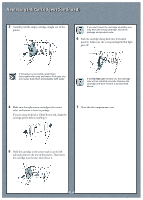
Aligning tthhee PPrriinntt HHeeaadd If banding appears on your prints, or vertical lines are not straight, you may need to align the print head. Before you begin, print a nozzle check (see page 4) to ensure that the problem is not caused by clogged nozzles. 1 Make sure the printer is turned on and 44-inch wide paper is loaded. (Be sure to use coated ink jet paper, such as the Doubleweight Matte Paper that came with the printer. For best results, use the paper you'll be printing on to perform the alignment.) 2 Press the SelecType button until HEAD ALIGNMENT MENU is displayed. 3 Press the Item button. PAPER THICK=STD appears on the display. If you are using EPSON paper, leave this setting on STD. If you are using other media, enter the thickness value of the paper in 0.1-mm increments by pressing the + or - button. Check the media specifications for its thickness. 8 Look at the other patterns in the first row to see if the same number is consistently the best line. If not, determine which number is generally the best. Ideally, number 8 (±1) should be the best line in all of the printed patterns. If it is, you can press Pause to exit the adjustment early. 9 Check the control panel display. It shows #1 C=8, which means that number 8 is the current setting for row #1 C. If you need to change the setting, use the + or - button to select the best line for that row. Then press the Enter button to register the setting. 10 Repeat steps 7 through 9 for each additional row. 11 When done, press the Pause button to exit the head alignment. You may have to repeat the adjustment more than once to ensure that number 8 is the best choice in all cases. 4 Press the Enter button. You see ALIGNMENT=Bi-D LC on the display. 5 Press the + button so that ALIGNMENT=Uni-D appears. 6 Press the Enter button to print the alignment pattern. 7 Examine the first row (marked #1 C). You see a series of patterns similar to the one below across the width of the paper. Use your own eye loupe or the one that came with the printer to determine which line is the best. (Each line is composed of two overlapping colors. Look for the line in which the colors overlap the most evenly.) In the example below, #8 is the best choice. 12 When done performing the adjustment in Uni-D (uni-directional) mode, as described above, you should repeat it in Bi-D mode (select ALIGNMENT = Bi-D ALL). The process is exactly the same, but the printed pattern is different: number 8 shows the best block To select the best pattern, use an eye loupe to determine which block has the smallest gaps. In the example above, number 8 has the smallest gaps. number 8 shows the best line 5
-
 1
1 -
 2
2 -
 3
3 -
 4
4 -
 5
5 -
 6
6 -
 7
7 -
 8
8 -
 9
9
 |
 |
