Epson Stylus Pro 10600 Quick Reference Guide - Page 7
Replacing Ink Cartridges Continued
 |
View all Epson Stylus Pro 10600 manuals
Add to My Manuals
Save this manual to your list of manuals |
Page 7 highlights
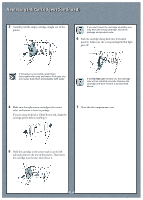
Replacing IInnkk CCaarrttrriiddggeess((CCoonnttiinnuueedd)) 3 Carefully pull the empty cartridge straight out of the printer. If you can't insert the cartridge smoothly, you may have the wrong cartridge. Check the package and product code. 6 Push the cartridge clamp back into the locked position. Make sure the corresponding Ink Out light goes off. If ink gets on your hands, wash them thoroughly with soap and water. If ink gets into your eyes, flush them immediately with water. If the Ink Out light remains on, the cartridge may not be installed correctly. Remove the cartridge and then reinsert it as described above. 4 Make sure the replacement cartridge is the correct color, and remove it from its package. If you're using Archival or UltraChrome ink, shake the cartridge gently before installing it. 7 Close the ink compartment cover. 5 Hold the cartridge so the arrow mark is on the left side and points to the rear of the printer. Then insert the cartridge into the slot. Don't force it. 7
-
 1
1 -
 2
2 -
 3
3 -
 4
4 -
 5
5 -
 6
6 -
 7
7 -
 8
8 -
 9
9
 |
 |
