Epson Stylus Pro 10600 Quick Reference Guide - Page 4
Checking and Cleaning the Print Head - ink cartridges
 |
View all Epson Stylus Pro 10600 manuals
Add to My Manuals
Save this manual to your list of manuals |
Page 4 highlights
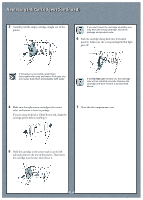
Checking and Cleeaanniinng tthhee PPrriinntt HHeeaadd If you notice missing colors or horizontal banding (thin light or dark lines) in your printouts, you may need to clean the print head. First print a nozzle check pattern, as described below. If dots are missing or out of place in the pattern, then run a cleaning cycle. 1 Load a sheet of paper (or roll paper) in the printer. If dots are missing from the pattern, as shown below, you need to run a cleaning cycle. 5 Make sure that all of the Ink Out lights on the printer's control panel are off. If an Ink Out light is flashing or on, you need to replace the corresponding ink cartridge instead. 6 Press the Cleaning button and hold it for at least 3 seconds. The Pause light flashes as the printer cleans its print head. The cleaning cycle takes about a minute and does not use any paper. 2 Press the SelecType™ button repeatedly until TEST PRINT MENU appears on the display. To avoid damaging the printer, don't turn it off until the cleaning cycle is finished and the Pause light has stopped flashing. 7 When the Pause light goes off, follow steps 1 through 4 to run another nozzle check to make sure the print head is clean. 3 Press the Item button. NOZZLE CHECK = PRINT appears on the display. 4 Press the Enter button. The nozzle check prints as shown below: If all the lines on the check pattern are complete, with no gaps in the dot pattern, the print head doesn't need cleaning. (You may need to use an eye loupe to check the pattern.) 4
-
 1
1 -
 2
2 -
 3
3 -
 4
4 -
 5
5 -
 6
6 -
 7
7 -
 8
8 -
 9
9
 |
 |
