Epson Stylus Pro 5500 Product Information Guide - Page 8
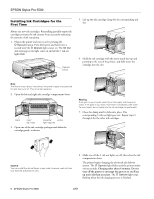
Using the Control Panel, Check the printout and select the numbered pattern that is
 |
View all Epson Stylus Pro 5500 manuals
Add to My Manuals
Save this manual to your list of manuals |
Page 8 highlights
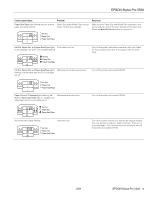
EPSON Stylus Pro 5500 Using the Control Panel 1. Turn off the printer, if necessary. 2. Hold down both the Reset and Eject/Continue buttons while you press and hold the P Operate button to turn on the printer. Release all three buttons when the P Operate light starts flashing. The printer enters print head alignment mode and three patterns like those to the right are printed (this may take up to seven minutes to print): 3. Check the printout and select the numbered pattern, from #1 to #3, that is the most misaligned. (If more than one pattern is misaligned, select the most misaligned one.) For example, pattern #2 here is the most misaligned. 4. Press the Reset button repeatedly until the H ink out light representing the misaligned pattern comes on. For example, press Reset until the cyan H ink out light comes on to indicate pattern #2. Ink out light indicators for misaligned pattern Pattern # 1 Black H ink out Cyan H ink out Magenta H ink out On - - 2 - On - 3 - - On 5. Press the Eject/Continue button to enter your selection. The printer prints 15 patterns, similar to the ones below. The P Operate light flashes while they print. This takes a couple of minutes. 7. Press the Eject/Continue button (to move forward) or the Reset button (to move backward) until the H ink out light(s) representing the correctly aligned pattern come(s) on. See the table below. Ink out light indicators for correctly aligned pattern Black Pattern # H ink out 1 On Cyan H ink out - Magenta H ink out - Yellow H ink out - 2 - On - - 3 On On - - 4 - - On - 5 On - On - 6 - On On - 7 On On On - 8 - - - On 9 On - - On 10 - On - On 11 On On - On 12 - - On On 13 On - On On 14 - On On On 15 On On On On For example, to select pattern 8 from the sample above, press the Eject/Continue or Reset button until the yellow H ink out light comes on. 8. Press the Cleaning button to enter your selection. The printer returns to print head alignment mode. 9. If other numbered patterns on the first printout (shown in step 3) are misaligned, repeat steps 2 through 9. 10. When you're finished aligning the print head, press the P Operate button to save the alignment setting and turn off the printer. 6. Check the printout and select the numbered pattern that is correctly aligned. For example, pattern 8 here is aligned. 8 - EPSON Stylus Pro 5500 2/01
-
 1
1 -
2
-
 3
3 -
 4
4 -
 5
5 -
 6
6 -
 7
7 -
 8
8 -
 9
9 -
 10
10 -
 11
11 -
 12
12 -
 13
13
 |
 |
