Epson Stylus Pro 7800 Professional Edition Quick Reference Guide - Page 4
appears on the control panel., the printing position automatically
 |
View all Epson Stylus Pro 7800 Professional Edition manuals
Add to My Manuals
Save this manual to your list of manuals |
Page 4 highlights
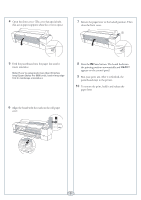
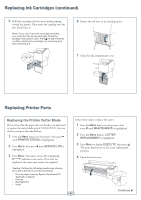
4 Open the front cover. (The cover has special tabs that act as paper supports when the cover is open.) 7 Return the paper lever to the locked position. Then close the front cover. 5 Feed the posterboard into the paper slot until it meets resistance. Note: If you're using stock more than 39 inches long (Epson Stylus Pro 9800 only), load it long edge first (in landscape orientation). 8 Press the Pause button. The board feeds into the printing position automatically and READY appears on the control panel. 9 Run your print job. After it is finished, the posterboard stays in the printer. 10 To remove the print, hold it and release the paper lever. 6 Align the board with the mark on the roll paper cover. 3
-
 1
1 -
 2
2 -
 3
3 -
 4
4 -
 5
5 -
 6
6 -
 7
7 -
 8
8 -
 9
9 -
 10
10 -
11
 |
 |

3
4
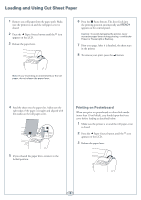
Open the front cover. (The cover has special tabs
that act as paper supports when the cover is open.)
5
Feed the posterboard into the paper slot until it
meets resistance.
Note:
If you’re using stock more than 39 inches
long (Epson Stylus Pro 9800 only), load it long edge
first (in landscape orientation).
6
Align the board with the mark on the roll paper
cover.
7
Return the paper lever to the locked position. Then
close the front cover.
8
Press the
Pause button. The board feeds into
the printing position automatically and
READY
appears on the control panel.
9
Run your print job. After it is finished, the
posterboard stays in the printer.
10
To remove the print, hold it and release the
paper lever.