Epson Stylus Pro 7800 Professional Edition Quick Reference Guide - Page 7
Replacing Printer Parts, Replacing the Printer Cutter Blade
 |
View all Epson Stylus Pro 7800 Professional Edition manuals
Add to My Manuals
Save this manual to your list of manuals |
Page 7 highlights
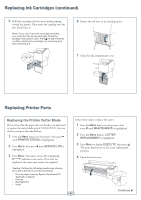
Replacing Ink Cartridges (continued) 5 Hold the cartridge with the arrow mark pointing toward the printer. Then insert the cartridge into the slot. Don't force it. Note: If you can't insert the cartridge smoothly, you may have the wrong cartridge. Check the package and product code. If the Ink light remains on after installing the cartridge, try removing and then reinserting it. 6 Return the ink lever to its locked position. 7 Close the ink compartment cover. Replacing Printer Parts Replacing the Printer Cutter Blade If you notice that the paper isn't cut cleanly, you may need to replace the cutter blade (part # C12C815291). You can check its status as described below: 1 Press the Menu button on the printer, then press until PRINTER STATUS is highlighted. 2 Press Menu, then press until SERVICE LIFE is highlighted. 3 Press Menu. The cutter service life is displayed. E*****F indicates a new cutter. If no stars are displayed, the cutter may need to be replaced. Caution: Cutting the following media may shorten the cutter's life and is not recommended: • Fine art paper (such as Epson UltraSmooth™, Textured, or Velvet) • Canvas • Backlight film • Vinyl Follow these steps to replace the cutter: 1 Press the Menu button on the printer, then press until MAINTENANCE is highlighted. 2 Press the Menu button. CUTTER REPLACEMENT is highlighted. 3 Press Menu to display EXECUTE, then press . The print head moves to the cutter replacement position. 4 Open the front cover. Continue 6 ▲
-
 1
1 -
 2
2 -
 3
3 -
 4
4 -
 5
5 -
 6
6 -
 7
7 -
 8
8 -
 9
9 -
 10
10 -
 11
11
 |
 |
