Epson Stylus Pro WT7900 Network Guide - Page 16
Configuring the Network Interface, NETWORK SETUP, ENABLE, READY, IP ADDRESS SETTING
 |
View all Epson Stylus Pro WT7900 manuals
Add to My Manuals
Save this manual to your list of manuals |
Page 16 highlights
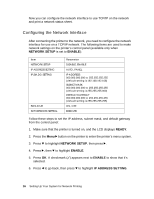
Now you can configure the network interface to use TCP/IP on the network and print a network status sheet. Configuring the Network Interface After connecting the printer to the network, you need to configure the network interface for use on a TCP/IP network. The following items are used to make network settings on the printer's control panel (available only when NETWORK SETUP is set to ENABLE): Item NETWORK SETUP IP ADDRESS SETTING IP,SM,DG SETTING BONJOUR INIT NETWORK SETTING Parameter DISABLE, ENABLE AUTO, PANEL IP ADDRESS 000.000.000.000 to 255.255.255.255 (default setting is 192.168.192.168) SUBNET MASK 000.000.000.000 to 255.255.255.255 (default setting is 255.255.255.000) DEFAULT GATEWAY 000.000.000.000 to 255.255.255.255 (default setting is 255.255.255.255) ON, OFF EXECUTE Follow these steps to set the IP address, subnet mask, and default gateway from the control panel: 1. Make sure that the printer is turned on, and the LCD displays READY. 2. Press the Menu r button on the printer to enter the printer's menu system. 3. Press d to highlight NETWORK SETUP, then press r. 4. Press r, then d to highlight ENABLE. 5. Press OK. A checkmark (✓) appears next to ENABLE to show that it's selected. 6. Press l to go back, then press d to highlight IP ADDRESS SETTING. 16 Setting Up Your System for Network Printing
-
 1
1 -
2
-
3
-
4
-
5
-
6
-
7
-
8
-
9
-
10
-
 11
11 -
 12
12 -
 13
13 -
 14
14 -
 15
15 -
 16
16 -
 17
17 -
 18
18 -
 19
19 -
 20
20 -
 21
21 -
22
-
23
-
24
-
25
-
26
-
27
-
28
-
29
-
30
-
31
-
32
-
33
 |
 |
