Epson Stylus Pro WT7900 Network Guide - Page 17
PANEL, IP, SM, DG SETTING, See Printing a Network Status Sheet - manual
 |
View all Epson Stylus Pro WT7900 manuals
Add to My Manuals
Save this manual to your list of manuals |
Page 17 highlights
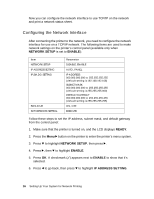
7. Press r, then press u or d to choose one of the following IP configuration settings: ❏ Choose PANEL if you would like to set the printer's IP settings manually (recommended). ❏ Choose AUTO if your network uses a DHCP server to provide IP addresses automatically. The printer's IP address will be obtained from the DHCP server whenever the printer is reset or turned on, but may change as IP addresses are reassigned over time. 8. Press OK. A checkmark (✓) appears next to the setting you selected. 9. Press l to go back, then do one of the following: ❏ If you selected PANEL as the IP address setting, continue with step 10. ❏ If you selected AUTO as the IP address setting, press the Pause/ Reset button to exit the printer menu. Then continue with step 14. 10. Press d to highlight IP,SM,DG SETTING, then press r. The LCD displays the IP address. 11. Press u or d to change each octet value, then press r to select the next octet. When you have changed the value of the last octet, press r. The LCD displays the subnet mask. 12. Press u or d to change each octet value, then press r to select the next octet. When you have changed the value of the last octet, press r. The LCD displays the default gateway. 13. Press u or d to change each octet value, then press r to select the next octet. When you have changed the value of the last octet, press OK and then press the Pause/Reset button to exit the printer menu. 14. Turn the printer off then back on again. c Caution: After turning off the printer, wait until the status lights go off before turning it back on; otherwise the network interface may not work correctly. 15. See "Printing a Network Status Sheet" below to print a network status sheet and confirm the new IP address, which you'll need during setup. You can also use the EpsonNet Config software to obtain the IP address. Setting Up Your System for Network Printing 17
-
 1
1 -
2
-
3
-
4
-
5
-
6
-
7
-
8
-
9
-
10
-
11
-
 12
12 -
 13
13 -
 14
14 -
 15
15 -
 16
16 -
 17
17 -
 18
18 -
 19
19 -
 20
20 -
 21
21 -
 22
22 -
23
-
24
-
25
-
26
-
27
-
28
-
29
-
30
-
31
-
32
-
33
 |
 |
