Epson WorkForce 610 Start Here - Page 3
Install ink cartridges
 |
UPC - 010343871878
View all Epson WorkForce 610 manuals
Add to My Manuals
Save this manual to your list of manuals |
Page 3 highlights
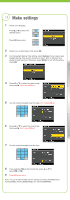
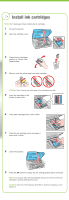
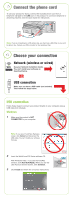
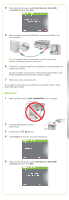
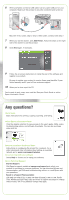
4 Install ink cartridges Note: Don't load paper before installing the ink cartridges. 1 Lift up the scanner. 2 Open the cartridge cover. 3 Shake the ink cartridges gently 4 or 5 times, then unpack them. 4 Remove only the yellow tape from each cartridge. Caution: Don't remove any other seals or the cartridges may leak. 5 Insert the cartridges in the holder for each color. 6 Press each cartridge down until it clicks. 7 Close the ink cartridge cover and press it down until it clicks. 8 Lower the scanner. 9 Press the OK button to charge the ink. Charging takes about 3 minutes. Note: Your product ships with full cartridges and part of the ink from the first cartridges is used for priming the product. Caution: Don't turn off the product while the ink system is charging or you'll waste ink.
-
 1
1 -
 2
2 -
 3
3 -
 4
4 -
 5
5 -
 6
6 -
 7
7 -
 8
8
 |
 |
