Eureka Rally2 980AE Owner's Guide - Page 8
Maintenance
 |
View all Eureka Rally2 980AE manuals
Add to My Manuals
Save this manual to your list of manuals |
Page 8 highlights
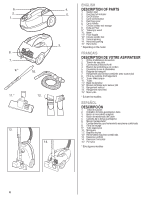
1. 2. 3. 4. 5. 6. 8 ENGLISH ! Caution: Unplug from electrical outlet before servicing. MAINTENANCE Note: Never operate the cleaner without the dust bag installed. This cleaner has a safety feature which prevents the bag cover from closing if there is no bag in place. The paper bag and filters play a very important role in the efficiency of the vacuum cleaner. The purpose of the paper bag is to trap dirt and at the same time the paper must be porous enough to allow air to pass through. If the paper bag or filters become clogged, no air can pass through the cleaner and no cleaning takes place regardless of how powerful the unit. To keep the cleaner operating at maximum efficiency, change the dust bag frequently and clean the filters as necessary. Some fine particles can restrict airflow very quickly and will decrease performance even before the bag appears to be full. When vacuuming carpet fresheners or cleaners, plaster dust, or similar fine substances, change the bag and clean the filters more often. BAG CHANGE INDICATOR The bag change indicator bar fills as the airflow through the bag decreases. Certain types of fine particles like powder, plaster dust, or carpet fibers can restrict airflow very quickly and will decrease performance even before the bag appears to be full. When the warning appears, change the disposable dust bag to restore maximum performance. If a clean dust bag does not restore maximum performance, clean the filters and check the hose and wands for obstructions. NOTE: Bag indicator is functional only when cleaner is running. REPLACING THE DUST BAG/CLEANING THE FILTER CAUTION: Keep fingers away from Dust Bag cover when closing to avoid pinching. Changing the dust bag (Style T) • Open the lid. Pull out the dust bag holder. (Fig.1) • Remove bag from dust bag holder. (Fig. 2) • Replace dust bag by sliding bag collar into slots to secure. (Fig. 1) • Insert the dust bag and holder back in cleaner. Tuck bag edge into cleaner. (Fig. 2) NOTE: Bag cover will not latch securely in place without a bag installed in the dust bag holder. When closing the lid make sure the holder is fully inserted and bag cover latch is secured. REPLACING THE FILTERS Filters should be cleaned or replaced when they become visibly soiled or suction power is reduced. Always operate the cleaner with the filters installed to avoid motor damage. The dust bag must be changed and the filters cleaned or replaced if the window of the Clean Filter Indicator changes into red when the cleaner is operating at maximum power and the nozzle is raised from the floor. Cleaning the motor filter Open the bag cover lid. Remove the filter and shake out debris. Rinse the filter in water if necessary. Let it dry before placing it back into cleaner. (Fig. 3) Cleaning the exhaust filter Open and remove the filter grill. (Fig. 4) Remove the filter and shake out debris. (Fig. 5) Rinse the filter in water if necessary. Let it dry before placing it back into cleaner. (Fig. 6) Replace filter grill.
-
 1
1 -
2
-
 3
3 -
 4
4 -
 5
5 -
 6
6 -
 7
7 -
 8
8 -
 9
9 -
 10
10 -
 11
11 -
 12
12 -
 13
13 -
14
-
15
-
16
 |
 |
