Frigidaire FH36DD50MS Use and Care Manual - Page 10
Install Duct Transition to Blower, Mount the Unit
 |
View all Frigidaire FH36DD50MS manuals
Add to My Manuals
Save this manual to your list of manuals |
Page 10 highlights
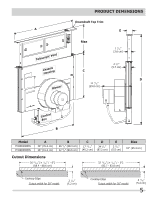
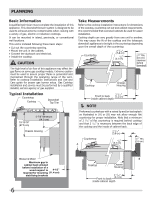
INSTALLATION 4. Install Duct Transition to Blower Install the duct transition on the blower, using the three wide head Phillips screws. It is recommended for all duct joints, the seam between the blower and the duct transition should be sealed with duct tape over the screws. Blower of the cabinet so that the vent chassis housing is vertical, check the level of the vent on both the right and left sides, and tighten the screws. Attach the stabilizing brackets to the back wall using the appropriate screws for your cabinet material and thickness. These screws are not supplied with downdraft system. The end of the stabilizing bracket may have to be bent down for transition duct clearance. Upper stabilizing brackets: Caution: Do not attach the upper bracket to the vent with screws, doing so may jam the vent. Attach a stabilizing bracket to the left and right cabinet walls just below the bottom of the cooktop chassis. The long leg of the bracket must be in contact with the vent chassis housing. (3) Wide Head Phillips Screws Duct Transition 5. Mount the Unit Set downdraft into opening and position with the back of the unit contacting the back edge of the cutout. Stabilizing brackets should be installed at the bottom of the vent chassis housing and just below the bottom of the cooktop chassis. Lower stabilizing brackets Down and Right DO NOT Blower Discharge: Screw Top One stabilizing bracket should be installed on each side of Stabilizing the vent chassis housing. Brackets to Remove the hex head screws from the bottom of the vent chassis housing and use them to attach each bracket to the Chassis Housing bottom of the housing. Slide the brackets to the back wall of the cabinet so that the vent chassis housing is vertical, check the level of the vent on both the right and left sides, and tighten the screws. Lower stabilizing brackets Left Blower Discharge: One stabilizing bracket should be installed on the right side of the vent chassis housing and one on the left side of the control box. Remove the hex head screws from the bottom of the vent chassis housing and use them to attach each bracket to the bottom of the housing. Slide the brackets to the back wall Remove screws from the chassis housing and re-use to install the brackets. 10 Alternate bracket location: Remove the screw from the left side of the control box and re-use to install the left bracket. Required for left side blower discharge.
-
 1
1 -
2
-
3
-
4
-
 5
5 -
 6
6 -
 7
7 -
 8
8 -
 9
9 -
 10
10 -
 11
11 -
 12
12 -
 13
13 -
 14
14 -
 15
15 -
16
 |
 |
