Garmin Montana 680t Owner s Manual - Page 6
Marking a Waypoint Using the Map - for sale
 |
View all Garmin Montana 680t manuals
Add to My Manuals
Save this manual to your list of manuals |
Page 6 highlights
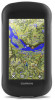
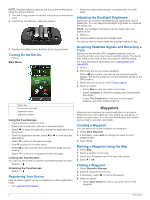
NOTE: Standard alkaline batteries are not recommended when using the camera feature. 1 Turn the D-ring counter-clockwise, and pull up to remove the cover. 2 Insert three AA batteries, observing polarity. 3 Replace the battery cover, and turn the D-ring clockwise. Turning On the Device Hold . Main Menu Status bar À Current time and date Á Application icons  Application drawer à Using the Touchscreen • Tap the screen to select an item. • Make each touchscreen selection a separate action. • Select to open the application drawer for applications and setup tools. • From the application drawer, select or to scroll through applications. • Select to return to the previous page. • Hold to return to the main menu. • Select to view specific menu items for the page you are viewing. • Select to save your changes and close the page. Locking the Touchscreen You can lock the screen to prevent inadvertent screen touches. Select > . Unlocking the Touchscreen Select > . Registering Your Device Help us better support you by completing our online registration today. • Go to garmin.com/express. • Keep the original sales receipt, or a photocopy, in a safe place. Adjusting the Backlight Brightness Extensive use of screen backlighting can significantly reduce battery life. You can adjust the backlight brightness to maximize the battery life. NOTE: The backlight brightness may be limited when the battery is low. 1 Select . 2 Use the slider to adjust the backlight level. The device may feel warm when the backlight setting is high. Acquiring Satellites Signals and Recording a Track Before you can use the GPS navigation features, such as recording a track, you must acquire satellite signals. The device may need a clear view of the sky to acquire satellite signals. For more information about GPS, go to www.garmin.com /aboutGPS. 1 Hold . 2 Wait while the device locates satellites. When turns green, your device has acquired satellite signals. The time and date are set automatically based on the GPS position. 3 Walk around to record a track (Tracks, page 3). 4 Select an option: • Select Map to view your track on the map. • Select Compass to view the compass and customizable data fields. • Select Trip Computer to view your current speed, distance, and other helpful statistics. Waypoints Waypoints are locations you record and store in the device. Waypoints can mark where you are, where you are going, or where you have been. You can add details about the location, such as name, elevation, and depth. Creating a Waypoint You can save your current location as a waypoint. 1 Select Mark Waypoint. 2 If necessary, select Edit to change the name or other waypoint data. 3 Select Save. Marking a Waypoint Using the Map 1 Select Map. 2 Select a location on the map. 3 Select the information bar at the top of the screen. 4 Select > OK. Finding a Waypoint 1 Select Waypoint Manager. 2 Select a waypoint from the list. 3 If necessary, select to narrow the search. 4 Select an option: • Select Spell Search to search using the name of the waypoint. 2 Waypoints
-
 1
1 -
 2
2 -
 3
3 -
 4
4 -
 5
5 -
 6
6 -
 7
7 -
 8
8 -
 9
9 -
 10
10 -
 11
11 -
 12
12 -
13
-
14
-
15
-
16
-
17
-
18
-
19
-
20
-
21
-
22
-
23
-
24
 |
 |
