Garmin Montana 680t Owner s Manual - Page 7
Selecting an Output Format for Saved Tracks - maps
 |
View all Garmin Montana 680t manuals
Add to My Manuals
Save this manual to your list of manuals |
Page 7 highlights
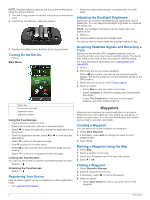
• Select Select Symbol to search using the symbol of the waypoint. • Select Search Near to search near a recently found location, another waypoint, your current location, or a point on the map. • Select Sort to view the list of waypoints based on nearest distance or alphabetical order. Editing a Waypoint Before you can edit a waypoint, you must create a waypoint. 1 Select Waypoint Manager. 2 Select a waypoint. 3 Select an item to edit, such as the name. 4 Enter the new information, and select . Deleting a Waypoint 1 Select > Waypoint Manager. 2 Select a waypoint. 3 Select > Delete > Yes. Increasing the Accuracy of a Waypoint Location You can refine a waypoint location for more accuracy. When averaging, the device takes several readings at the same location and uses the average value to provide more accuracy. 1 Select Waypoint Manager. 2 Select a waypoint. 3 Select > Average Location. 4 Move to the waypoint location. 5 Select Start. 6 Follow the on-screen instructions. 7 When the confidence status bar reaches 100%, select Save. For best results, collect 4 to 8 samples for the waypoint, waiting at least 90 minutes between samples. Projecting a Waypoint You can create a new location by projecting the distance and bearing from a marked location to a new location. 1 Select Waypoint Manager. 2 Select a waypoint. 3 Select > Project Waypoint. 4 Enter the bearing, and select . 5 Select a unit of measure. 6 Enter the distance, and select . 7 Select Save. Tracks A track is a recording of your path. The track log contains information about points along the recorded path, including time, location, and elevation for each point. Recording a Track Log By default, the device records a track log automatically while it is on and receiving a GPS signal. You can pause and start track recording manually. 1 Walk around to record a track. 2 Select Current Track > . 3 Select an option: • To pause track recording, select . • To start track recording, select . Changing the Current Track Color 1 Select Current Track > > Color. 2 Select a color. Saving the Current Track 1 Select Current Track > . 2 Select an option: • Select to save the entire track. • Select > Save Portion, and select a section of the track. The current track is saved using the default output format or your previously configured output format (Selecting an Output Format for Saved Tracks, page 3). Selecting an Output Format for Saved Tracks 1 Select Current Track > > > Setup Tracks > Output Format. 2 Select an option: • To save fitness information with the track, select Tracks (FIT). • To save track information only in a more widely compatible format, select Tracks (GPX). • To save to both output formats, select Both (GPX/FIT). Navigating Using TracBack® While navigating, you can navigate back to the beginning of your track. This can be helpful when finding your way back to camp or the trail head. 1 Select Current Track > > TracBack. The map displays your route with a magenta line, start point, and end point. 2 Navigate using the map or the compass. Clearing the Current Track Select > Current Track > > Clear. Viewing Track Information 1 Select Track Manager. 2 Select a track. 3 Select an option: • To view the elevation plot (Elevation Plot, page 5) of the track, select . • To view data fields and options for the track, select . TIP: You can select to archive the track. • To view the track on the map, select . TIP: You can select the information bar at the top of the map screen to view more details about the track. Saving a Location on a Track 1 Select Track Manager. 2 Select a track. 3 Select . 4 Select a location on the track. 5 Select the information bar at the top of the screen. Information about the location appears. 6 Select > OK. Showing Saved Tracks on the Map You can show one or more saved tracks on the map. Tracks 3
-
 1
1 -
 2
2 -
 3
3 -
 4
4 -
 5
5 -
 6
6 -
 7
7 -
 8
8 -
 9
9 -
 10
10 -
 11
11 -
 12
12 -
13
-
14
-
15
-
16
-
17
-
18
-
19
-
20
-
21
-
22
-
23
-
24
 |
 |
