Garmin SL40 SL 40 User Guide - Page 8
Annunciators, Controls, Power/Volume/Squelch, Large and Small Knobs, Buttons, Flip/Flop (Arrows)
 |
View all Garmin SL40 manuals
Add to My Manuals
Save this manual to your list of manuals |
Page 8 highlights
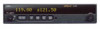
Getting Started Annunciators and Controls TX - Transmit\ s - Standby Frequency m - Monitor Mode I - Intercom Annunciators Annunciators Several annunciators are used to help indicate the operating modes of your SL40. The TX (Transmit) annunciator is lighted whenever you are transmitting. If the avionics bus drops below 9 VDC, the SL40 will not transmit. An LED will be lighted above the MON and RCL buttons when these functions are selected. An "s" will appear to the left of the Standby frequency. An "m" will appear to the left of the Standby frequency when you are using the Monitor function. An "I" indicates the Intercom function is being used. Volume, Power, and Squelch Control Controls Power/Volume/Squelch The knob on the left side of the SL40 controls power on/off, volume, and squelch test. Rotate the knob clockwise (CW) past the detent to turn the power on. Continuing to rotate the knob to the right increases speaker and headphone amplifier volume level. Rotate the knob to the left to reduce the volume level. Pull the knob out to disable automatic squelch. The SL40 may be installed to have the on/off switch disabled and to have power controlled from the avionics panel. Large (outer) and Small (inner) knobs Large and Small Knobs The dual concentric knobs on the right side of the SL40 are used to select frequencies or to view the features available within a function. Details are provided in the appropriate section. Buttons Five backlighted buttons allow you to access the functions in your SL40. Flip/Flop Button 2 Flip/Flop (Arrows) Press the Flip/Flop button to switch between the active (left-most) and standby (right- most) frequency. Switching between frequencies is disabled while you are transmitting.
-
 1
1 -
2
-
 3
3 -
 4
4 -
 5
5 -
 6
6 -
 7
7 -
 8
8 -
 9
9 -
 10
10 -
 11
11 -
 12
12 -
 13
13 -
14
-
15
-
16
-
17
-
18
-
19
-
20
-
21
-
22
 |
 |
