Garmin dezl OTR700/800/1000 Owners Manual - Page 12
Arriving at Your Destination, Changing Your Active Route
 |
View all Garmin dezl OTR700/800/1000 manuals
Add to My Manuals
Save this manual to your list of manuals |
Page 12 highlights
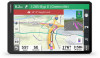
The map tool displays the next several turns or directions beside the map. The list updates automatically as you navigate the route. • To view the complete list of turns and directions for the entire route, select the text bar at the top of the map. 2 Select a turn or direction (optional). Detailed information appears. An image of the junction may appear for junctions on major roadways, if available. Viewing the Entire Route on the Map 1 While navigating a route, select anywhere on the map. 2 Select . Arriving at Your Destination When you approach your destination, the device provides information to help you complete your route. • indicates the location of your destination on the map, and a voice prompt announces you are approaching your destination. • When you approach some destinations, the device automatically suggests parking areas. You can select More to view a full list of suggested parking areas (Parking Near Your Destination, page 6). • When you approach some destinations while using a truck vehicle profile, the device automatically prompts you to find a truck destination such as a loading dock or truck parking. You can select a suggested point on the map, and then select Go! to navigate to that destination. • When you stop at your destination, the device automatically ends the route. If the device does not detect your arrival automatically, you can select Stop to end your route. Completing a Truck Route When you approach some truck destinations, a map tool appears to help you find common truck destinations such as parking areas and loading docks. 1 Select a numbered trucking destination . 2 Select Go!. Parking Near Your Destination Your device can help you find a parking spot near your destination. When you approach some destinations, the device automatically suggests parking areas. NOTE: This feature should be used only when you are using the car vehicle profile. While using a truck vehicle profile, you can search for truck parking near your destination (Finding Truck Parking, page 9). 1 Select an option: • When the device suggests parking, select More to see all suggested parking areas. NOTE: When you select a suggested parking area, the device automatically updates your route. • If the device does not suggest parking locations, select Where To? > Categories > Parking, and select > My Destination. 2 Select Filter Parking, and select one or more categories to filter parking by availability, type, price, or payment methods (optional). NOTE: Detailed parking data is not available in all areas or for all parking locations. 3 Select a parking location, and select Go!. The device guides you to the parking area. Changing Your Active Route Adding a Location to Your Route Before you can add a location to your route, you must be navigating a route (Starting a Route, page 5). You can add locations to the middle or end of your route. For example, you can add a fuel station as the next destination in your route. TIP: To create complex routes with multiple destinations or scheduled stops, you can use the trip planner to plan, schedule, and save a trip (Planning a Trip, page 21). 1 From the map, select > Where To?. 2 Search for a location (Finding and Saving Locations, page 8). 3 Select a location. 4 Select Go!. 5 Select an option: • To add the location as the next destination in your route, select Add As Next Stop. • To add the location to the end of your route, select Add As Last Stop. • To add the location and edit the order of destinations in your route, select Add to Active Route. The device re-calculates the route to include the added location and guides you to the destinations in order. Shaping Your Route Before you can shape your route, you must start a route (Starting a Route, page 5). You can manually shape your route to change its course. This allows you to direct the route to use a certain road or go through a certain area without adding a destination to the route. 1 Touch anywhere on the map. 2 Select Shape Route. TIP: You can select to zoom in on the map and select a more precise location. The device enters route shaping mode and recalculates the route to travel through the selected location. 3 Select Go!. 4 If necessary, select an option: • To add more shaping points to the route, select additional locations on the map. • To remove a shaping point, select the shaping point and select Remove. Taking a Detour You can take a detour for a specified distance along your route or detour around specific roads. This is useful if you encounter construction zones, closed roads, or poor road conditions. 1 From the map, select > Edit Route. 2 Select an option: • To detour your route for a specific distance, select Detour by Distance. 6 Navigating to Your Destination
-
 1
1 -
2
-
3
-
4
-
5
-
6
-
 7
7 -
 8
8 -
 9
9 -
 10
10 -
 11
11 -
 12
12 -
 13
13 -
 14
14 -
 15
15 -
 16
16 -
 17
17 -
18
-
19
-
20
-
21
-
22
-
23
-
24
-
25
-
26
-
27
-
28
-
29
-
30
-
31
-
32
-
33
-
34
-
35
-
36
 |
 |
