Garmin dezl OTR700/800/1000 Owners Manual - Page 8
Turning the Device On or Off, Acquiring GPS Signals
 |
View all Garmin dezl OTR700/800/1000 manuals
Add to My Manuals
Save this manual to your list of manuals |
Page 8 highlights
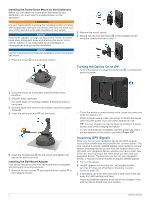
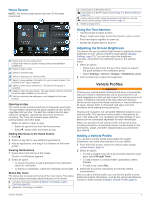
Installing the Screw-Down Mount on the Dashboard Before you can attach the screw-down ball mount to your dashboard, you must select a suitable location on the dashboard. WARNING It is your responsibility to ensure the mounting location complies with all applicable laws and ordinances, and does not block your view of the road during the safe operation of your vehicle. NOTICE Avoid wires, gauges, air bags, air bag covers, HVAC, and other items when drilling pilot holes and attaching the mount to the vehicle. Garmin® is not responsible for any damages or consequences arising from the installation. NOTICE Garmin recommends professional installation of the screw-down ball mount. 1 Place the mount on the selected location. 2 Remove the mount socket. 3 Secure the one-inch ball mount to the magnetic mount using the screws removed in step 1. Turning the Device On or Off • To turn the device on, press the power key , or connect the device to power. 2 Using the mount as a template, mark the three screw locations. 3 Drill pilot holes (optional). For some types of mounting material, drilling pilot holes is necessary. 4 Securely fasten the mount to the surface using the supplied screws . 5 Insert the ball mount arm into the mount. 6 Insert the thumbscrew into the mount, and tighten it to secure the ball mount arm. Installing the Ball Mount Adapter Your device includes a one-inch ball mount that is compatible with third-party mounting solutions. 1 Remove the four screws securing the mount socket to the magnetic mount. • To put the device in power saving mode, press the power key while the device is on. While in power saving mode, the screen is off and the device uses very little power, but it can wake instantly for use. TIP: You can charge your device faster by putting it in power saving mode while charging the battery. • To turn off the device completely, hold the power key until a prompt appears on the screen, and select Power Off. Acquiring GPS Signals When you turn on your navigation device, the GPS receiver must collect satellite data and establish the current location. The time required to acquire satellite signals varies based on several factors, including how far you are from the location where you last used your navigation device, whether you have a clear view of the sky, and how long it has been since you last used your navigation device. The first time you turn on your navigation device, it may take several minutes to acquire satellite signals. 1 Turn on the device. 2 Verify appears in the status bar, and enable location services if it does not (Enabling or Disabling Location Services, page 23). 3 If necessary, go to an open area with a clear view of the sky, away from tall buildings and trees. Acquiring Satellites appears at the top of the navigation map until the device determines your location. 2 Getting Started
-
 1
1 -
2
-
 3
3 -
 4
4 -
 5
5 -
 6
6 -
 7
7 -
 8
8 -
 9
9 -
 10
10 -
 11
11 -
 12
12 -
 13
13 -
14
-
15
-
16
-
17
-
18
-
19
-
20
-
21
-
22
-
23
-
24
-
25
-
26
-
27
-
28
-
29
-
30
-
31
-
32
-
33
-
34
-
35
-
36
 |
 |
