Garmin eTrex 10 Quick Start Manual - Page 6
where To? Menu, Creating a Route - accuracy
 |
View all Garmin eTrex 10 manuals
Add to My Manuals
Save this manual to your list of manuals |
Page 6 highlights
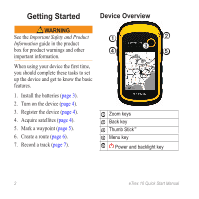
Increasing the Accuracy of a Waypoint Location Waypoint averaging allows you to increase the accuracy of a waypoint location by collecting multiple samples of the waypoint location. 1. Select Waypoint Averaging. 2. Select a waypoint. 3. Move to the location. 4. Select Start. 5. When the Sample Confidence status bar reaches 100%, select Save. For best results, collect four to eight samples for the waypoint, waiting at least 90 minutes between samples. Where To? Menu You can use the Where To? menu to find a destination to navigate to. Not all Where To? categories are available in all areas and maps. Creating a Route A route is a sequence of waypoints that leads you to your final destination. 1. Select Route Planner > Create Route > Select First Point. 2. Select a category. 3. Select the first point in the route. 4. Select Use. 5. Repeat steps 2-4 until the route is complete. 6. Select back to save the route. 6 eTrex 10 Quick Start Manual
-
 1
1 -
 2
2 -
 3
3 -
 4
4 -
 5
5 -
 6
6 -
 7
7 -
 8
8 -
 9
9 -
 10
10 -
 11
11 -
 12
12
 |
 |